VNCサーバーインストール2010/05/26 |
| [1] | VNCサーバーを導入してクライアントのWindowsマシンからグラフィカルにリモート接続します。 |
|
[root@dlp ~]# yum -y install tigervnc-server [root@dlp ~]# vi /etc/sysconfig/vncservers # 18行目:行頭の#を削除し、以下のように 'ディスプレイ番号:ユーザー' として設定 VNCSERVERS=" 1:fedora "# 19行目:行頭の#を削除し、以下のように行末の '-localhost' を削除。 # また画面解像度は好みに応じて指定。 VNCSERVERARGS[ 1 ]="-geometry 1024x768 -nolisten tcp -nohttpd"[root@dlp ~]# su - fedora [fedora@dlp ~]$ vncpasswd # VNC用パスワード設定 Password: # 入力 Verify: # 再入力 [fedora@dlp ~]$ su - Password: [root@dlp ~]# /etc/rc.d/init.d/vncserver start Starting VNC server: 1:fedora xauth: creating new authority file /home/fedora/.Xauthority New 'dlp.srv.world:1 (fedora)' desktop is dlp.srv.world:1 Creating default startup script /home/fedora/.vnc/xstartup Starting applications specified in /home/fedora/.vnc/xstartup Log file is /home/fedora/.vnc/dlp.srv.world:1.log [ OK ] [root@dlp ~]# vi /home/fedora/.vnc/xstartup # twm & # 最終行:コメント化
exec gnome-session & # Ghome起動 [root@dlp ~]# vi /home/fedora/.bash_profile # 最終行に追記:日本語化
export LANG=ja_JP.UTF-8 [root@dlp ~]# /etc/rc.d/init.d/vncserver restart Shutting down VNC server: 1:fedora [ OK ] Starting VNC server: 1:fedora New 'dlp.srv.world:1 (fedora)' desktop is dlp.srv.world:1 Starting applications specified in /home/fedora/.vnc/xstartup Log file is /home/fedora/.vnc/dlp.srv.world:1.log [ OK ] |
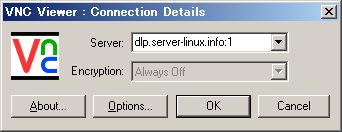
| [2] | サーバー側の次は、Windows用のVNCクライアントを入れます。 下記サイトより、名前等をテキトーに入力してダウンロードします。 http://www.realvnc.com/products/free/4.1/download.html ダウンロードしたらインストールして、「Run VNC Viewer」をクリックして起動します。 以下の画面になります。「Server」の欄に「サーバーのホスト名:[1]で指定したディスプレイ番号」と指定しOKをクリックします。 |
|
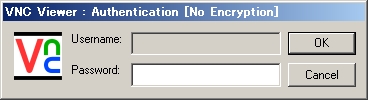
| [3] | 以下の画面になるので[1]で設定したパスワードを入力します。 |
|
| [4] | 以下のように接続できました。 |

|
関連コンテンツ