Proxyサーバー構築2010/06/03 |
| Proxyサーバーを構築しWebブラウジングを高速化します。
|
|
| [1] | squid のインストールと設定 |
|
[root@lan ~]# yum -y install squid [root@lan ~]# vi /etc/squid/squid.conf # 13行目:コメントにしておく # acl localnet src 10.0.0.0/8# acl localnet src 172.16.0.0/12# acl localnet src 192.168.0.0/16# acl localnet src fc00::/7# acl localnet src fe80::/10# 18行目:追記 (許可する範囲) acl lan src 10.0.0.0/24 # 58行目:コメントにしておく # http_access allow localnethttp_access allow localhost # 60行目:追記('lan'を許可) http_access allow lan # And finally deny all other access to this proxy http_access deny all # 65行目:変更 http_port 8080 # 最終行:追記
request_header_access X-Forwarded-For deny all
request_header_access Via deny all request_header_access Cache-Control deny all # 最終行:追記 (ホスト名定義) visible_hostname lan.srv.world # forwarded_for on # 最終行:追記 (IP非表示) forwarded_for off [root@lan ~]# /etc/rc.d/init.d/squid start init_cache_dir /var/spool/squid... Starting squid: [ OK ] [root@lan ~]# chkconfig squid on
|
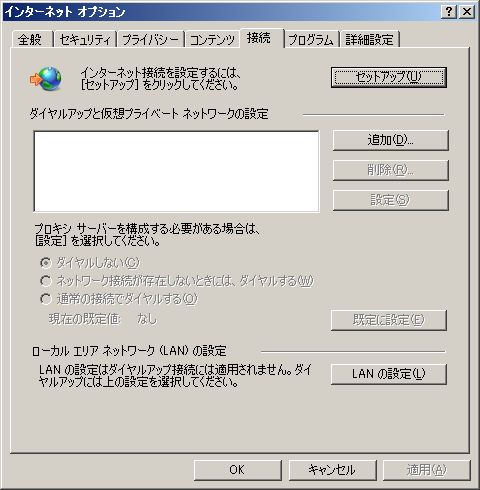
| [2] | クライアントのWindows側での設定です。まずはブラウザを立ち上げます。 以下はインターネットエクスプローラ8の例です。 「ツール」-「インターネットオプション」を開き以下のように「接続」のタブに移動します。 |
|
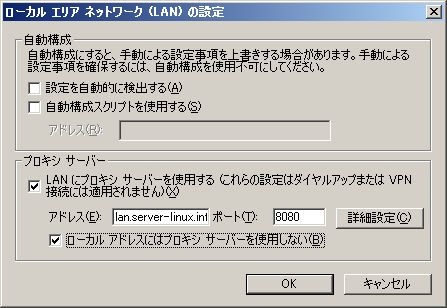
| [3] | 以下のようにプロキシサーバーの欄の「使用する」にチェックを入れ、 アドレス欄にはプロキシサーバーのホスト名を入力し、ポート欄には [1] で設定したポート番号を入力して、 OKをクリックして閉じます。これでクライアントの設定は完了です。以降はプロキシ経由でWebアクセスを行うことができます。 |
|
関連コンテンツ