Pen : HTTP を負荷分散2016/01/11 |
|
シンプル軽量な TCP ベースの負荷分散ソフトウェア Pen をインストールします。
TCP プロトコルベースのため、SMTP, FTP, LDAP 等々の負荷分散も可能です。 例として、ここでは以下のような環境で構築します。
        |
--------+--------------------------------------------------------------------
        |
        +-------------------+--------------------+--------------------+
        |10.0.0.30          |10.0.0.51           |10.0.0.52           |10.0.0.53
 +------+-----+     +-------+------+     +-------+------+     +-------+------+
 |  Frontend  |     |   Backend#1  |     |   Backend#2  |     |   Backend#3  |
 | Pen Server |     |  Web Server  |     |  Web Server  |     |  Web Server  |
 +------------+     +--------------+     +--------------+     +--------------+
|
|
Pen をインストールした Frontend サーバーへの HTTP 通信を Backend#1, Backend#2, Backend#3 の
Webサーバーへ負荷分散するように設定します。
|
|
| [1] | Pen をインストールします。 |
|
root@dlp:~# apt-get -y install pen
|
| [2] | Pen の設定です。 |
|
root@dlp:~#
vi /etc/pen.conf # 新規作成 # ログファイル LOGFILE=/var/log/pen.log # ステータス出力先ファイル WEBFILE=/var/www/html/pen/webstats.html # 最大接続数 MAX_CONNECTIONS=256 # X-Forwarded-For ヘッダーを送る XFORWARDEDFOR=true # Round-Robin モード ROUNDROBIN=true # 待ち受けポート PORT=80 # バックエンドサーバーの数 BACKEND=3 # バックエンドサーバーを定義 SERVER1=10.0.0.51:80 SERVER2=10.0.0.52:80 SERVER2=10.0.0.53:80
#! /bin/sh
### BEGIN INIT INFO
# Provides:          pen
# Required-Start:    $remote_fs $syslog
# Required-Stop:     $remote_fs $syslog
# Should-Start:      $named
# Should-Stop:       $named
# Default-Start:     2 3 4 5
# Default-Stop:      0 1 6
# Short-Description: light weight simple load balancer
# Description:       light weight simple load balancer
#
### END INIT INFO
#
# Pen - light weight simple load balancer

PATH=/sbin:/bin:/usr/sbin:/usr/bin
DAEMON=/usr/bin/pen
DESC="light weight simple load balancer"
NAME=pen
PIDFILE=/var/run/pen.pid

# Exit if the daemon does not exist (anymore)
test -f $DAEMON || exit 0

. /lib/lsb/init-functions
. /etc/pen.conf

SERVER=`grep "^SERVER" /etc/pen.conf | cut -d= -f2`
[ $XFORWARDEDFOR = "true" ] && SERVER="-H $SERVER"
[ $ROUNDROBIN = "true" ] && SERVER="-r $SERVER"
[ $SSLCERTS ] && SERVER="-E $SSLCERTS $SERVER"

# The real work of an init script
case "$1" in
    start)
        log_daemon_msg "Starting $DESC" "$NAME"
        start-stop-daemon --start --quiet --oknodo --pidfile $PIDFILE \
        --startas $DAEMON -- $PORT -w $WEBFILE -x $MAX_CONNECTIONS -p $PIDFILE -l $LOGFILE -S $BACKEND $SERVER
        log_end_msg $?
        ;;
  stop)
        log_daemon_msg "Stopping $DESC" "$NAME"
        start-stop-daemon --stop --quiet --oknodo --pidfile $PIDFILE
        log_end_msg $?
        ;;
  restart|force-reload)
        $0 stop && sleep 2 && $0 start
        ;;
  status)
        status_of_proc $DAEMON "Pend"
        ;;
  *)
        echo "Usage: $0 {start|stop|restart|force-reload|status}"
        exit 1
        ;;
esac

# Fallthrough if work done.
exit 0
chmod 755 /etc/init.d/pend root@dlp:~# /etc/init.d/pend start |
| [3] | バックエンド Webサーバーで X-Forwarded-For ヘッダーをロギングするよう設定しておきます。 |
|
root@node01:~# a2enmod remoteip Enabling module remoteip. To activate the new configuration, you need to run: service apache2 restart
root@node01:~#
vi /etc/apache2/apache2.conf # 206-209行目:以下のように変更 # RemoteIPInternalProxy は Pen のIPアドレスを指定
RemoteIPHeader X-Forwarded-For RemoteIPInternalProxy 10.0.0.30 LogFormat "%v:%p %a %l %u %t \"%r\" %>s %O \"%{Referer}i\" \"%{User-Agent}i\"" vhost_combinedLogFormat " %a %l %u %t \"%r\" %>s %O \"%{Referer}i\" \"%{User-Agent}i\"" combined
/etc/init.d/apache2 restart * Restarting web server apache2 ...done. |
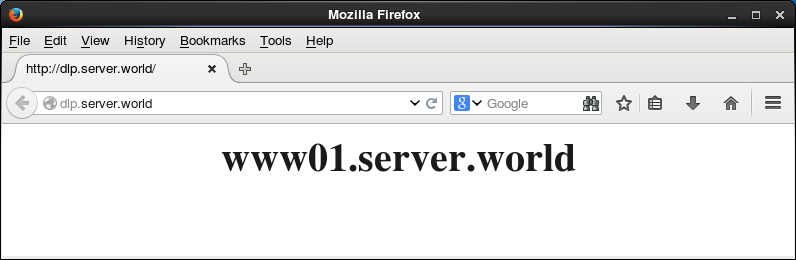
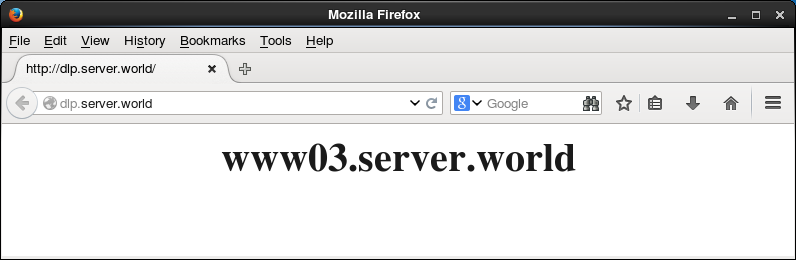
| [4] | 任意のクライアントから Pen サーバーへ HTTP アクセスし、何度かリロードしたりバックエンドサーバーの一部を手動で停止する等して、動作を確認してください。 |
|
|
関連コンテンツ