Elastic Stack 7 : X-Pack.Security2021/06/22 |
|
X-Pack.Security の機能を有効に設定します。
|
|
| [1] | Elasticsearch が稼働する任意の Master ノード上で接続用の各ユーザーのパスワードを設定します。 |
|
[root@dlp ~]#
vi /etc/elasticsearch/elasticsearch.yml # 最終行に追記 または 設定が存在する場合は値を [true] に変更 xpack.security.enabled: true xpack.security.transport.ssl.enabled: true
[root@dlp ~]#
[root@dlp ~]# systemctl restart elasticsearch /usr/share/elasticsearch/bin/elasticsearch-setup-passwords interactive Initiating the setup of passwords for reserved users elastic,apm_system,kibana,logstash_system,beats_system,remote_monitoring_user. You will be prompted to enter passwords as the process progresses. Please confirm that you would like to continue [y/N] y # 以下 パスワードを全て設定する必要がある Enter password for [elastic]: Reenter password for [elastic]: Enter password for [apm_system]: Reenter password for [apm_system]: Enter password for [kibana_system]: Reenter password for [kibana_system]: Enter password for [logstash_system]: Reenter password for [logstash_system]: Enter password for [beats_system]: Reenter password for [beats_system]: Enter password for [remote_monitoring_user]: Reenter password for [remote_monitoring_user]: Changed password for user [apm_system] Changed password for user [kibana_system] Changed password for user [kibana] Changed password for user [logstash_system] Changed password for user [beats_system] Changed password for user [remote_monitoring_user] Changed password for user [elastic] |
| [2] | Elasticsearch が稼働する任意の Master ノード上で Elasticsearch クラスター内のノード間で使用される証明書を生成します。 |
|
[root@dlp ~]# /usr/share/elasticsearch/bin/elasticsearch-certutil ca
This tool assists you in the generation of X.509 certificates and certificate
signing requests for use with SSL/TLS in the Elastic stack.

The 'ca' mode generates a new 'certificate authority'
This will create a new X.509 certificate and private key that can be used
to sign certificate when running in 'cert' mode.

Use the 'ca-dn' option if you wish to configure the 'distinguished name'
of the certificate authority

By default the 'ca' mode produces a single PKCS#12 output file which holds:
    * The CA certificate
    * The CA's private key

If you elect to generate PEM format certificates (the -pem option), then the output will
be a zip file containing individual files for the CA certificate and private key

# 出力ファイル名を指定 (デフォルトで OK なら 空 Enter)
Please enter the desired output file [elastic-stack-ca.p12]:
# 任意のパスワードを設定
Enter password for elastic-stack-ca.p12 :
# --ca [生成済みの CA ファイル名] [root@dlp ~]# /usr/share/elasticsearch/bin/elasticsearch-certutil cert --ca elastic-stack-ca.p12
This tool assists you in the generation of X.509 certificates and certificate
signing requests for use with SSL/TLS in the Elastic stack.

The 'cert' mode generates X.509 certificate and private keys.
    * By default, this generates a single certificate and key for use
       on a single instance.
    * The '-multiple' option will prompt you to enter details for multiple
       instances and will generate a certificate and key for each one
    * The '-in' option allows for the certificate generation to be automated by describing
       the details of each instance in a YAML file

    * An instance is any piece of the Elastic Stack that requires an SSL certificate.
      Depending on your configuration, Elasticsearch, Logstash, Kibana, and Beats
      may all require a certificate and private key.
    * The minimum required value for each instance is a name. This can simply be the
      hostname, which will be used as the Common Name of the certificate. A full
      distinguished name may also be used.
    * A filename value may be required for each instance. This is necessary when the
      name would result in an invalid file or directory name. The name provided here
      is used as the directory name (within the zip) and the prefix for the key and
      certificate files. The filename is required if you are prompted and the name
      is not displayed in the prompt.
    * IP addresses and DNS names are optional. Multiple values can be specified as a
      comma separated string. If no IP addresses or DNS names are provided, you may
      disable hostname verification in your SSL configuration.

    * All certificates generated by this tool will be signed by a certificate authority (CA)
      unless the --self-signed command line option is specified.
      The tool can automatically generate a new CA for you, or you can provide your own with
      the --ca or --ca-cert command line options.

By default the 'cert' mode produces a single PKCS#12 output file which holds:
    * The instance certificate
    * The private key for the instance certificate
    * The CA certificate

If you specify any of the following options:
    * -pem (PEM formatted output)
    * -keep-ca-key (retain generated CA key)
    * -multiple (generate multiple certificates)
    * -in (generate certificates from an input file)
then the output will be be a zip file containing individual certificate/key files

# CA 生成で設定したパスワードを入力
Enter password for CA (elastic-stack-ca.p12) :
# 出力ファイル名を指定 (デフォルトで OK なら 空 Enter)
Please enter the desired output file [elastic-certificates.p12]:
# 任意のパスワードを設定
Enter password for elastic-certificates.p12 :

Certificates written to /usr/share/elasticsearch/elastic-certificates.p12

This file should be properly secured as it contains the private key for
your instance.

This file is a self contained file and can be copied and used 'as is'
For each Elastic product that you wish to configure, you should copy
this '.p12' file to the relevant configuration directory
and then follow the SSL configuration instructions in the product guide.

For client applications, you may only need to copy the CA certificate and
configure the client to trust this certificate.
[root@dlp ~]# chgrp elasticsearch /usr/share/elasticsearch/elastic-certificates.p12 /usr/share/elasticsearch/elastic-stack-ca.p12 [root@dlp ~]# chmod 640 /usr/share/elasticsearch/elastic-certificates.p12 /usr/share/elasticsearch/elastic-stack-ca.p12 [root@dlp ~]# mv /usr/share/elasticsearch/elastic-* /etc/elasticsearch/ |
| [3] |
[2] で生成した証明書を Elasticsearch が稼働する全ノードの同じディレクトリ配下へコピーしておきます。
(当例の場合 [/etc/elasticsearch/] 配下)
|
| [4] | Elasticsearch が稼働する全ノードで、生成した証明書の設定を追加します。 |
|
# [2] で生成した CA のパスワードをキーストアに登録 [root@dlp ~]# /usr/share/elasticsearch/bin/elasticsearch-keystore add xpack.security.transport.ssl.keystore.secure_password Enter value for xpack.security.transport.ssl.keystore.secure_password: # [2] で生成した証明書のパスワードをキーストアに登録 [root@dlp ~]# /usr/share/elasticsearch/bin/elasticsearch-keystore add xpack.security.transport.ssl.truststore.secure_password Enter value for xpack.security.transport.ssl.truststore.secure_password:
[root@dlp ~]#
vi /etc/elasticsearch/elasticsearch.yml # 最終行に追記 xpack.security.transport.ssl.verification_mode: certificate xpack.security.transport.ssl.keystore.path: /etc/elasticsearch/elastic-certificates.p12 xpack.security.transport.ssl.truststore.path: /etc/elasticsearch/elastic-certificates.p12 systemctl restart elasticsearch |
| [5] | クライアントから Elasticsearch へアクセスする際の SSL 化の設定も追加しておきます。 よって、事前に SSL 証明書を取得して準備しておく必要があります。 当例では [/etc/elasticsearch] 配下に取得した SSL 証明書をコピー済みとして進めます。 |
|
[root@dlp ~]# chgrp elasticsearch /etc/elasticsearch/*.pem [root@dlp ~]# chmod 640 /etc/elasticsearch/*.pem
[root@dlp ~]#
vi /etc/elasticsearch/elasticsearch.yml # 最終行に追記 xpack.security.http.ssl.enabled: true xpack.security.http.ssl.key: /etc/elasticsearch/privkey.pem xpack.security.http.ssl.certificate: /etc/elasticsearch/fullchain.pem
[root@dlp ~]#
systemctl restart elasticsearch
# https アクセス確認 : [-u elastic] は [1] で設定したユーザーとパスワードで応答 [root@dlp ~]# curl https://dlp.srv.world:9200/_cat/indices?v -u elastic health status index uuid pri rep docs.count docs.deleted store.size pri.store.size green open .apm-agent-configuration y3hQme2SQpGMtb64NLsNdA 1 0 0 0 208b 208b green open .monitoring-kibana-7-2021.06.22 kwO6mH_KS3CflADDho3_Jw 1 0 74 0 141.1kb 141.1kb yellow open winlogbeat-7.13.2-2021.06.22-000001 gTKUKWkrQdWP_TzEnrlowA 1 1 1932 0 1.6mb 1.6mb yellow open heartbeat-7.13.2-2021.06.22-000001 LHK787g7S92UFiUXDDrwpQ 1 1 702 0 407.3kb 407.3kb green open .tasks 2gvaahTYQKCS8QPLGl1irg 1 0 2 0 7.8kb 7.8kb green open .security-7 J2Ah-6QDSlSqV7ZxMdHLPQ 1 0 7 0 25.6kb 25.6kb green open .kibana_7.13.2_001 zA_r0rrjT7OMUMVSGmRVfg 1 0 5332 3 3.5mb 3.5mb green open .monitoring-es-7-2021.06.22 6Dt-UADhSEO-1xMwIBqnnA 1 0 2774 297 1.9mb 1.9mb green open .apm-custom-link d1-9Pkn-RXOu_qhMOanvVA 1 0 0 0 208b 208b yellow open filebeat-7.13.2-2021.06.22-000001 c18zEwqAQVeNecW7d6EAQg 1 1 11859 0 1.8mb 1.8mb green open .kibana-event-log-7.13.2-000001 Y-rCmM6yTBKa9W5H1LeJ1g 1 0 2 0 11kb 11kb yellow open auditbeat-7.13.2-2021.06.22-000001 -kMW1wnKQ9-b8WjnJmvScA 1 1 5677 0 3.7mb 3.7mb green open .async-search WRLoMwCITRKD3C_BrFJ9bw 1 0 68 99 127.8kb 127.8kb green open .kibana_task_manager_7.13.2_001 x6V232xKQLinqRedJRAbgw 1 0 10 121 96kb 96kb yellow open test_index Vh0HutpLRciaMWX3pFo7Zg 1 1 1 0 5.5kb 5.5kb yellow open packetbeat-7.13.2-2021.06.22-000001 nYN59YPRQwGmDrMRXijZxA 1 1 92086 0 27.8mb 27.8mb yellow open sshd_fail-2021.06 HiOI2ac-RzK2BiwQ_gb-VQ 1 1 43 0 68.7kb 68.7kb yellow open metricbeat-7.13.2-2021.06.22-000001 aVbbCHScQBujmT8JMRdRBw 1 1 25085 0 14.7mb 14.7mb |
| [6] | Kibana および Logstash 稼働中の場合は、そちらも Security プラグイン対応の設定が必要です。 |
|
[root@dlp ~]#
vi /etc/kibana/kibana.yml # 32行目 : コメント解除して https 用の URL に変更 elasticsearch.hosts: " https://dlp.srv.world:9200 "
# 45行目 : コメント解除して [1] で設定した Kibana 用のユーザーとパスワードに変更 elasticsearch.username: " kibana_system "elasticsearch.password: " password "
[root@dlp ~]#
systemctl restart kibana
[root@dlp ~]#
vi /etc/logstash/logstash.yml # 最終行に追記 # ユーザーとパスワードは [1] で設定したもの xpack.monitoring.enabled: true xpack.monitoring.elasticsearch.url: "https://dlp.srv.world:9200/" xpack.monitoring.elasticsearch.username: "logstash_system" xpack.monitoring.elasticsearch.password: "password" xpack.management.enabled: true xpack.management.elasticsearch.url: "https://dlp.srv.world:9200/" xpack.management.elasticsearch.username: "logstash_system" xpack.management.elasticsearch.password: "password" systemctl restart logstash
|
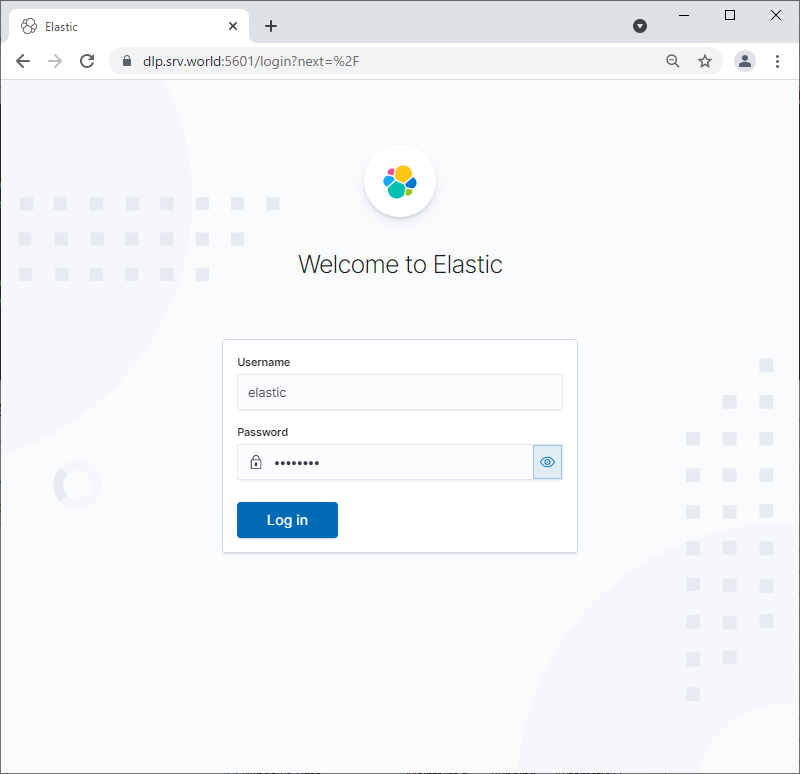
| [7] | Kibana ダッシュボードにアクセスすると、認証を要求されるようになります。[1] で登録したユーザーとパスワードで認証可能です。 |
|
|
関連コンテンツ