Apache2 : mod_md の設定2020/07/30 |
|
[mod_md] をインストールして、Let's Encrypt から取得する SSL/TLS 証明書の 取得/更新 を自動化します。
設定をしたい対象のバーチャルホストごとに設定可能です。
なお、[mod_md] を設定するバーチャルホストは、こちらの SSL/TLS の手動設定は不要です。
また、Let's Encrypt から手動で取得する際と同様、設定をしたい対象のサイトは、インターネット側からアクセス可能である必要があります。
|
|
| [1] | [mod_md] をインストールします。 |
|
root@www:~# apt -y install libapache2-mod-md
|
| [2] | [mod_md] の設定です。 |
|
root@www:~#
vi /etc/apache2/conf-available/acme.conf # 新規作成
MDBaseServer              on
MDCertificateProtocol     ACME
MDCAChallenges            http-01
MDDriveMode               auto
MDPrivateKeys             RSA 2048
MDRenewWindow             33%
MDStoreDir                md
MDCertificateAuthority    https://acme-v02.api.letsencrypt.org/directory
MDCertificateAgreement    https://letsencrypt.org/documents/LE-SA-v1.2-November-15-2017.pdf

<Location "/md-status">
    SetHandler md-status
    Require ip 127.0.0.1 10.0.0.0/24
</Location>

# [MDRenewWindow]
# 証明書を更新するタイミングを指定する
# 指定しない場合のデフォルトは [33%]
# Let's Encrypt の有効期限 = 90日
# 90日 * 33% ≒ 30日 ⇒ 残り30日で更新される
# 日数で指定する場合の記号は [d]
# 30日 ⇒ [30d]

# [MDStoreDir]
# 証明書等の各種データの保存ディレクトリ
# 指定しない場合のデフォルトは [md]
# [ServerRoot] からの相対パス

# [md-status]
# MD の状態をモニタリングする
|
| [3] | 対象のバーチャルホストごとに設定します。 各 [ServerAdmin] には Let's Encrypt からの各種通知を受け取ることが可能な、有効なメールアドレスを指定する必要があります。 |
MDomain www.srv.world
MDCertificateAgreement accepted
DirectoryIndex index.html
ServerAdmin root@www.srv.world

<VirtualHost *:80>
    DocumentRoot /var/www/html
    ServerName www.srv.world
</VirtualHost>

<VirtualHost *:443>
    SSLEngine on
    DocumentRoot /var/www/html
    ServerName www.srv.world
</VirtualHost>
MDomain dlp.srv.world
MDCertificateAgreement accepted
DirectoryIndex index.html
ServerAdmin root@dlp.srv.world

<VirtualHost *:80>
    DocumentRoot /var/www/dlp.srv.world
    ServerName dlp.srv.world
</VirtualHost>

<VirtualHost *:443>
    SSLEngine on
    DocumentRoot /var/www/dlp.srv.world
    ServerName dlp.srv.world
</VirtualHost>
a2enmod md Enabling module md. To activate the new configuration, you need to run: systemctl restart apache2root@www:~# a2enconf acme Enabling conf acme. To activate the new configuration, you need to run: systemctl reload apache2root@www:~# a2ensite www.srv.world Enabling site www.srv.world. To activate the new configuration, you need to run: systemctl reload apache2root@www:~# a2ensite dlp.srv.world Enabling site dlp.srv.world. To activate the new configuration, you need to run: systemctl reload apache2
root@www:~#
systemctl restart apache2
# 初回起動時は各設定のチェックが実行され # [MDStoreDir] に設定したディレクトリ内に起動のためのダミー証明書が作成される root@www:~# ll /etc/apache2/md/domains/dlp.srv.world total 20 drwx------ 2 root root 4096 Jul 30 19:26 ./ drwx------ 4 root root 4096 Jul 30 19:26 ../ -rw------- 1 root root 1115 Jul 30 19:26 fallback-cert.pem -rw------- 1 root root 1704 Jul 30 19:26 fallback-privkey.pem -rw------- 1 root root 471 Jul 30 19:26 md.json # 問題なければ正規の証明書が取得される root@www:~# ll /etc/apache2/md/domains/dlp.srv.world total 36 drwx------ 2 root root 4096 Jul 30 19:29 ./ drwx------ 4 root root 4096 Jul 30 19:29 ../ -rw------- 1 root root 15715 Jul 30 19:29 job.json -rw------- 1 root root 516 Jul 30 19:29 md.json -rw------- 1 root root 1704 Jul 30 19:29 privkey.pem -rw------- 1 root root 3554 Jul 30 19:29 pubcert.pem |
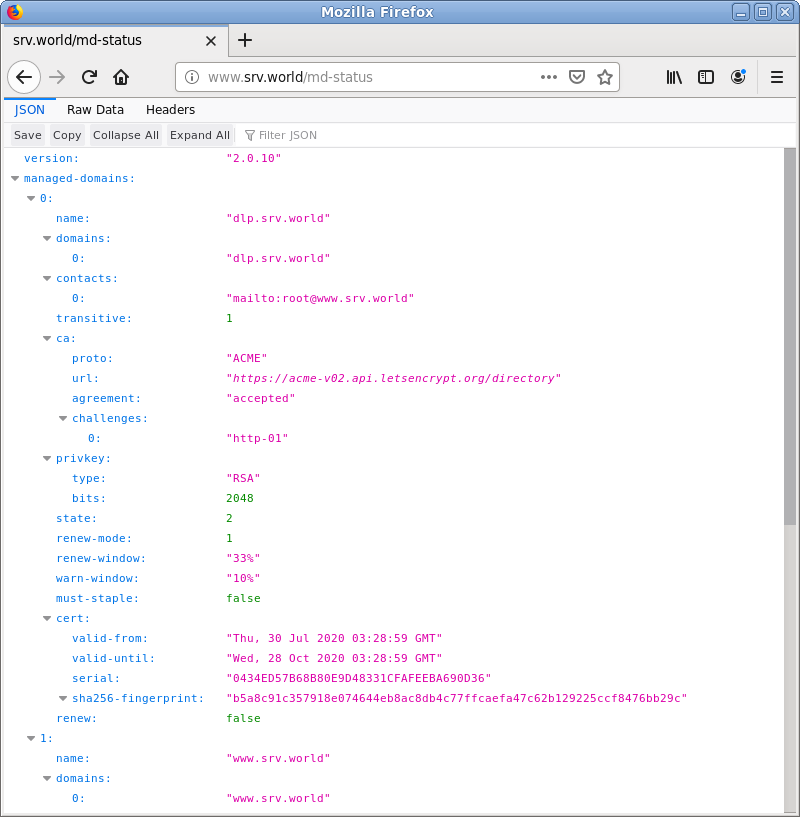
| [4] | 有効期限等々、証明書の確認は [openssl] コマンドで実施可能です。 または、[2] で設定した [md-status] にアクセスすることでも確認できます。 |
|
root@www:~# openssl s_client -connect www.srv.world:443 | openssl x509 -noout -startdate -enddate depth=2 O = Digital Signature Trust Co., CN = DST Root CA X3 verify return:1 depth=1 C = US, O = Let's Encrypt, CN = Let's Encrypt Authority X3 verify return:1 depth=0 CN = www.srv.world verify return:1 notBefore=Jul 30 03:29:11 2020 GMT notAfter=Oct 28 03:29:11 2020 GMTroot@www:~# openssl s_client -connect dlp.srv.world:443 | openssl x509 -noout -startdate -enddate depth=2 O = Digital Signature Trust Co., CN = DST Root CA X3 verify return:1 depth=1 C = US, O = Let's Encrypt, CN = Let's Encrypt Authority X3 verify return:1 depth=0 CN = dlp.srv.world verify return:1 notBefore=Jul 30 03:28:59 2020 GMT notAfter=Oct 28 03:28:59 2020 GMT |
|
関連コンテンツ