SPICEサーバー2013/04/27 |
|
SPICE ( Simple Protocol for Independent Computing Environment ) で、仮想マシンにリモート接続できるようにします。
VNCのように接続先ホストが待ち受けるのではなく、KVMホスト側で仮想マシンへの接続を待ち受けるため、
接続先の仮想マシンのネットワークはつながっていなくとも、KVMホストさえネットワークにつながっていれば仮想マシンへリモート接続できます。
まずはKVMホスト側で仮想マシンがSPICE対応で起動できるように設定します。
|
|
| [1] | 既存の仮想マシンのxmlファイルを編集してSPICE対応で起動します。 当サイトの仮想マシン作成例だとグラフィクスなしで作成しているため以下の変更のみでOKですが、 グラフィクスありで作成した場合は、xmlファイル中の、<graphics>~ と <video>~ のセクションは削除して以下の変更をしてください。 |
|
# 仮想マシン「www」の設定編集 [root@dlp ~]# virsh edit www
<domain type='kvm'>
  <name>www</name>
  <uuid>b994b26e-f9eb-fc91-899a-98fb8de56029</uuid>
  <memory unit='KiB'>2097152</memory>
  <currentMemory unit='KiB'>2097152</currentMemory>
  <vcpu placement='static'>2</vcpu>
  <os>
    <type arch='x86_64' machine='pc-i440fx-1.4'>hvm</type>
    <boot dev='hd'/>
  </os>
  <features>
    <acpi/>
    <apic/>
    <pae/>
  </features>
  <clock offset='utc'/>
  <on_poweroff>destroy</on_poweroff>
  <on_reboot>restart</on_reboot>
  <on_crash>restart</on_crash>
  <devices>
    <emulator>/usr/bin/kvm-spice</emulator>
    <disk type='file' device='disk'>
      <driver name='qemu' type='raw'/>
      <source file='/var/kvm/images/www.img'/>
      <target dev='vda' bus='virtio'/>
      <address type='pci' domain='0x0000' bus='0x00' slot='0x04' function='0x0'/>
    </disk>
     <controller type='usb' index='0'>
      <address type='pci' domain='0x0000' bus='0x00' slot='0x01' function='0x2'/>
    </controller>
    <interface type='bridge'>
      <mac address='52:54:00:39:5d:8d'/>
      <source bridge='br0'/>
      <model type='virtio'/>
      <address type='pci' domain='0x0000' bus='0x00' slot='0x03' function='0x0'/>
    </interface>
    <serial type='pty'>
      <target port='0'/>
    </serial>
    <console type='pty'>
      <target type='serial' port='0'/>
    </console>
    <input type='mouse' bus='ps2'/>
# 以下、追記 (passwd=*** は任意のパスワードを設定)
    <graphics type='spice' port='5930' autoport='no' listen='0.0.0.0' passwd='password'>
      <listen type='address' address='0.0.0.0'/>
    </graphics>
    <video>
      <model type='qxl' ram='65536' vram='32768' heads='1'/>
      <address type='pci' domain='0x0000' bus='0x00' slot='0x02' function='0x0'/>
    </video>
    <memballoon model='virtio'>
      <address type='pci' domain='0x0000' bus='0x00' slot='0x05' function='0x0'/>
    </memballoon>
  </devices>
</domain>
Domain www XML configuration edited.[root@dlp ~]# virsh start www # 仮想マシン起動 Domain www started |
| [3] |
以上でSPICE対応での仮想マシン起動は完了です。SPICEクライアントからの接続は次項を参照ください。
|
| [4] | ちなみに、仮想マシン作成時からSPICEを有効にしたいのであれば、以下のように指定します。 WindowsのようにインストールにGUIが必須なOSをインストールする際に、KVMホストマシンにGUI環境を構築しなくとも、 SPICE有効で起動すれば、ホストマシンにGUI環境がなくともインストールできます。 |
|
[root@dlp ~]# virt-install \
-n windows \ -r 4096 \ -f /var/kvm/images/windows.img \ -s 50 \ --vcpus=2 \ --os-type windows \ --os-variant=win7 \ --network bridge=br0 \ --graphics spice,port=5930,listen=0.0.0.0,password=password \ --video qxl \ --channel spicevmc \ --cdrom /dev/cdrom |
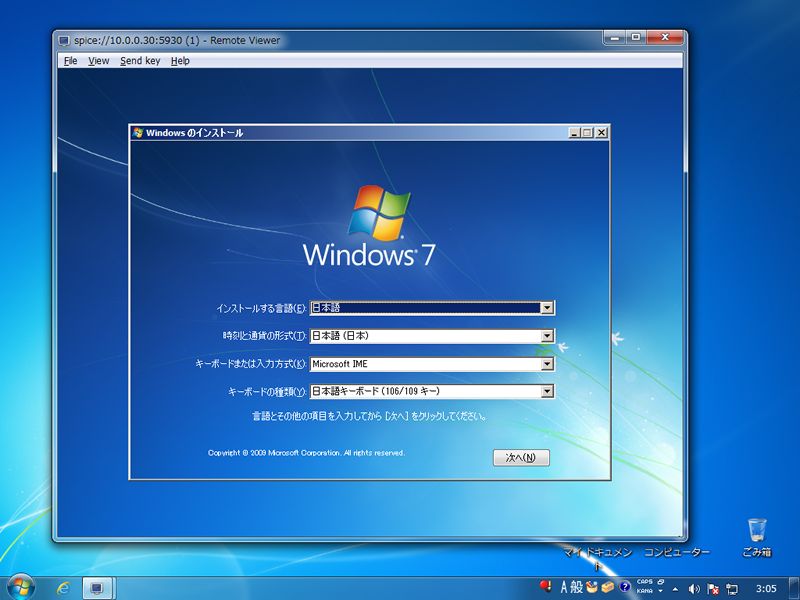
| 以下のようにクライアントマシンからSPICE接続でGUIインストールできます。 |
|
関連コンテンツ