Snort - ネットワーク型IDS2011/06/05 |
|
ネットワーク型IDS ( Intrusion Detection System - 侵入検知システム ) の Snort をインストールします。
ホスト型の Tripwire に対して、ネットワーク型の Snort はネットワーク上のパケットを監視します。
バックエンドでデータベースを使うためMySQLインストール済みを前提とします。
|
|
| [1] | まずは Snort をビルドするのに必要なものをインストールしておきます。 |
|
[root@dlp ~]# yum --enablerepo=epel -y install gcc make rpm-build autoconf automake flex libpcap-devel bison libdnet libdnet-devel mysql-devel pcre-devel php-mysql # EPELからインストール
|
| [2] | Daq をインストールしておきます。Snort サイトから最新版を確認しダウンロードしてください。 |
|
[root@dlp ~]#
[root@dlp ~]# wget http://www.snort.org/downloads/858 -O daq-0.5-1.src.rpm rpm -Uvh daq-0.5-1.src.rpm 1:daq warning: user rjordan does not exist - using root warning: group rjordan does not exist - using root ########################################### [100%] warning: user rjordan does not exist - using root warning: group rjordan does not exist - using root [root@dlp ~]# cd rpmbuild/SPECS [root@dlp SPECS]# sed -i 's/\/lib\//\/lib64\//g' daq.spec [root@dlp SPECS]# rpmbuild -bb daq.spec [root@dlp SPECS]# rpm -Uvh ../RPMS/x86_64/daq-0.5-1.x86_64.rpm Preparing... ########################################### [100%] 1:daq ########################################### [100%] |
| [3] | Snort のインストールです。Snort サイトから最新版を確認しダウンロードしてください。 |
|
[root@dlp ~]#
[root@dlp ~]# wget http://www.snort.org/downloads/865 -O snort-2.9.0.5-1.src.rpm rpm -Uvh snort-2.9.0.5-1.src.rpm 1:snort warning: user ssturges does not exist - using root warning: group ssturges does not exist - using root ########################################### [100%] warning: user ssturges does not exist - using root warning: group ssturges does not exist - using root [root@dlp ~]# cd rpmbuild/SPECS
[root@dlp SPECS]#
vi snort.spec # 280行目あたり:以下のように追記 SNORT_BASE_CONFIG="--prefix=%{_prefix} \ --bindir=%{_sbindir} \ --sysconfdir=%{_sysconfdir}/snort \ --with-libpcap-includes=%{_includedir} \ --enable-decoder-preprocessor-rules --enable-targetbased \ --enable-zlib \ --enable-ipv6 \ --enable-normalizer \ --with-mysql-lib=/usr/lib64/mysql rpmbuild -bb --with mysql snort.spec [root@dlp SPECS]# rpm -Uvh ../RPMS/x86_64/snort-2.9.0.5-1.x86_64.rpm ../RPMS/x86_64/snort-mysql-2.9.0.5-1.x86_64.rpm Preparing... ########################################### [100%] 1:snort ########################################### [ 50%] 2:snort-mysql ########################################### [100%] |
| [4] | Snort用のデータベースを作成しておきます。 |
|
[root@dlp ~]# mysql -u root -p Enter password: Welcome to the MySQL monitor. Commands end with ; or \g. Your MySQL connection id is 4 Server version: 5.1.52 Source distribution Copyright (c) 2000, 2010, Oracle and/or its affiliates. All rights reserved. This software comes with ABSOLUTELY NO WARRANTY. This is free software, and you are welcome to modify and redistribute it under the GPL v2 license Type 'help;' or '\h' for help. Type '\c' to clear the current input statement.
mysql>
create database snort; Query OK, 1 row affected (0.00 sec)
mysql>
grant all privileges on snort.* to snort@localhost identified by 'password'; Query OK, 0 rows affected (0.00 sec)
mysql>
mysql> flush privileges; Query OK, 0 rows affected (0.00 sec) exit Bye [root@dlp ~]# mysql -u snort -p snort < /usr/share/snort-*/schemas/create_mysql Enter password: snort ユーザーのDBパスワード |
| [5] | Snort の設定 |
|
[root@dlp ~]#
vi /etc/snort/snort.conf # 39行目:内部ネットワークに変更 ipvar HOME_NET 10.0.0.0/24
# 177行目:コメントにする # dynamicdetection directory /usr/local/lib/snort_dynamicrules
# 376行目:DB設定追記 ( "password=" は設定したパスワードを指定 ) output database: log, mysql, user=snort password=password dbname=snort host=localhost
[root@dlp ~]#
vi /etc/sysconfig/snort # 69行目:コメントにする ( ログはMySQLに出力 ) # ALERTMODE=fast
[root@dlp ~]#
vi /etc/logrotate.d/snort # 4行目:以下のように変更 ( 不要な部分を削除 ) /var/log/snort/alert /var/log/snort/*log { |
| [6] | Snort のルールファイルを入手するため、こちらから Snort サイトにユーザー登録してください。 ユーザー登録後、こちらからルールファイルをダウンロードしてください。 ダウンロードするファイルは「Registered User Release」の下の「snortrules-snapshot-xxxx.tar.gz」です。 ダウンロード後は、サーバーにアップロードして、以下のように所定の場所に配置し、Snort を起動します。 |
|
[root@dlp ~]# tar zxvf snortrules-snapshot-2905.tar.gz [root@dlp ~]# cp rules/* /etc/snort/rules/ [root@dlp ~]# rm -rf rules snortrules-snapshot-2905.tar.gz [root@dlp ~]# /etc/rc.d/init.d/snortd start Starting snort: Spawning daemon child... My daemon child 19430 lives... Daemon parent exiting [ OK ]
|
| [7] | Snort のログをWebブラウザで確認できる BASE をインストールします。 |
|
[root@dlp ~]#
[root@dlp ~]# wget http://jaist.dl.sourceforge.net/sourceforge/secureideas/base-1.4.5.tar.gz tar zxvf base-1.4.5.tar.gz [root@dlp ~]# mv base-1.4.5 /var/www/base [root@dlp ~]# chown -R apache. /var/www/base [root@dlp ~]# cp /var/www/base/base_conf.php.dist /var/www/base/base_conf.php
[root@dlp ~]#
vi /var/www/base/base_conf.php # 50行目:BASEのパス $BASE_urlpath = ' /base ';
# 80行目:adodbのパス $DBlib_path = ' /usr/share/php/adodb ';
# 102行目:自身の環境用に変更 # snortのDB名 $alert_dbname = ' snort ';$alert_host = 'localhost'; $alert_port = ''; # snortのDBのユーザー名 $alert_user = ' snort ';# snortのDBのパスワード $alert_password = ' password ';
[root@dlp ~]#
vi /etc/httpd/conf.d/base.conf # 新規作成 Alias /base /var/www/base <Directory /var/www/base/> Order Deny,Allow Deny from all Allow from 127.0.0.1 10.0.0.0/24 </Directory> /etc/rc.d/init.d/httpd restart Stopping httpd: [ OK ] Starting httpd: [ OK ] |
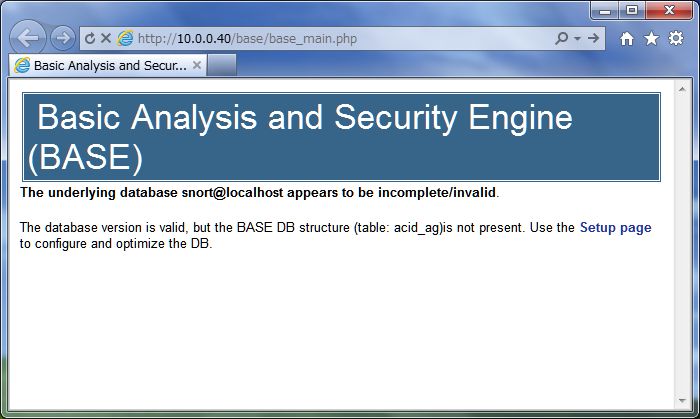
| [8] | Webブラウザで「http://(ホスト名またはIPアドレス)/base/」にアクセスし、「Setup page」をクリックします。 |
|
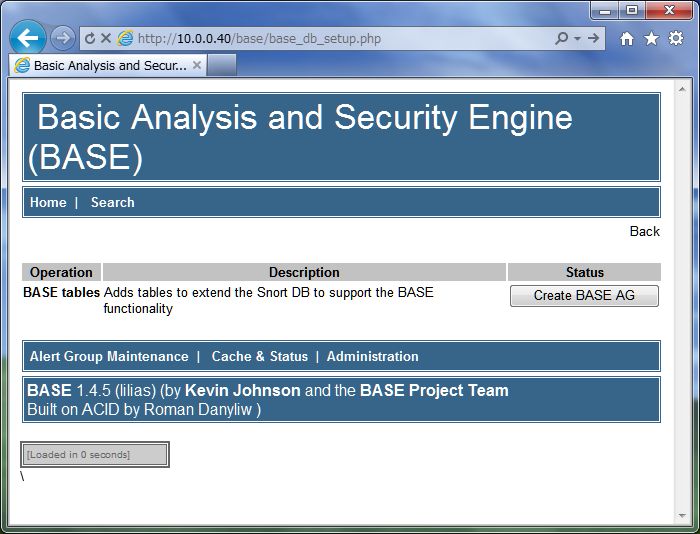
| [9] | 右上の方の「Create BASE AG」ボタンをクリックします。 |
|
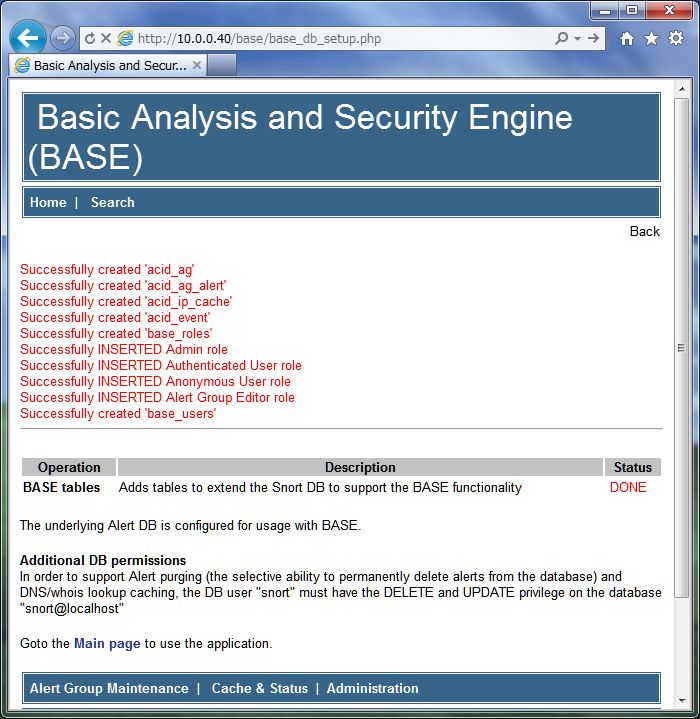
| [10] | 以下のように正常に終了したら下の方にある「Main page」をクリックしてメインページに移動します。 |
|
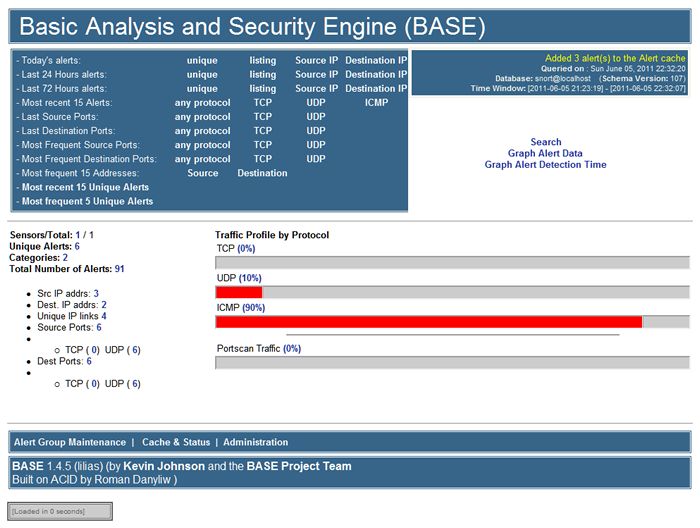
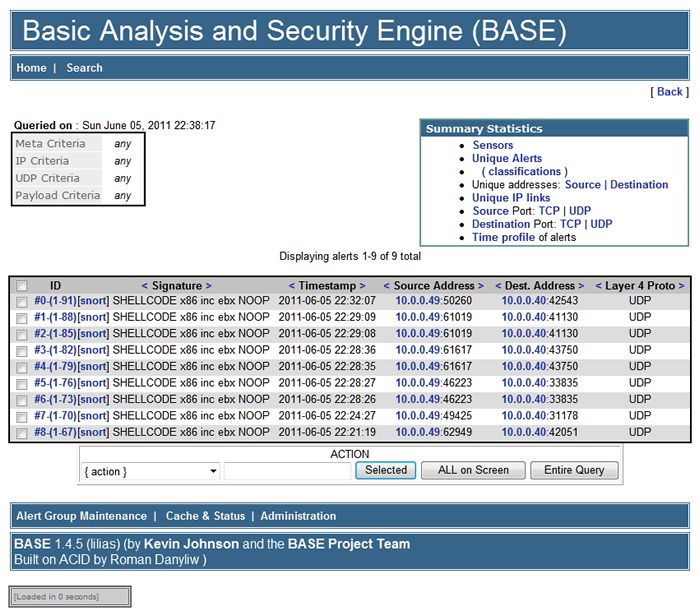
| [11] | メインページになります。ここから Snort のログを確認することができます。 |
|
|
関連コンテンツ