GPU パススルーの設定2023/03/15 |
|
GPU パススルーの設定です。当設定により、仮想マシン上で GPU を使用可能となります。
|
|
| [1] | シェルアクセスして作成する場合は、以下のように実行します。 |
|
# システムをメンテナンスモードに切り替える [root@ctrl:~] esxcli system maintenanceMode set --enable true
lspci | grep -i nvidia 0000:02:00.0 VGA compatible controller: NVIDIA Corporation GK104 [GeForce GTX 770] 0000:02:00.1 Audio device: NVIDIA Corporation GK104 HDMI Audio Controller # PCI パススルーを有効にする [root@ctrl:~] esxcli system settings kernel set --setting=disablePciPassthrough --value=FALSE [root@ctrl:~] esxcli system settings kernel list | grep disablePciPassthrough disablePciPassthrough Bool FALSE FALSE FALSE Disable PCI Passthrough[root@ctrl:~] esxcli hardware pci pcipassthru set --device-id=0000:02:00.0 --enable=true [root@ctrl:~] esxcli hardware pci pcipassthru set --device-id=0000:02:00.1 --enable=true [root@ctrl:~] esxcli hardware pci pcipassthru list Device ID Enabled ------------ ------- 0000:00:19.0 false 0000:00:1a.0 false 0000:00:1b.0 false 0000:00:1d.0 false 0000:01:00.0 false 0000:02:00.0 true 0000:02:00.1 true 0000:04:00.0 false # VGA ドライバーを無効にする # *注 : 再起動後 コンソール画面は表示されなくなるため注意 [root@ctrl:~] esxcli system settings kernel set --setting=vga --value=FALSE
# システム 再起動 [root@ctrl:~] esxcli system shutdown reboot --reason "Enable PCIpassthru"
# システム再起動後 メンテナンスモード解除 [root@ctrl:~] esxcli system maintenanceMode set --enable false |
| [2] | [1] のシステム設定変更後は、GPU デバイスを割り当てたい仮想マシンに GPU パススルーの設定をします。 |
|
[root@ctrl:~] lspci | grep -i nvidia 0000:02:00.0 VGA compatible controller: NVIDIA Corporation GK104 [GeForce GTX 770] 0000:02:00.1 Audio device: NVIDIA Corporation GK104 HDMI Audio Controller[root@ctrl:~] lspci -n | grep 0000:02:00.0 0000:02:00.0 Class 0300: 10de:1184[root@ctrl:~] vim-cmd vmsvc/getallvms Vmid Name File Guest OS Version Annotation 2 Windows Server 2022 [VM-Data] Windows Server 2022/Windows Server 2022.vmx windows2019srvNext_64Guest vmx-19 3 Ubuntu_22.04 [VM-Data] Ubuntu_22.04/Ubuntu_22.04.vmx ubuntu64Guest vmx-19 # 例として [Ubuntu_22.04] に GPU パススルーを設定 [root@ctrl:~] passthruid="0000:02:00.0" [root@ctrl:~] deviceId=$(lspci -n | grep ${passthruid} | awk '{print $4}' | cut -d':' -f2) [root@ctrl:~] vendorId=$(lspci -n | grep ${passthruid} | awk '{print $4}' | cut -d':' -f1) [root@ctrl:~] systemId=$(grep uuid /etc/vmware/esx.conf | awk '{print $3}') [root@ctrl:~] memsize=$(grep ^memSize /vmfs/volumes/VM-Data/Ubuntu_22.04/Ubuntu_22.04.vmx | awk '{print $3}')
# * Nested Virtualization と GPU パススルー設定の併用は不可 [root@ctrl:~] sed -i -e '/^vhv.enable /d' /vmfs/volumes/VM-Data/Ubuntu_22.04/Ubuntu_22.04.vmx [root@ctrl:~] sed -i -e '/^sched.mem.minSize /d' /vmfs/volumes/VM-Data/Ubuntu_22.04/Ubuntu_22.04.vmx [root@ctrl:~] sed -i -e '/^sched.mem.min /d' /vmfs/volumes/VM-Data/Ubuntu_22.04/Ubuntu_22.04.vmx [root@ctrl:~] sed -i -e '/^sched.mem.pin /d' /vmfs/volumes/VM-Data/Ubuntu_22.04/Ubuntu_22.04.vmx
[root@ctrl:~] cat >> /vmfs/volumes/VM-Data/Ubuntu_22.04/Ubuntu_22.04.vmx <<EOF
pciPassthru0.deviceId = "0x${deviceId}"
pciPassthru0.id = "${passthruid}"
pciPassthru0.present = "TRUE"
pciPassthru0.systemId = ${systemId}
pciPassthru0.vendorId = "0x${vendorId}"
sched.mem.pin = "TRUE"
sched.mem.min = ${memsize}
sched.mem.minSize = ${memsize}
hypervisor.cpuid.v0 = "FALSE"
EOF
[root@ctrl:~] vim-cmd vmsvc/reload 3 |
|
VMware Host Client で設定する場合は以下のように実行します。
|
|
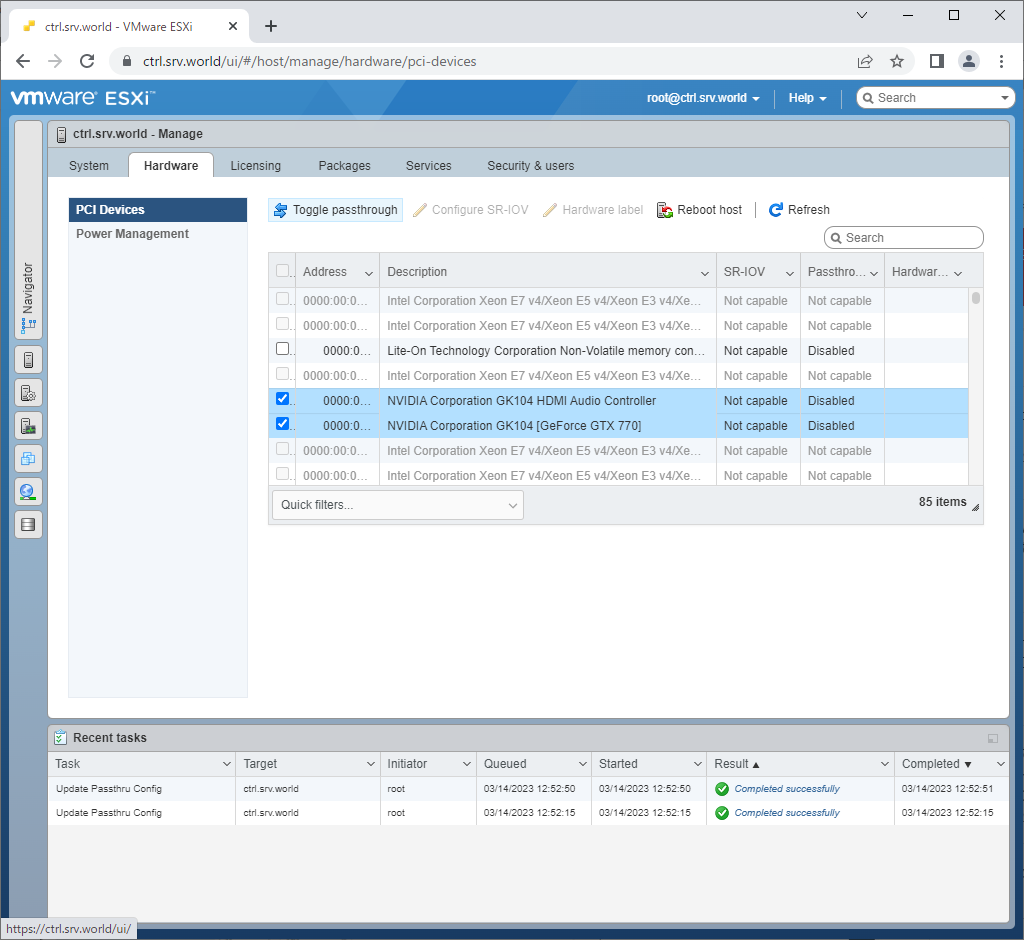
| [3] | 以下のように、[管理] - [ハードウェア] の画面で、パススルーしたい対象のデバイスを選択し、[Toggle passtrough] ボタンをクリックします。 |
|
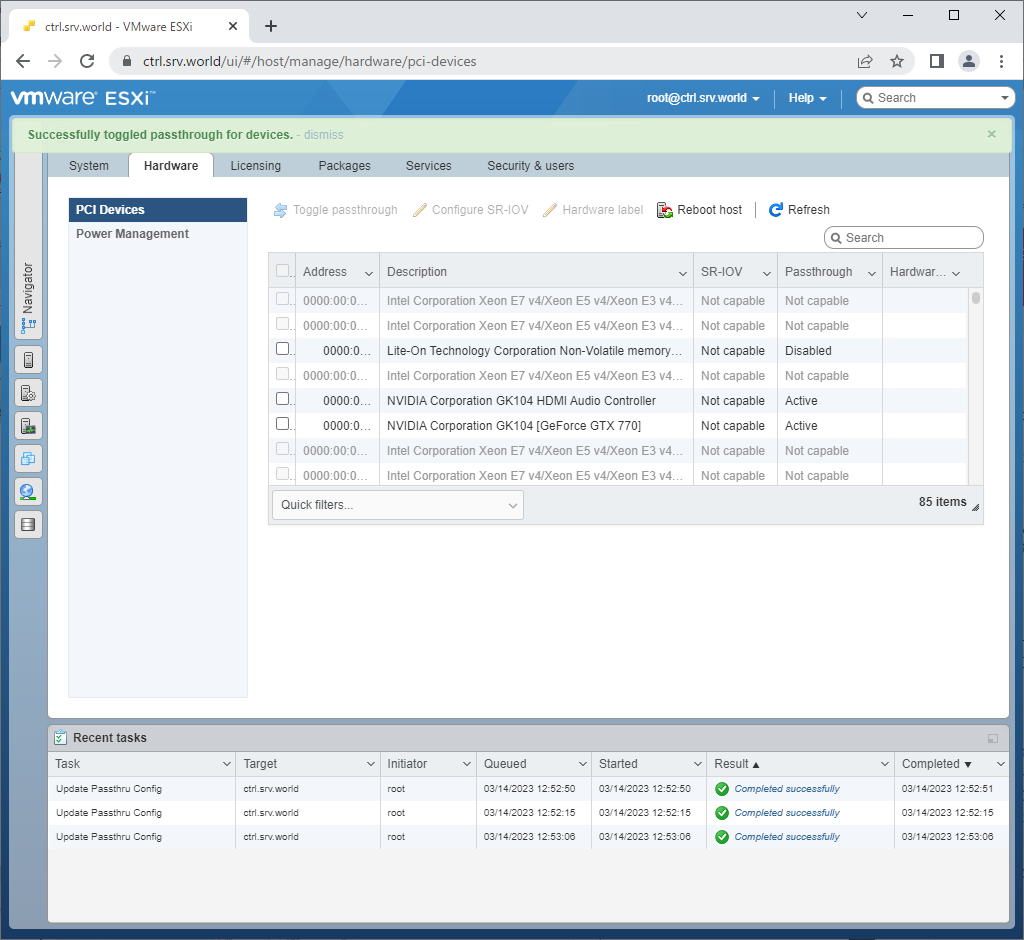
| [4] | パススルーが有効になると、以下のように [Passtrough] が [Active] になります。 設定後、システム再起動をした後に、もし、[Passtrough] のステータスが [Enabled / Needs Reboot] となる場合は、再度、無効/有効 を設定しなおすか、あるいは、[1] で設定している [VGA ドライバーを無効にする] コマンドでデフォルトの VGA を無効にすることで回避できます。 |
|
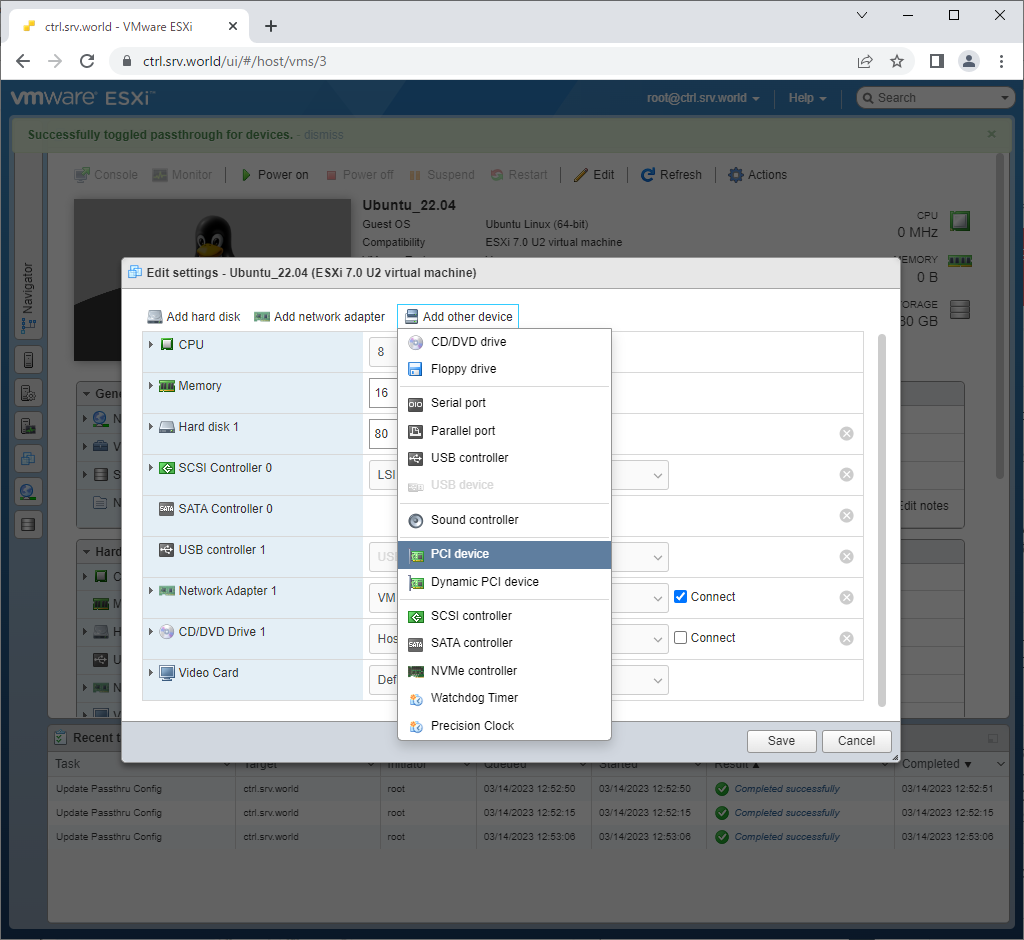
| [5] | 次に、仮想マシンにパススルーの設定をします。設定したい仮想マシンの設定画面を開き、[Add other device] - [PCI device] を開きます。 |
|
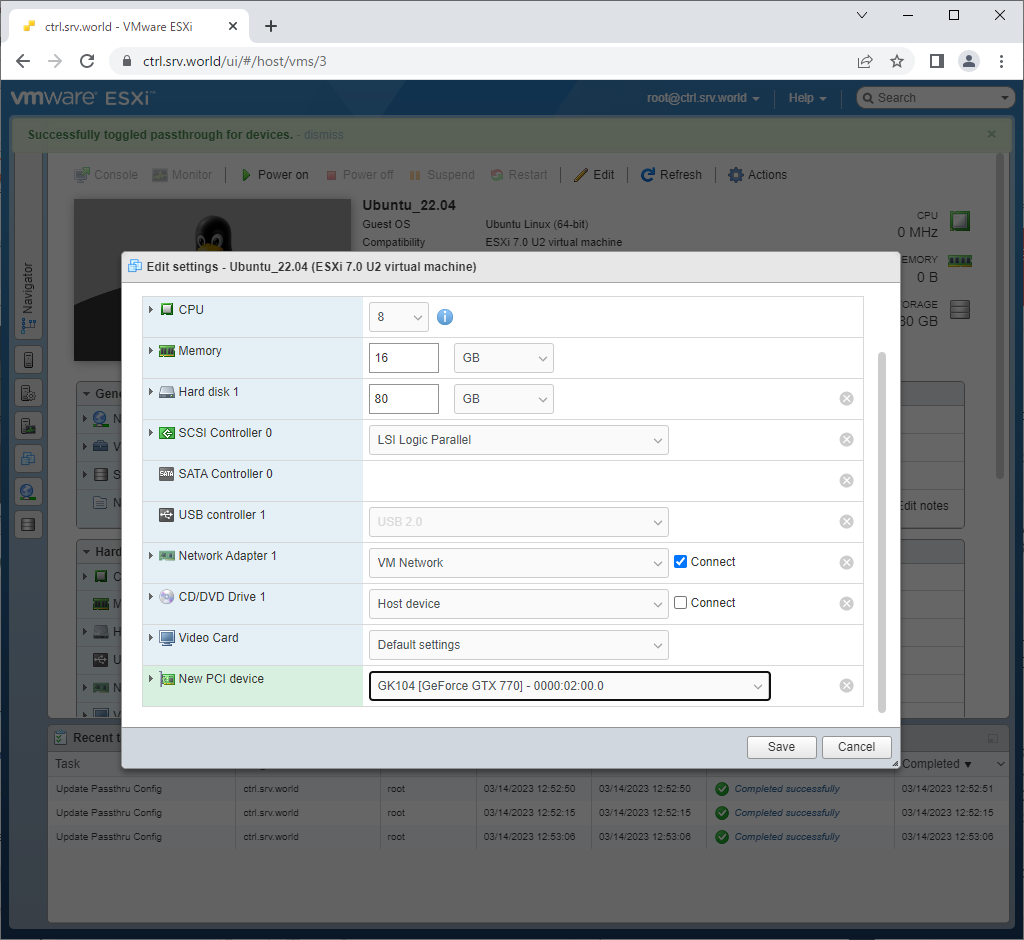
| [6] | 追加された PCI デバイスのリストから、GPU デバイスを選択します。 |
|
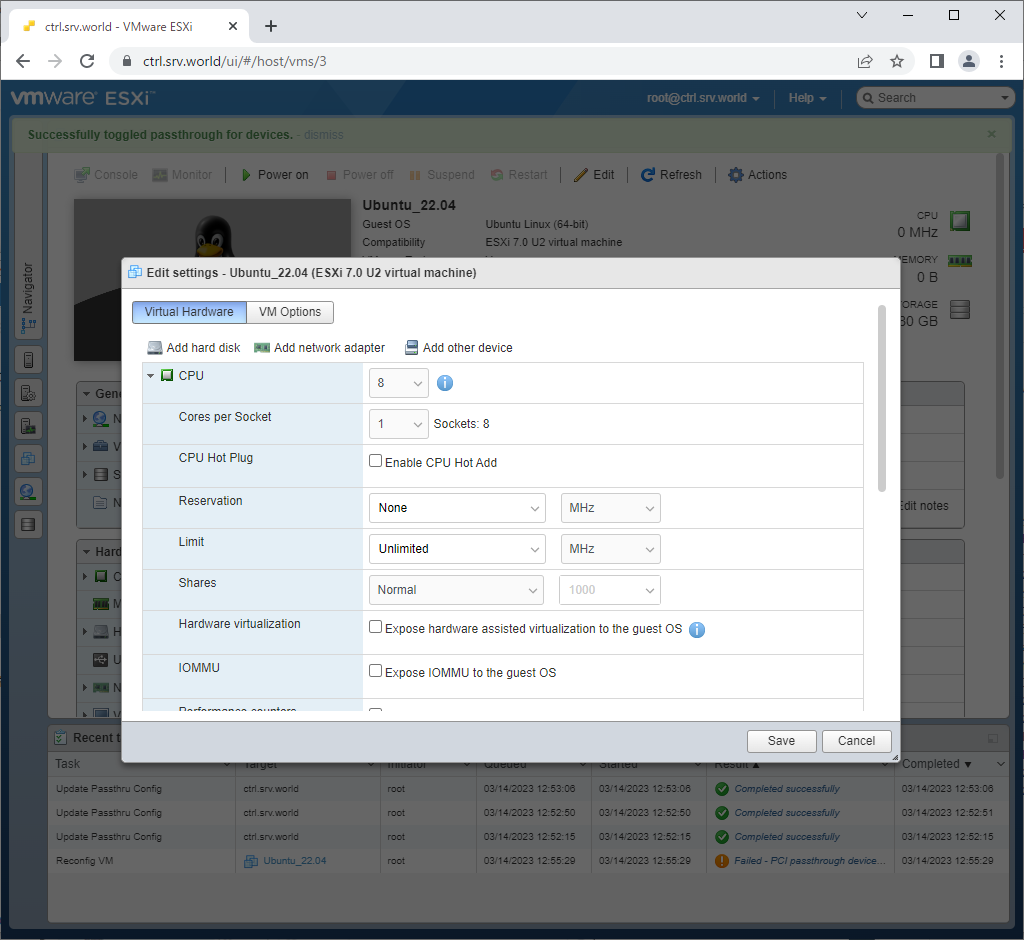
| [7] | CPU の設定で、Nested Virtualization が有効になっている場合は、無効に変更します。([Hardware virtualization] の項) Nested Virtualization と GPU パススルー設定との併用は不可となっています。 |
|
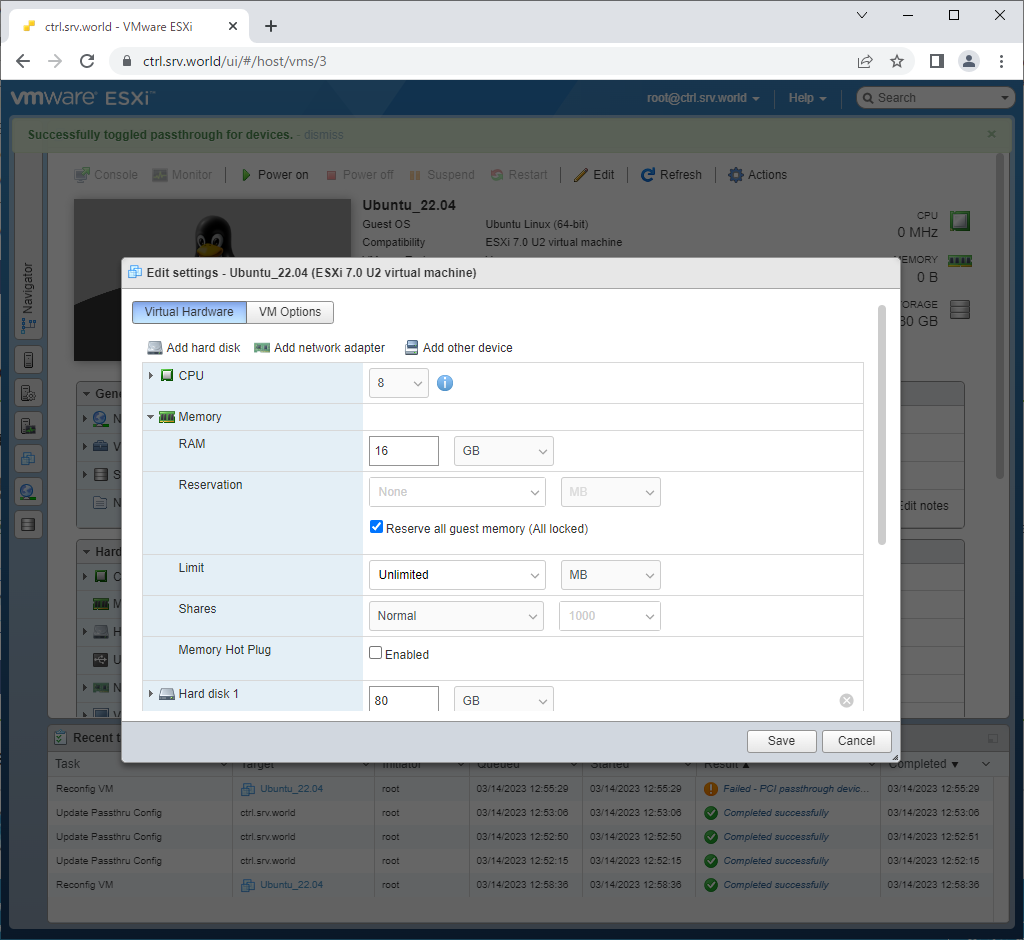
| [8] | Memory の設定で、[すべてのゲスト メモリを予約 (すべてロック)] にチェックを入れます。 以上で、設定を保存して終了します。 |
|
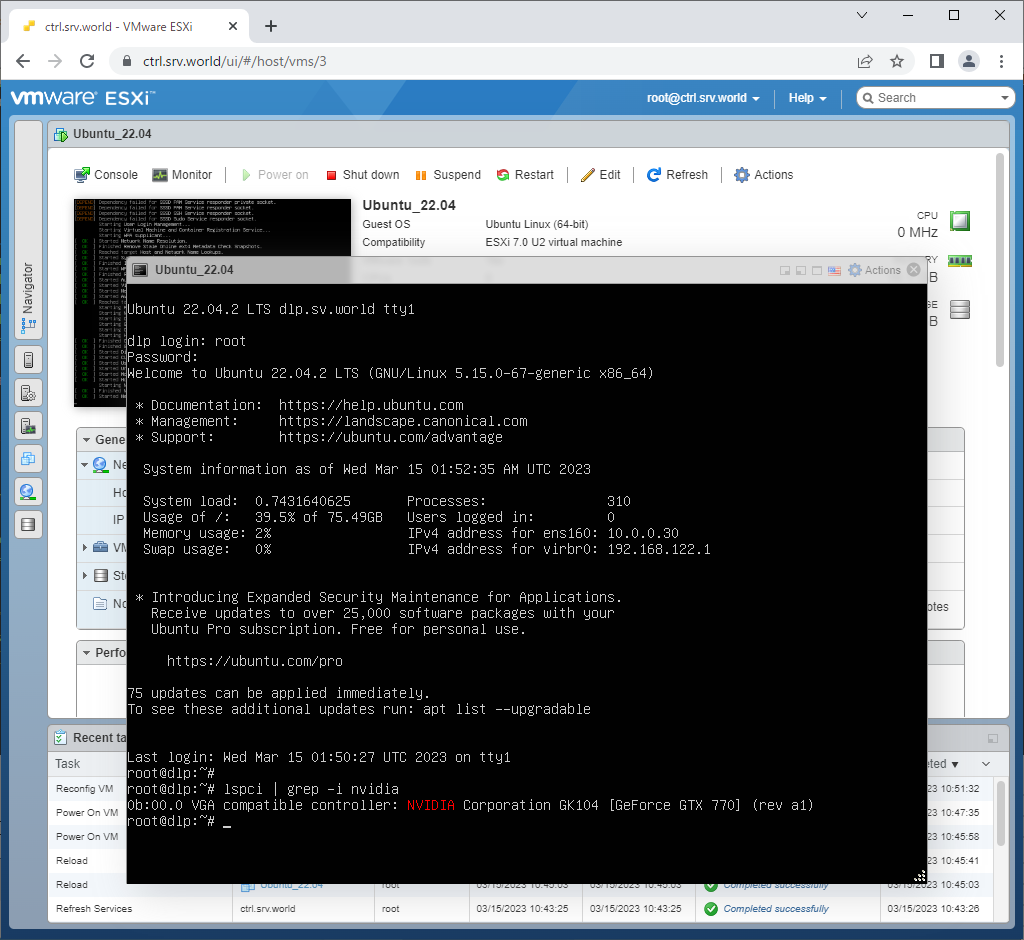
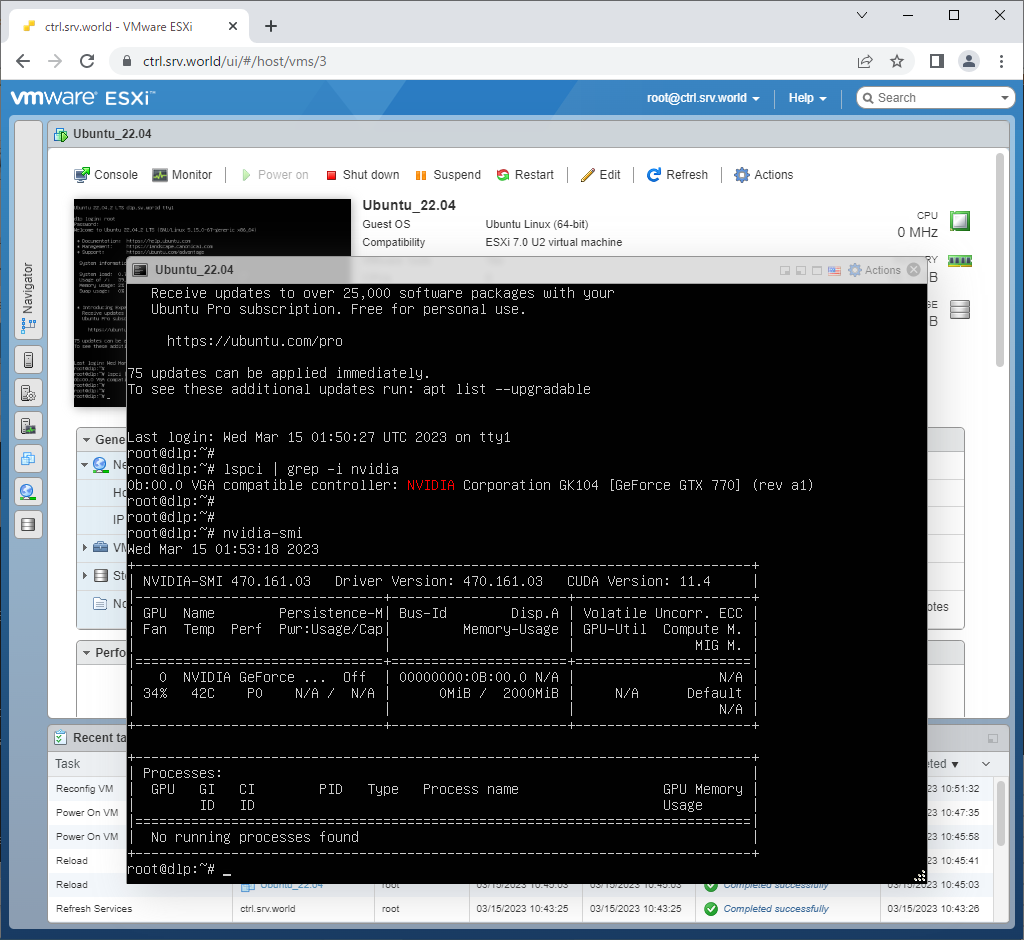
| [9] | GPU パススルーを有効にした仮想マシンを起動して、GPU デバイスが認識されているか確認しておくとよいでしょう。 |
|
|
関連コンテンツ