MicroK8s : ダッシュボードを有効にする2021/04/07 |
|
MicroK8s クラスターでダッシュボードを有効にする場合は以下のように設定します。
|
| [1] | プライマリーノードで、ダッシュボード アドオンを有効にします。 |
|
[root@dlp ~]# microk8s enable dashboard dns Enabling Kubernetes Dashboard Enabling Kubernetes Dashboard Enabling Metrics-Server clusterrole.rbac.authorization.k8s.io/system:aggregated-metrics-reader created clusterrolebinding.rbac.authorization.k8s.io/metrics-server:system:auth-delegator created rolebinding.rbac.authorization.k8s.io/metrics-server-auth-reader created Warning: apiregistration.k8s.io/v1beta1 APIService is deprecated in v1.19+, unavailable in v1.22+; use apiregistration.k8s.io/v1 APIService apiservice.apiregistration.k8s.io/v1beta1.metrics.k8s.io created serviceaccount/metrics-server created deployment.apps/metrics-server created service/metrics-server created clusterrole.rbac.authorization.k8s.io/system:metrics-server created clusterrolebinding.rbac.authorization.k8s.io/system:metrics-server created clusterrolebinding.rbac.authorization.k8s.io/microk8s-admin created Adding argument --authentication-token-webhook to nodes. Adding argument --authentication-token-webhook to nodes. Metrics-Server is enabled Applying manifest serviceaccount/kubernetes-dashboard created service/kubernetes-dashboard created secret/kubernetes-dashboard-certs created secret/kubernetes-dashboard-csrf created secret/kubernetes-dashboard-key-holder created configmap/kubernetes-dashboard-settings created role.rbac.authorization.k8s.io/kubernetes-dashboard created clusterrole.rbac.authorization.k8s.io/kubernetes-dashboard created rolebinding.rbac.authorization.k8s.io/kubernetes-dashboard created clusterrolebinding.rbac.authorization.k8s.io/kubernetes-dashboard created deployment.apps/kubernetes-dashboard created service/dashboard-metrics-scraper created deployment.apps/dashboard-metrics-scraper created If RBAC is not enabled access the dashboard using the default token retrieved with: token=$(microk8s kubectl -n kube-system get secret | grep default-token | cut -d " " -f1) microk8s kubectl -n kube-system describe secret $token In an RBAC enabled setup (microk8s enable RBAC) you need to create a user with restricted permissions as shown in: https://github.com/kubernetes/dashboard/blob/master/docs/user/access-control/creating-sample-user.md Enabling DNS Applying manifest serviceaccount/coredns created configmap/coredns created deployment.apps/coredns created service/kube-dns created clusterrole.rbac.authorization.k8s.io/coredns created clusterrolebinding.rbac.authorization.k8s.io/coredns created Restarting kubelet Adding argument --cluster-domain to nodes. Adding argument --cluster-domain to nodes. Adding argument --cluster-dns to nodes. Adding argument --cluster-dns to nodes. Restarting nodes. Restarting nodes. DNS is enabled[root@dlp ~]# microk8s kubectl get services -n kube-system NAME TYPE CLUSTER-IP EXTERNAL-IP PORT(S) AGE metrics-server ClusterIP 10.152.183.206 <none> 443/TCP 57s kubernetes-dashboard ClusterIP 10.152.183.116 <none> 443/TCP 54s dashboard-metrics-scraper ClusterIP 10.152.183.17 <none> 8000/TCP 54s kube-dns ClusterIP 10.152.183.10 <none> 53/UDP,53/TCP,9153/TCP 53s[root@dlp ~]# microk8s kubectl -n kube-system get pods -o wide NAME READY STATUS RESTARTS AGE IP NODE NOMINATED NODE READINESS GATES metrics-server-8bbfb4bdb-h6hsr 1/1 Running 0 85s 10.1.142.70 dlp.srv.world <none> <none> calico-kube-controllers-847c8c99d-cglw5 1/1 Running 1 124m 10.1.142.66 dlp.srv.world <none> <none> calico-node-nlzz4 1/1 Running 0 21m 10.0.0.30 dlp.srv.world <none> <none> coredns-86f78bb79c-nvfqr 1/1 Running 0 81s 10.1.142.71 dlp.srv.world <none> <none> kubernetes-dashboard-7ffd448895-hp574 1/1 Running 0 82s 10.1.142.72 dlp.srv.world <none> <none> dashboard-metrics-scraper-6c4568dc68-fzngj 1/1 Running 0 81s 10.1.142.73 dlp.srv.world <none> <none> # セキュリティトークン確認 # [token:] 行の 2列目が該当 [root@dlp ~]# microk8s kubectl -n kube-system describe secret $(microk8s kubectl -n kube-system get secret | grep default-token | awk '{print $1}')
Name:         default-token-v8wsc
Namespace:    kube-system
Labels:       <none>
Annotations:  kubernetes.io/service-account.name: default
              kubernetes.io/service-account.uid: d52370c4-afb1-4db1-a4a1-94c51e28316f

Type:  kubernetes.io/service-account-token

Data
====
token:      eyJhbGciOiJSUzI1NiIsImtpZCI6IlBNUDgtc1NVWmh6VUNpWVpJV2gwWlNscXNQYXNS.....
ca.crt:     1103 bytes
namespace:  11 bytes
# 外部からもアクセスできるようにポートフォワードする [root@dlp ~]# microk8s kubectl port-forward -n kube-system service/kubernetes-dashboard --address 0.0.0.0 10443:443 Forwarding from 0.0.0.0:10443 -> 8443 # Firewalld 稼働中の場合はポート許可 [root@dlp ~]# firewall-cmd --add-port=10443/tcp --permanent [root@dlp ~]# firewall-cmd --reload |
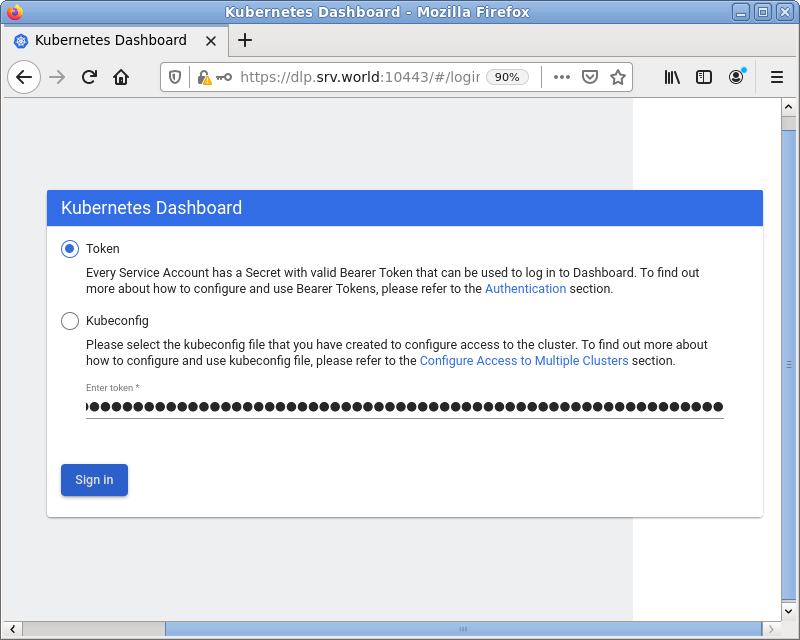
| [2] | ローカルネットワーク内の任意のクライアントコンピューターで Web ブラウザーを起動し、[https://(MicroK8s プライマリーノードのホスト名 または IP アドレス):10443/] にアクセスします。以下のような画面が表示されたら、[1] で確認したセキュリティトークンを コピー & ペーストして [Sing In] ボタンをクリックします。なお、下例の画面は英語表示となっていますが、日本語 OS でアクセスすれば日本語で表示されます。 |
|
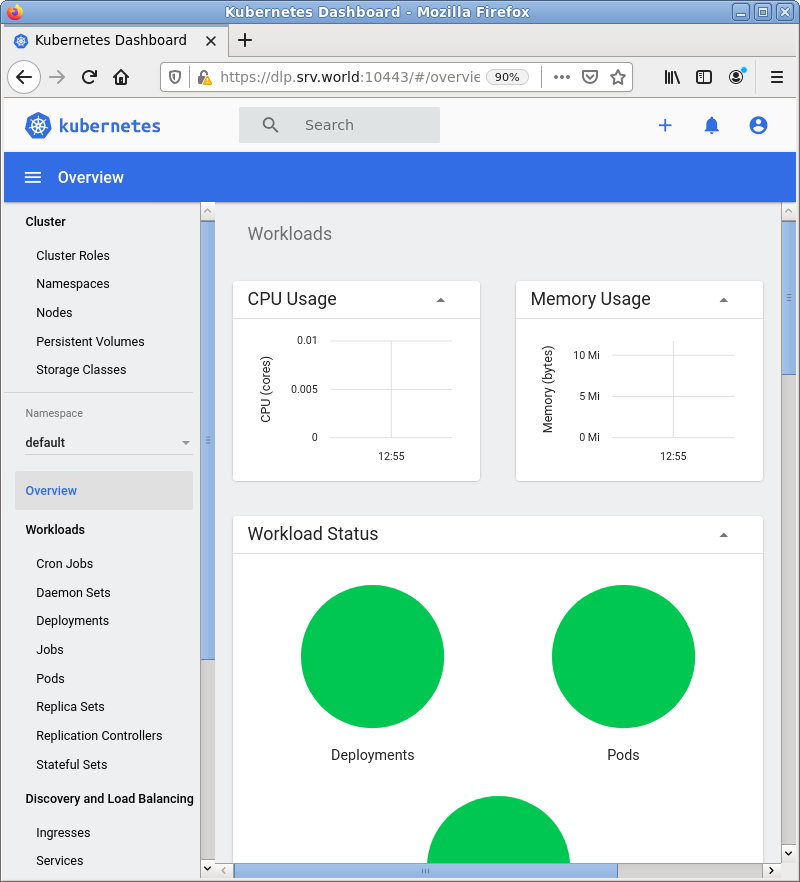
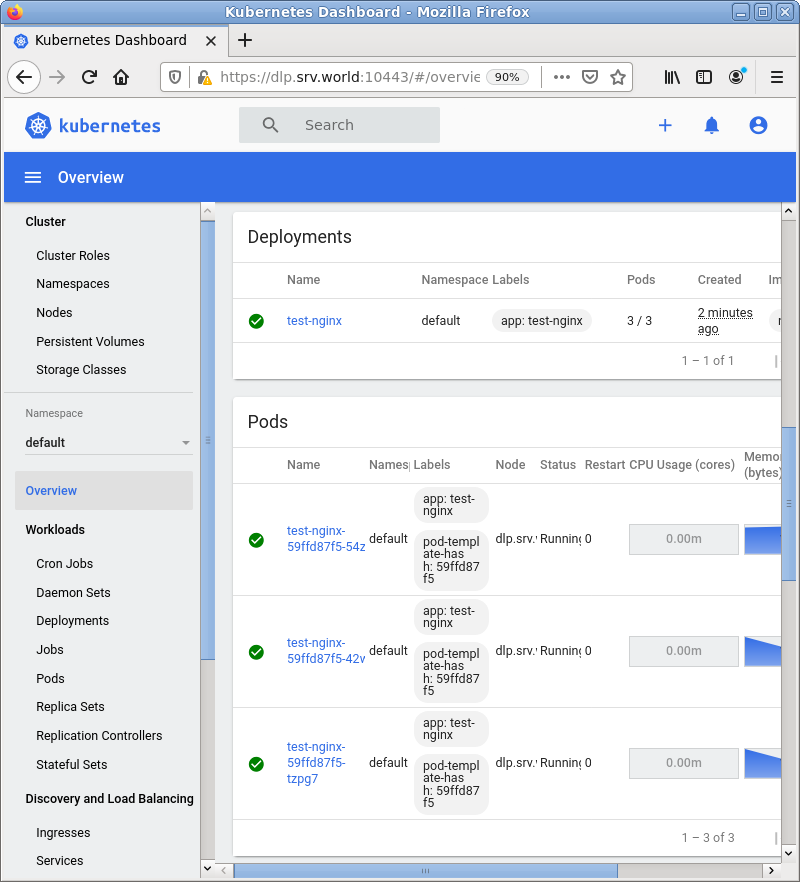
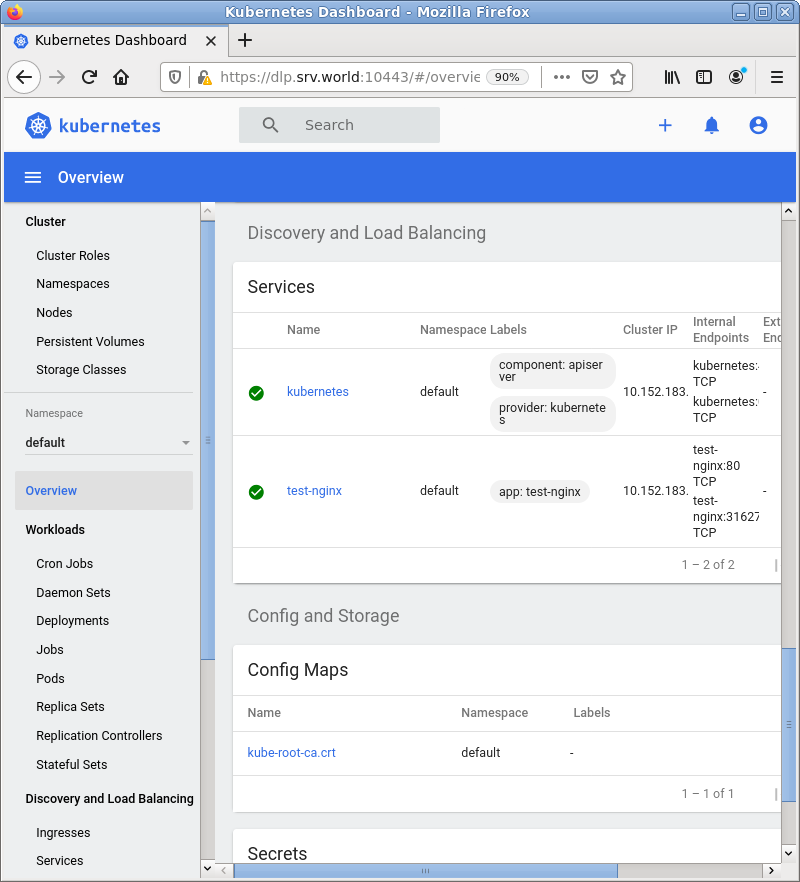
| [3] | 認証が成功すると MicroK8s クラスターのダッシュボードが表示されます。 |
|
|
|
関連コンテンツ