Sensu : インストール2017/10/23 |
|
監視システム Sensu のインストールと設定です。
|
|
| [1] | Sensu はデータストアに Redis を使用するため、インストールしておきます。 |
|
# EPELからインストール
[root@dlp ~]#
yum --enablerepo=epel -y install redis
[root@dlp ~]#
vi /etc/redis.conf # 61行目:変更 (他ホストからの接続許可) bind 0.0.0.0
# 80行目:変更 protected-mode no
# 481行目:追記 (接続パスワードを設定) requirepass password
systemctl start redis [root@dlp ~]# systemctl enable redis
|
| [2] | Sensu のリポジトリを追加して Sensu と Web ダッシュボードツール Uchiwa をインストールします。 |
|
[root@dlp ~]#
[root@dlp ~]# cat > /etc/yum.repos.d/sensu.repo <<'EOF'
[sensu] name=sensu baseurl=https://sensu.global.ssl.fastly.net/yum/$releasever/$basearch/ enabled=0 gpgcheck=0 EOF yum --enablerepo=sensu -y install sensu uchiwa
|
| [3] |
Uchiwa ダッシュボードへのアクセス用に こちらを参照して SSL 証明書を作成しておきます。
|
| [4] | Sensu と Uchiwa の基本設定をして起動します。 |
|
[root@dlp ~]#
cp -p /etc/pki/tls/certs/server.key /etc/sensu/uchiwa.key [root@dlp ~]# cp -p /etc/pki/tls/certs/server.crt /etc/sensu/uchiwa.crt [root@dlp ~]# chown uchiwa. /etc/sensu/uchiwa.*
[root@dlp ~]#
vi /etc/sensu/config.json # 新規作成
{
  "transport": {
    "name": "redis"
  },
  "api": {
    "host": "127.0.0.1",
    "port": 4567
  }
}
[root@dlp ~]#
vi /etc/sensu/conf.d/redis.json # 新規作成 # Redis の [password] は [1] で設定した接続パスワード
{
  "redis": {
    "host": "127.0.0.1",
    "port": 6379,
    "password": "password"
  }
}
[root@dlp ~]#
vi /etc/sensu/conf.d/client.json # 新規作成 # [subscriptions] は任意のワードを設定 (ロールの定義)
{
  "client": {
    "environment": "development",
    "name": "dlp",
    "address": "127.0.0.1",
    "subscriptions": [
      "development",
      "sensu-server"
    ]
  }
}
[root@dlp ~]#
vi /etc/sensu/uchiwa.json # 以下のように変更 # [adminpassword] は任意のパスワードを設定
{
  "sensu": [
    {
      "name": "dlp.srv.world",
      "host": "127.0.0.1",
      "port": 4567,
      "timeout": 10
    }
  ],
  "uchiwa": {
    "host": "0.0.0.0",
    "port": 3000,
    "refresh": 10,
    "user": "admin",
    "pass": "adminpassword",
    "ssl": {
      "certfile": "/etc/sensu/uchiwa.crt",
      "keyfile": "/etc/sensu/uchiwa.key"
    }
  }
}
chown sensu. /etc/sensu/config.json /etc/sensu/conf.d/* [root@dlp ~]# systemctl start sensu-server sensu-api sensu-client uchiwa [root@dlp ~]# systemctl enable sensu-server sensu-api sensu-client uchiwa
|
| [5] | Firewalld を有効にしている場合は、Redis, Sensu, Uchiwa のサービスポートの許可が必要です。 |
|
[root@dlp ~]# firewall-cmd --add-port={6379/tcp,4567/tcp,3000/tcp} --permanent success [root@dlp ~]# firewall-cmd --reload success |
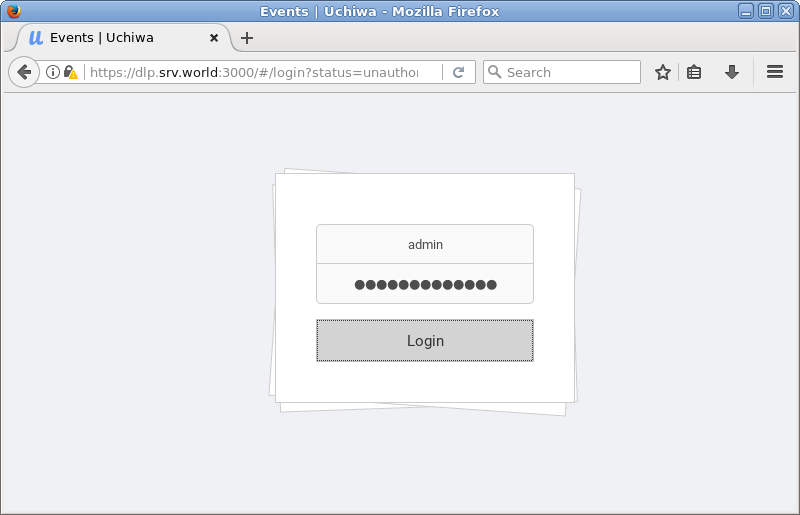
| [6] | 任意のクライアントコンピューターで Webブラウザを起動し [https://(Uchiwaサーバーのホスト名またはIPアドレス):3000/] にアクセスします。 すると認証を求められるので、Uchiwa に設定したユーザー名とパスワードで認証します。 |
|
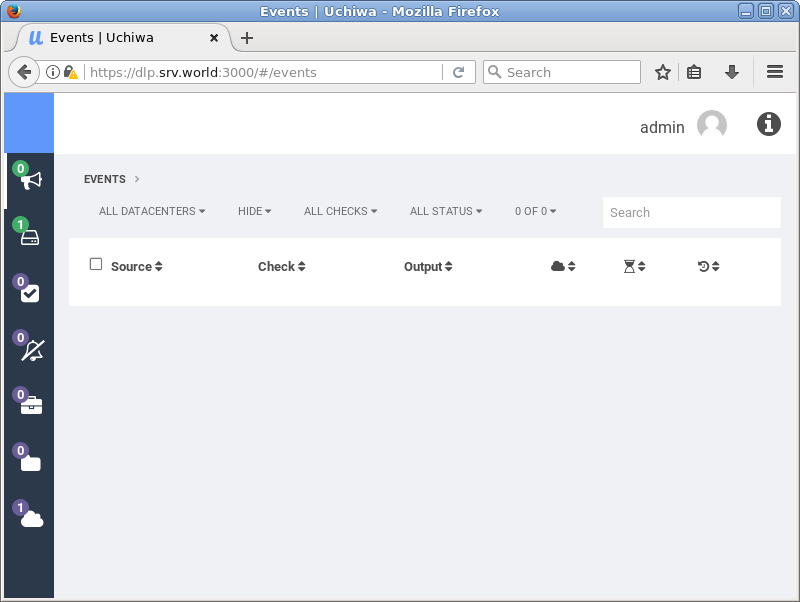
| [7] | 正常に認証完了すると Uchiwa のダッシュボードが表示されます。 |
|
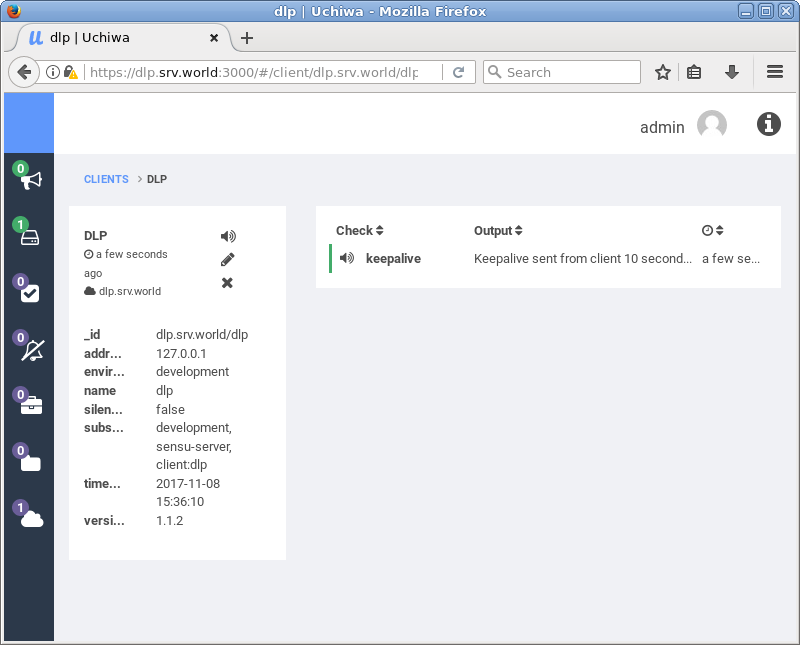
| [8] | 初期状態では、クライアントとして設定したローカルホストの情報のみが参照できます。 |
|
関連コンテンツ