MicroK8s : Enable Dashboard2021/05/13 |
|
To enable Dashboard on MicroK8s Cluster, Configure like follows.
|
| [1] | Enable Dashboard add-on on primary Node. |
|
root@dlp:~# microk8s enable dashboard dns Enabling Kubernetes Dashboard Enabling Metrics-Server clusterrole.rbac.authorization.k8s.io/system:aggregated-metrics-reader created clusterrolebinding.rbac.authorization.k8s.io/metrics-server:system:auth-delegator created rolebinding.rbac.authorization.k8s.io/metrics-server-auth-reader created ..... ..... If RBAC is not enabled access the dashboard using the default token retrieved with: token=$(microk8s kubectl -n kube-system get secret | grep default-token | cut -d " " -f1) microk8s kubectl -n kube-system describe secret $token In an RBAC enabled setup (microk8s enable RBAC) you need to create a user with restricted permissions as shown in: https://github.com/kubernetes/dashboard/blob/master/docs/user/access-control/creating-sample-user.md Enabling DNS Applying manifest serviceaccount/coredns created configmap/coredns created deployment.apps/coredns created service/kube-dns created clusterrole.rbac.authorization.k8s.io/coredns created clusterrolebinding.rbac.authorization.k8s.io/coredns created Restarting kubelet Adding argument --cluster-domain to nodes. Adding argument --cluster-domain to nodes. Adding argument --cluster-dns to nodes. Adding argument --cluster-dns to nodes. Restarting nodes. Restarting nodes. DNS is enabledroot@dlp:~# microk8s kubectl get services -n kube-system NAME TYPE CLUSTER-IP EXTERNAL-IP PORT(S) AGE metrics-server ClusterIP 10.152.183.6 <none> 443/TCP 65s kubernetes-dashboard ClusterIP 10.152.183.42 <none> 443/TCP 62s dashboard-metrics-scraper ClusterIP 10.152.183.116 <none> 8000/TCP 61s kube-dns ClusterIP 10.152.183.10 <none> 53/UDP,53/TCP,9153/TCP 60s # confirm security token # it is the second column value on [token:] line root@dlp:~# microk8s kubectl -n kube-system describe secret $(microk8s kubectl -n kube-system get secret | grep default-token | awk '{print $1}')
Name:         default-token-lwqw5
Namespace:    kube-system
Labels:       <none>
Annotations:  kubernetes.io/service-account.name: default
              kubernetes.io/service-account.uid: 4ee6cbf7-0216-4556-a801-291a81bed0ae

Type:  kubernetes.io/service-account-token

Data
====
ca.crt:     1103 bytes
namespace:  11 bytes
token:      eyJhbGciOiJSUzI1NiIsImtpZCI6InpCZmh3QzlNZHBqYzRPMDNSYXRwMk9tMjE5bzducE9oNWdFRTBRQ1JaSUUifQ.eyJpc3MiOiJrdWJlcm5ldGVzL3NlcnZpY2VhY2NvdW50Iiwia3ViZXJuZXRlcy5pby9zZXJ2aWNlYWNjb3VudC9uYW1lc3BhY2UiOiJrdWJlLXN5c3RlbSIsImt1YmVybmV0ZXMuaW8vc2VydmljZWFjY291bnQvc2VjcmV0Lm5hbWUiOiJkZWZhdWx0LXRva2VuLWx3cXc1Iiwia3ViZXJuZXRlcy5pby9zZXJ2aWNlYWNjb3VudC9zZXJ2aWNlLWFjY291bnQubmFtZSI6ImRlZmF1bHQiLCJrdWJlcm5ldGVzLmlvL3NlcnZpY2VhY2NvdW50L3NlcnZpY2UtYWNjb3VudC51aWQiOiI0ZWU2Y2JmNy0wMjE2LTQ1NTYtYTgwMS0yOTFhODFiZWQwYWUiLCJzdWIiOiJzeXN0ZW06c2VydmljZWFjY291bnQ6a3ViZS1zeXN0ZW06ZGVmYXVsdCJ9.UY10KPgYKKbgz_ASuayMYrA6wWKktEP03yxv6IxbJ3QQ9rbGhaQ-GItmKz9W7fTD8loBnFKJ5o3_BPpHQ592u3qtEc56Y9CZDT2SW5BLSw0rjJFJGq0iqOrQpq4HNDKoPd-ab6PfJlvQkgEsMerfjEU3pW2E5iXCItPGHaI4OjKU8nl5pHvfDUmX7F4U4Dj5gE-b1v1nn-k00uOkQTNb9XlBMqs22r-J1Ic8xJuRmxoNaPniGL3pbcn6Vv2z3byRTj_6jzxYT0TtkbViS4t0_PzKF8d24L-mGl2_FDzYlbCeOtXBJXwWzgkgbXxxkz_NqoPbcuYu-NbNXMATpDQY3g
# set port-forwarding to enable external access root@dlp:~# microk8s kubectl port-forward -n kube-system service/kubernetes-dashboard --address 0.0.0.0 10443:443 Forwarding from 0.0.0.0:10443 -> 8443 |
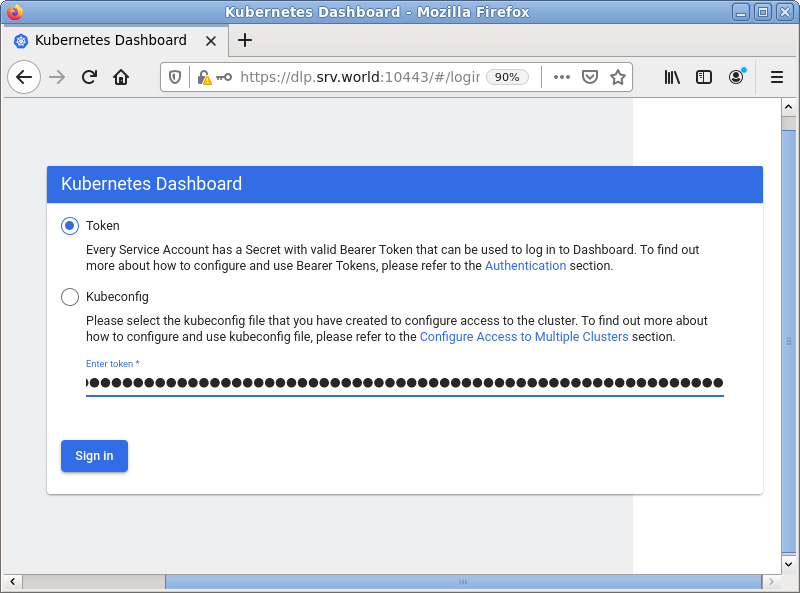
| [2] | Access to [https://(MicroK8s primary node's Hostname or IP address):10443/] with an web browser on any Client computer in local network. Copy and paste the security token you confirmed on [1] to [Enter token] section and Click [Sing In] button. |
|
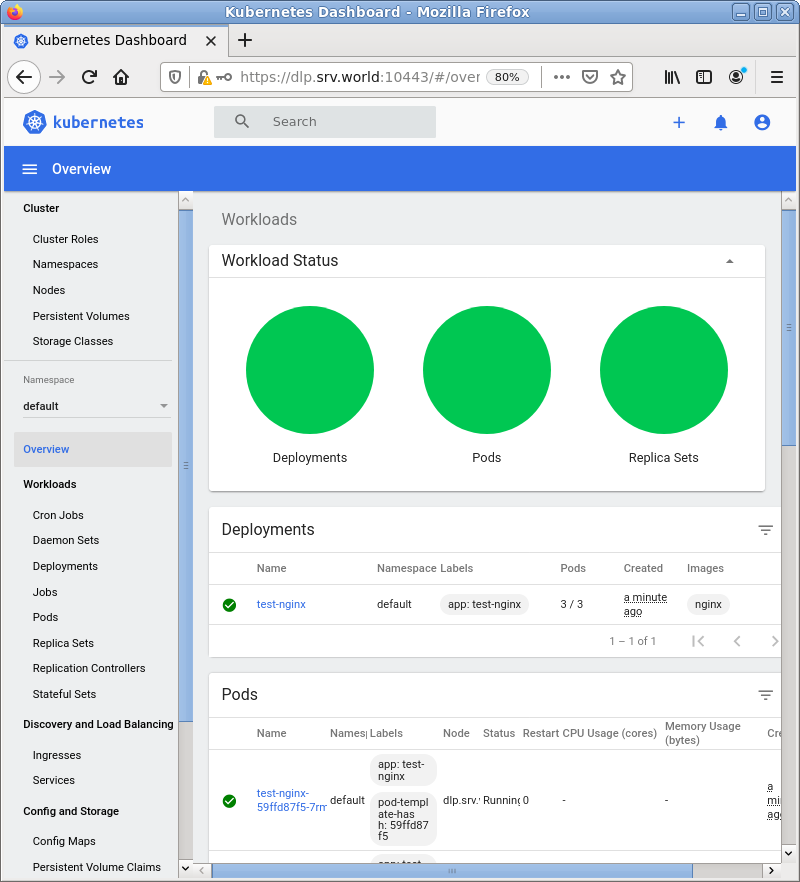
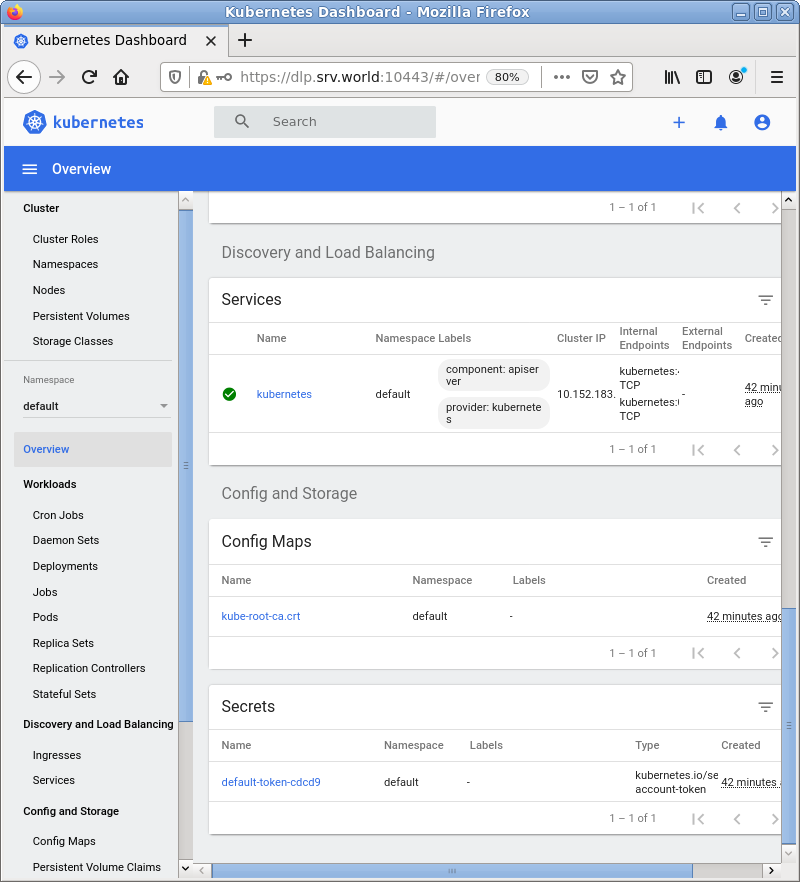
| [3] | After successfully authenticated, MicroK8s Cluster Dashboard is displayed. |
|
|
Matched Content