FreeBSD 14 : Install2023/12/13 |
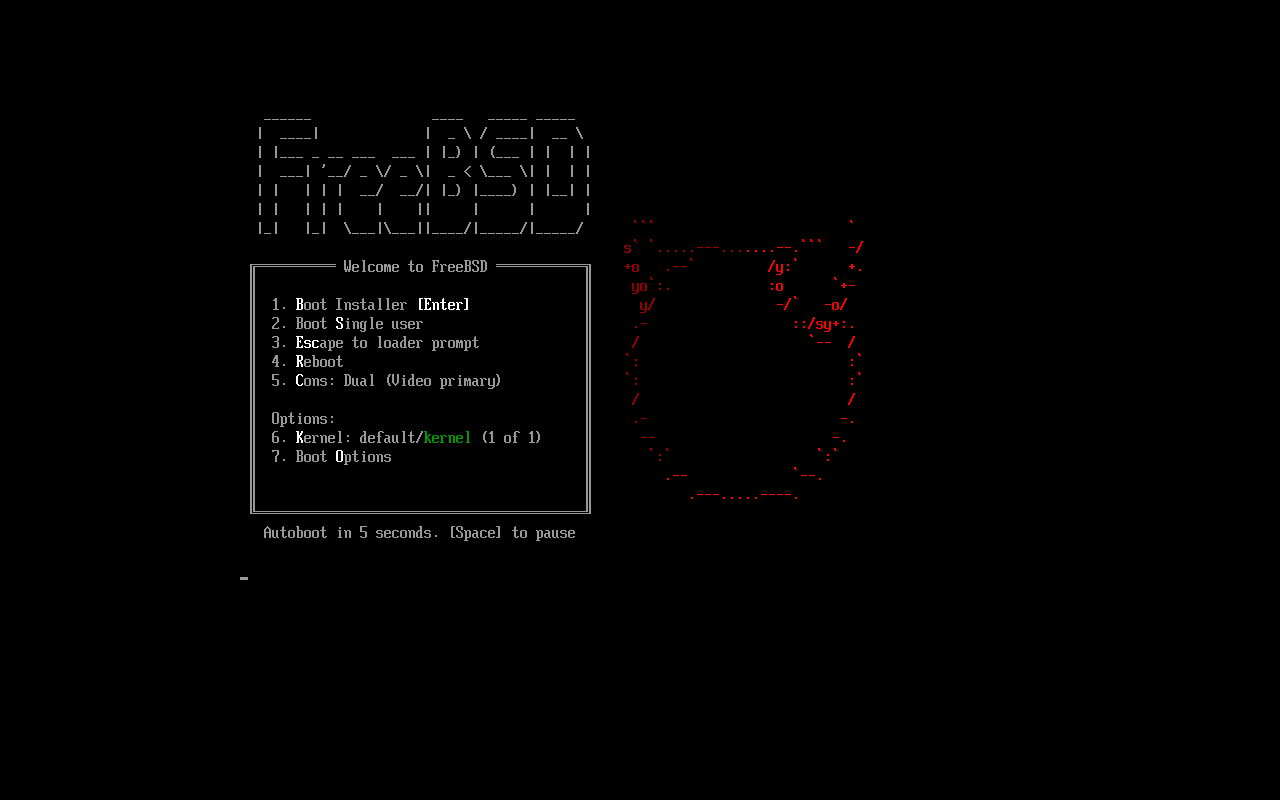
| [1] | Insert the installation USB memory stick or DVD media into your computer and start it. Then FreeBSD 14 installer will start and the following screen will be displayed. To proceed with the installation, press the [Enter] key. |
|
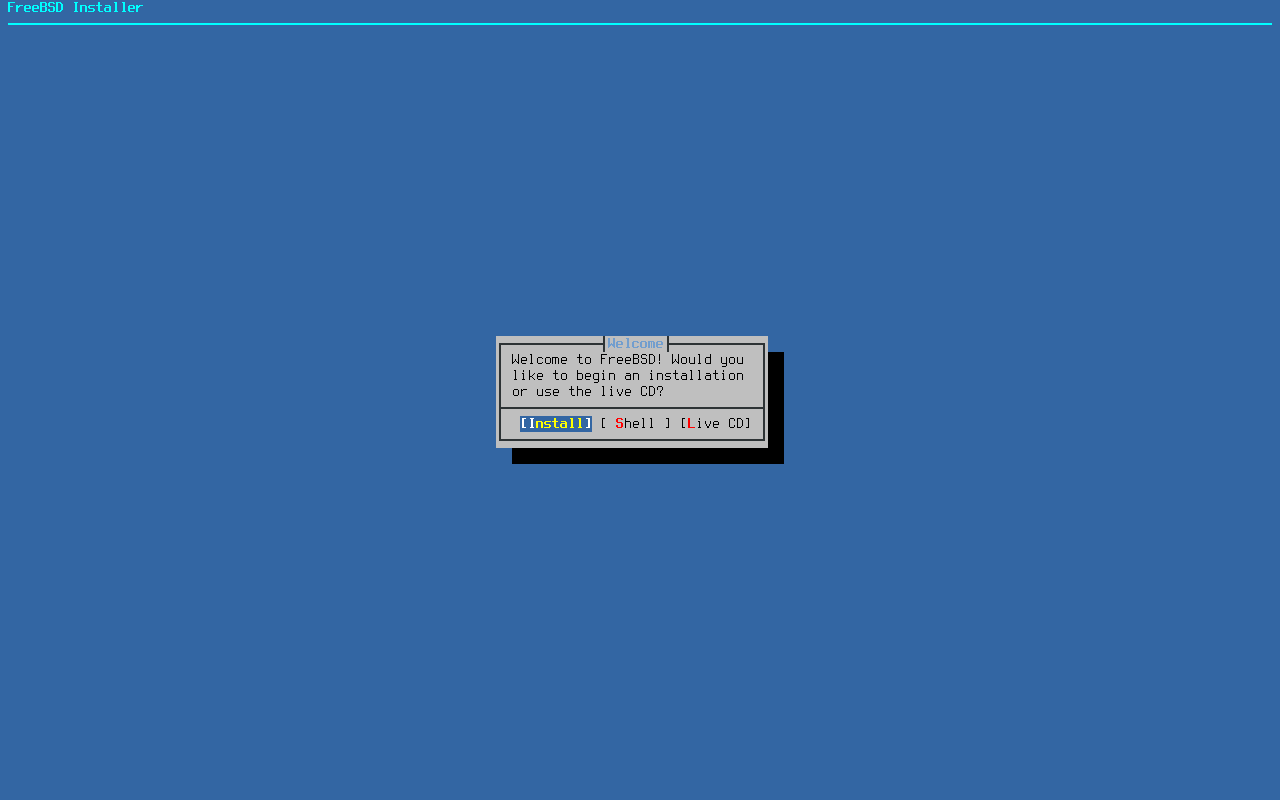
| [2] | To proceed with the installation, select [Install] and press the [Enter] key. |
|
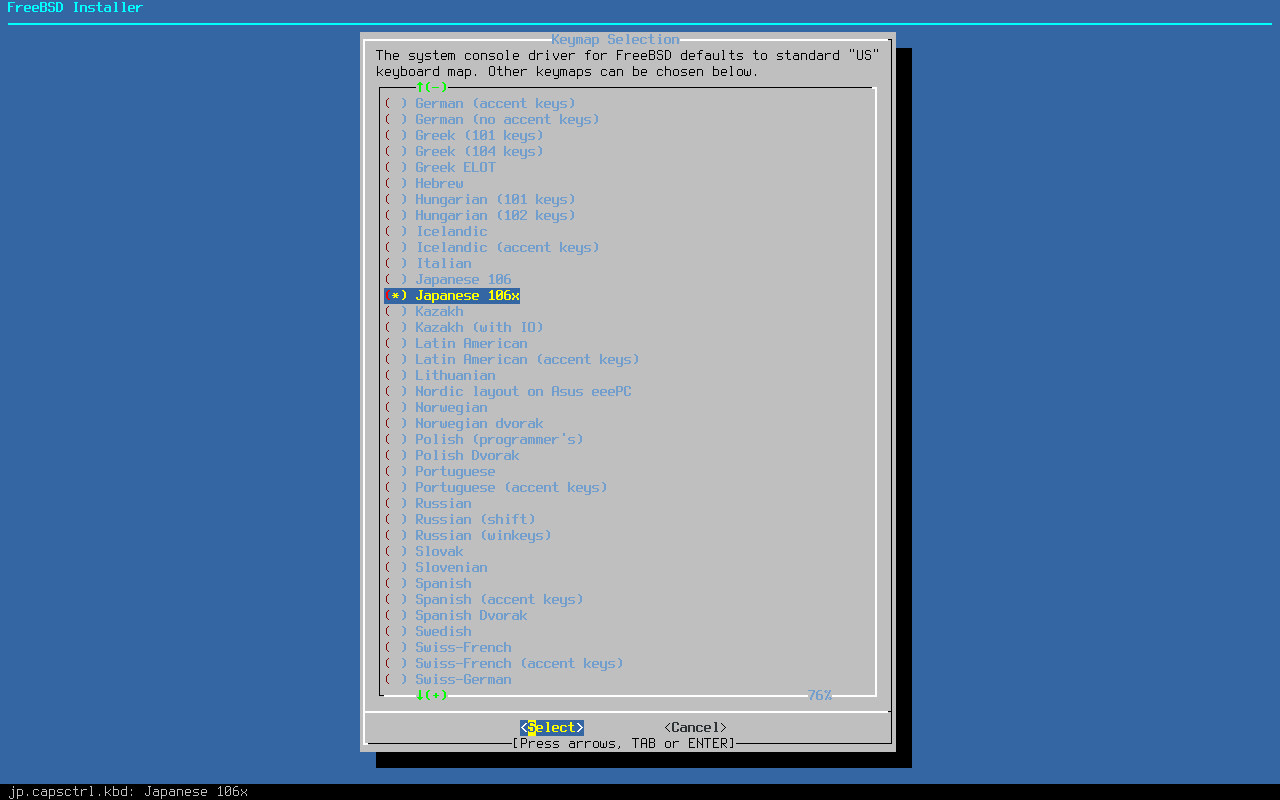
| [3] | This is the Keyboard map setting section. Select the keyboard map for your language by pressing the [Space] key. |
|
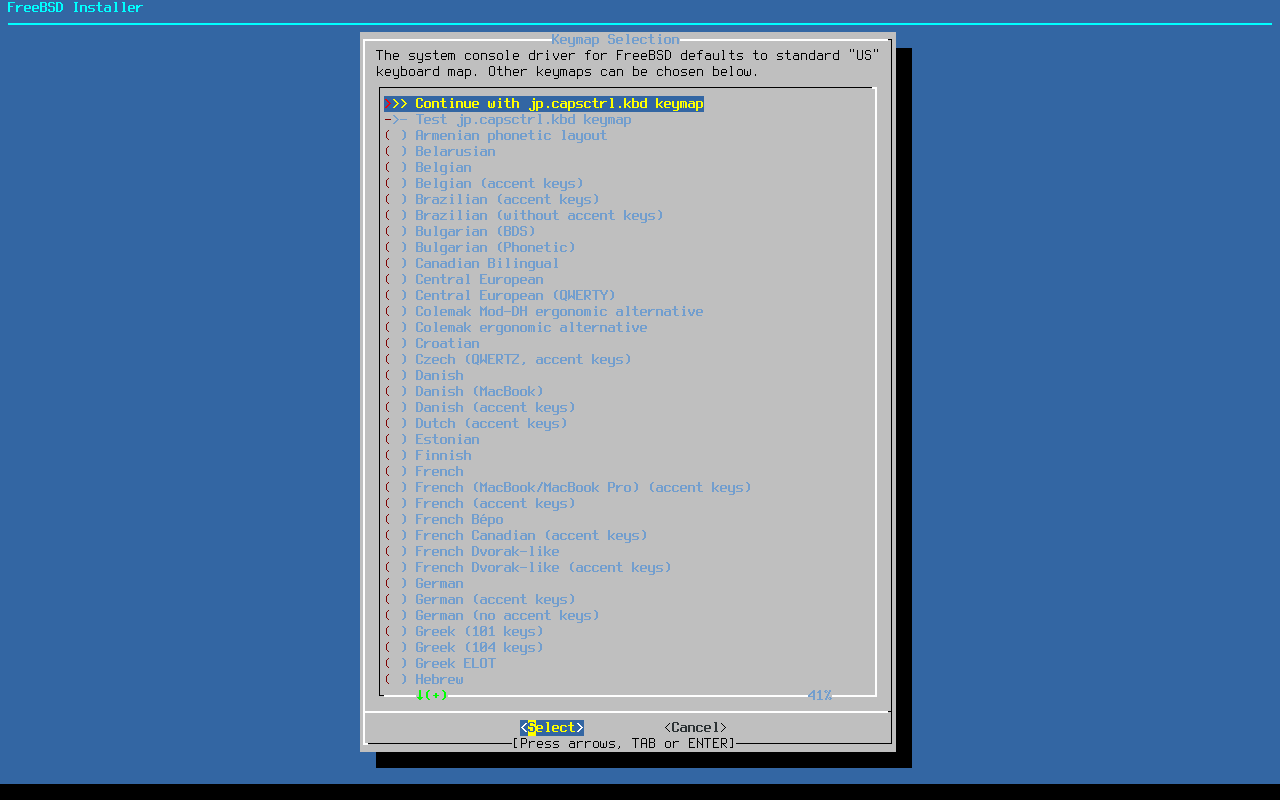
| [4] | To proceed to the next step, move the cursor to [Continue with *** keymap] at the top and press the [Enter] key. |
|
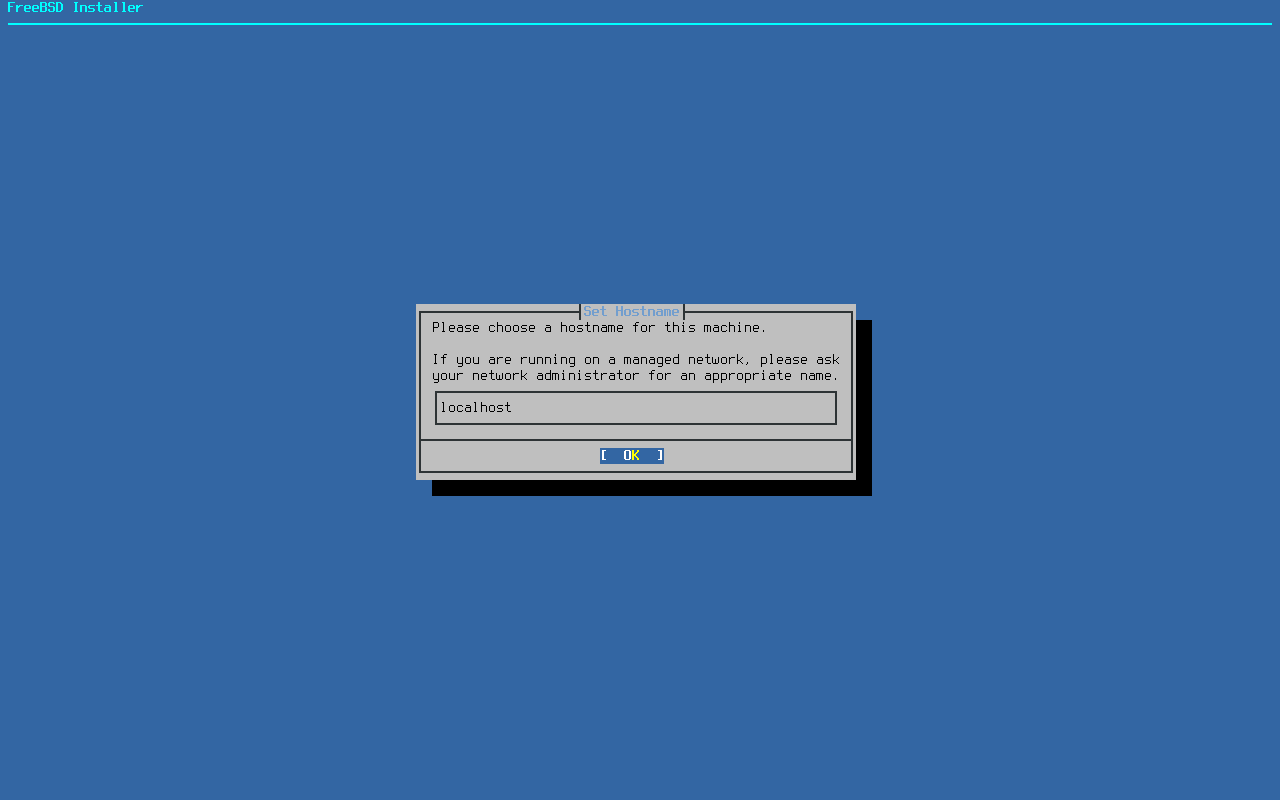
| [5] | This is the host name setting section for the computer. Enter any name and press the [Enter] key. It can be changed after installation. |
|
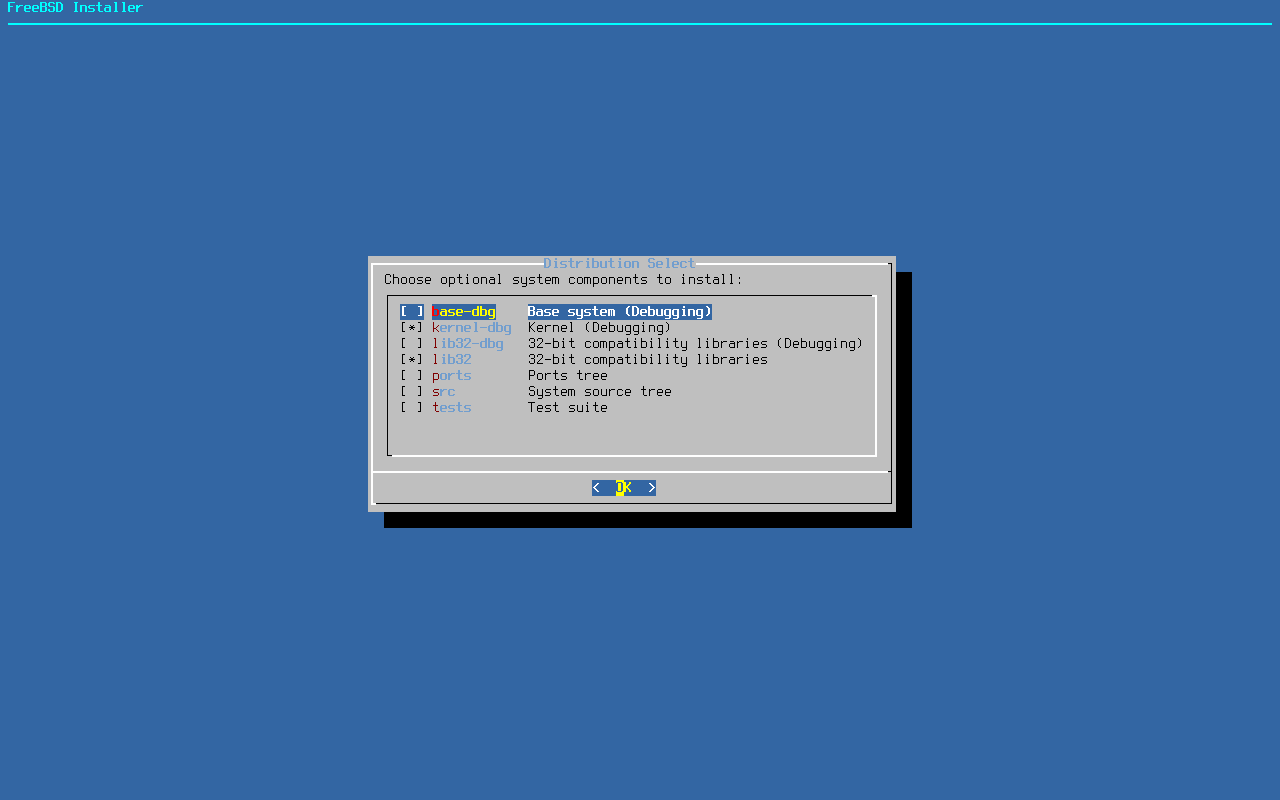
| [6] | If you like to add system components, select it from the list. If you have no specific requirements, you can leave it at the default. |
|
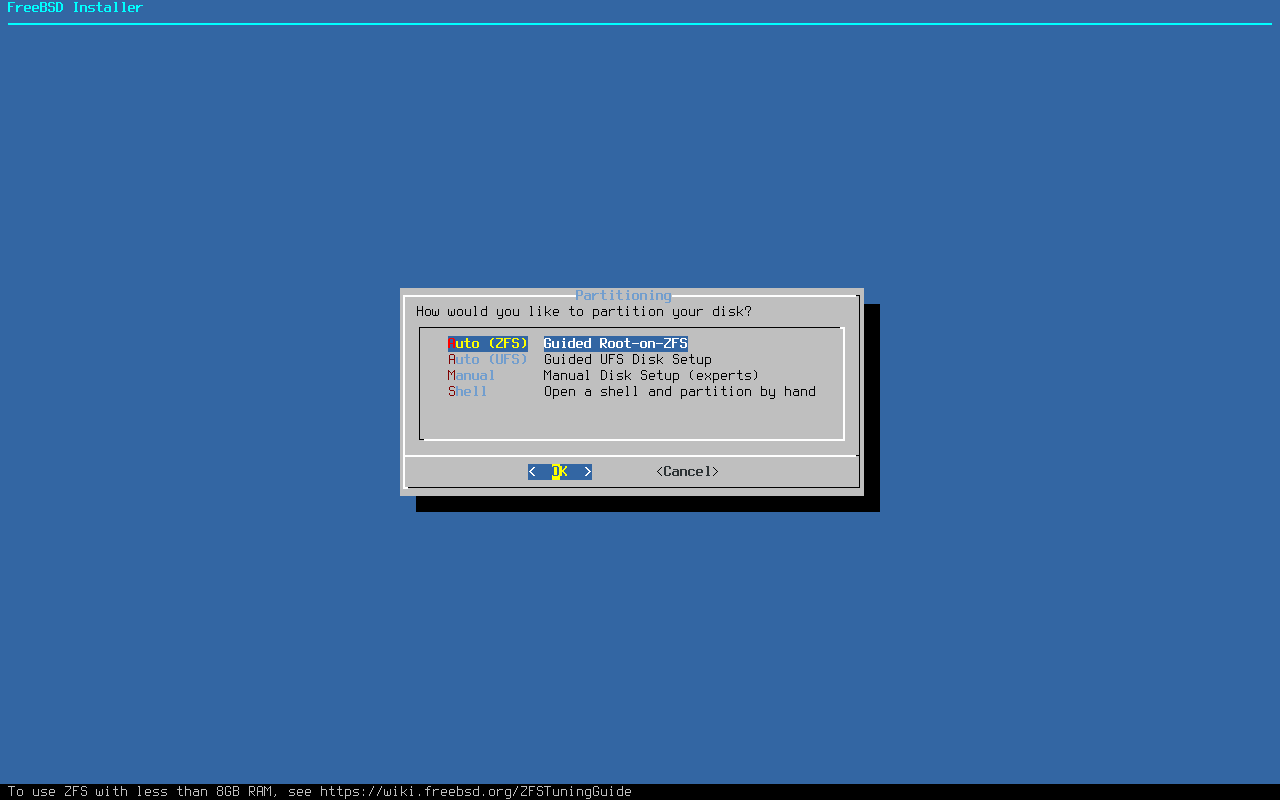
| [7] | This is the disk partitioning setting section. From the top, automatic configuration using the ZFS file system, automatic configuration using the UFS file system, manual configuration, and manual configuration on the shell. Set as your needs. In this example, proceed with [Auto (ZFS)]. |
|
| [8] | This is a confirmation of the previous settings. Check the contents, and if no problems, select [Install] and press the [Enter] key. |
|
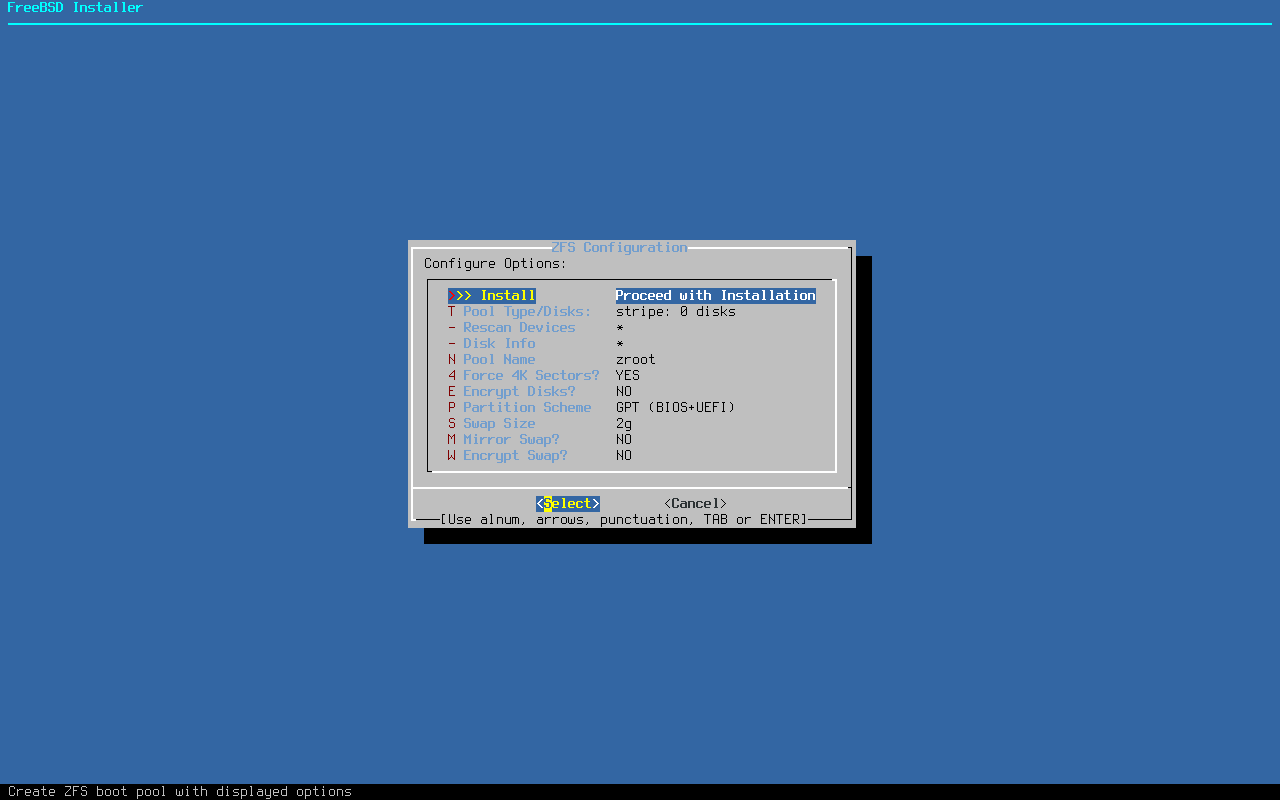
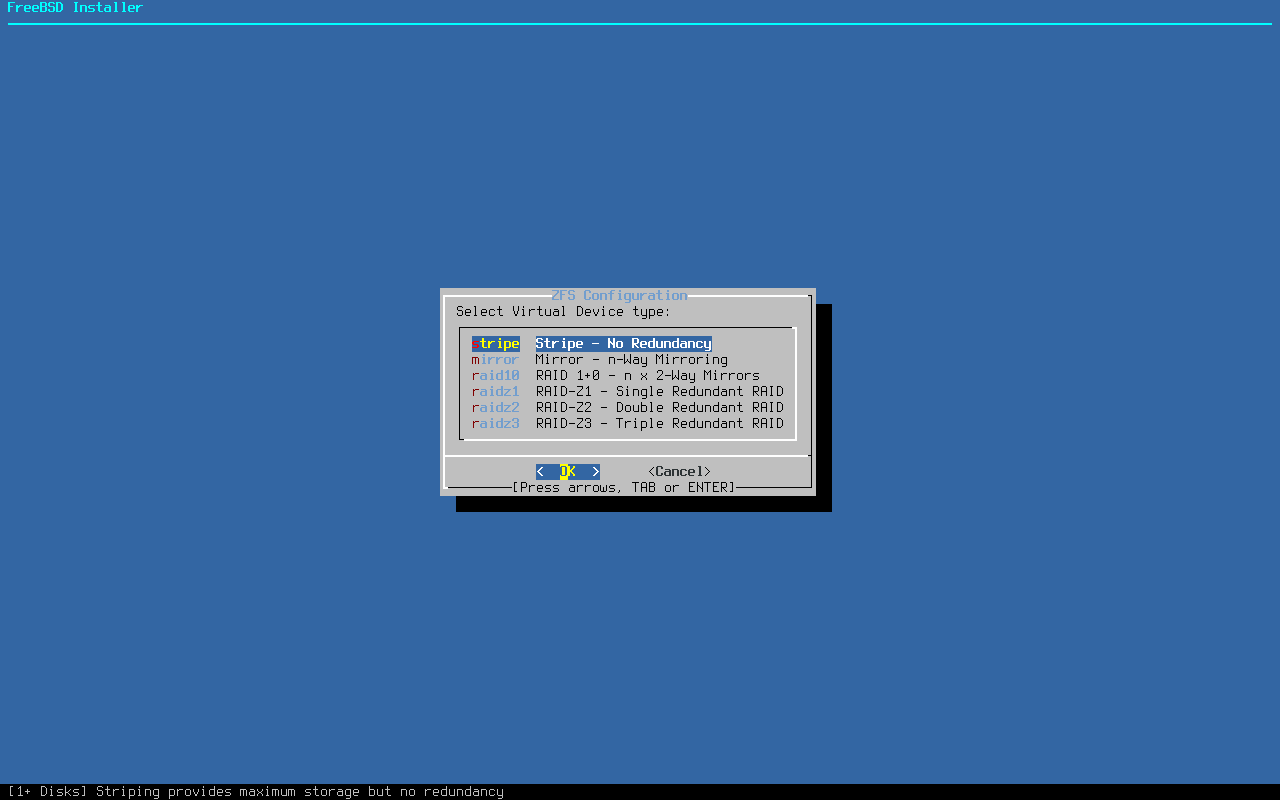
| [9] | If you selected ZFS in [8] section, set the ZFS configuration. Select mirror configurations or more redundant RAID levels as needed. Redundant configurations require two or more disks installed in your computer, so if only one disk is installed, the only option is [Stripe]. Note that if you select UFS in [8] section, a partition setting screen similar to that often seen in other OS will appear. |
|
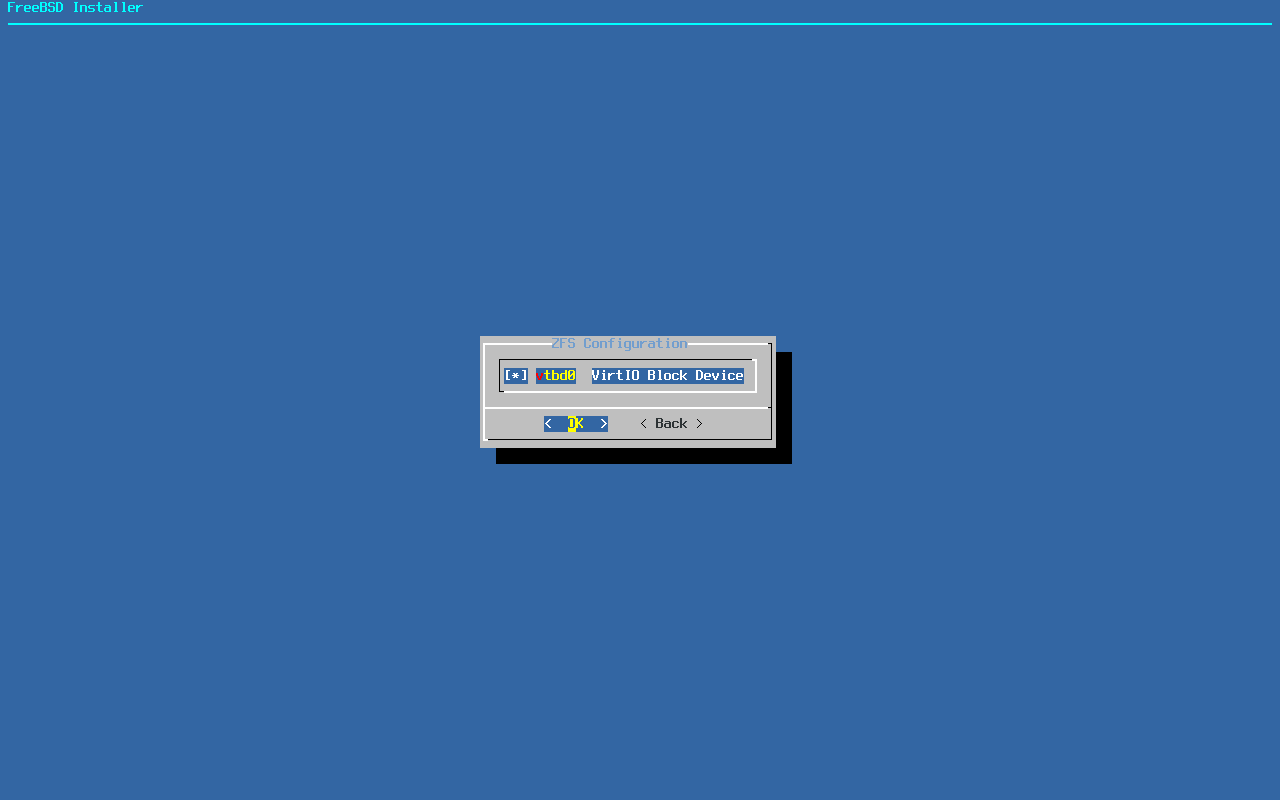
| [10] | If you selected ZFS in [8] section, Select a disk to write the root partition. Similar choices are required even if you choose UFS. |
|
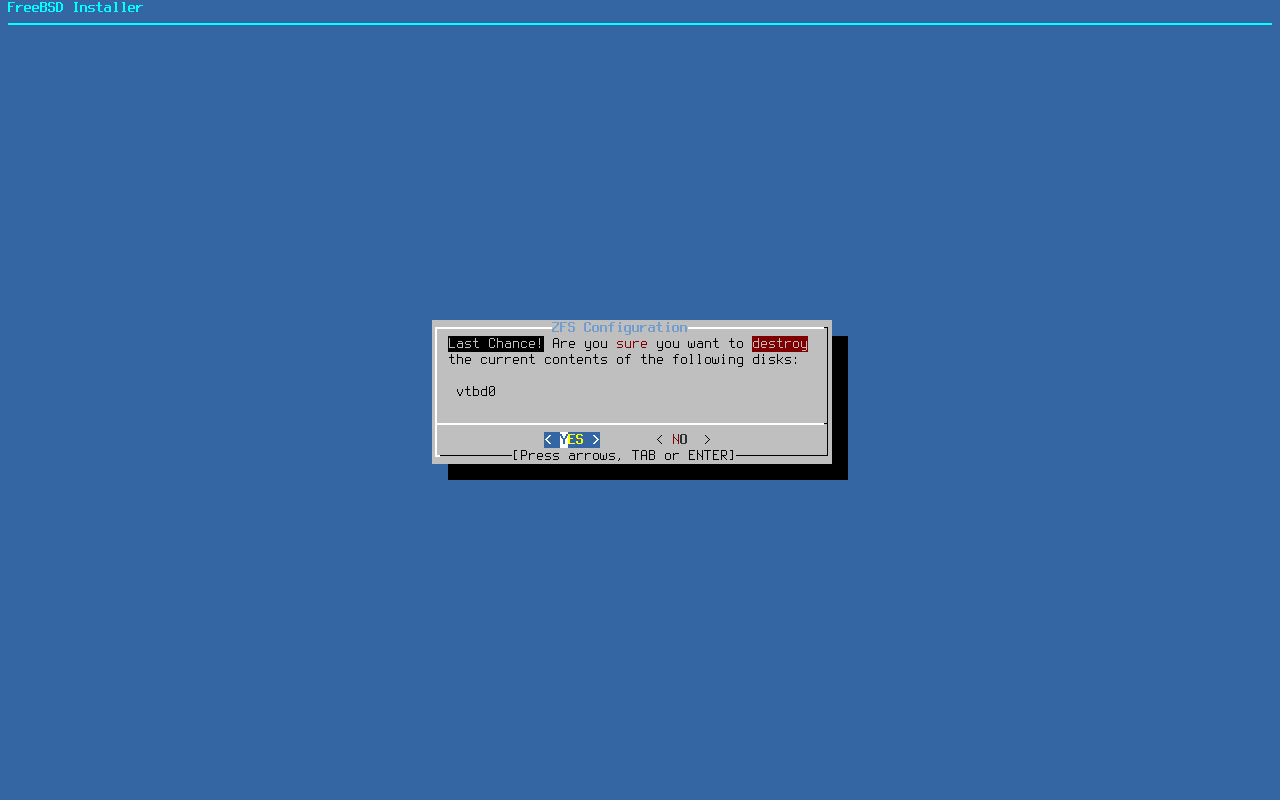
| [11] | This is final confirmation that existing data on the disk you selected in [10] section will be erased by disk formatting. If you agree, select [Yes] and press the [Enter] key. |
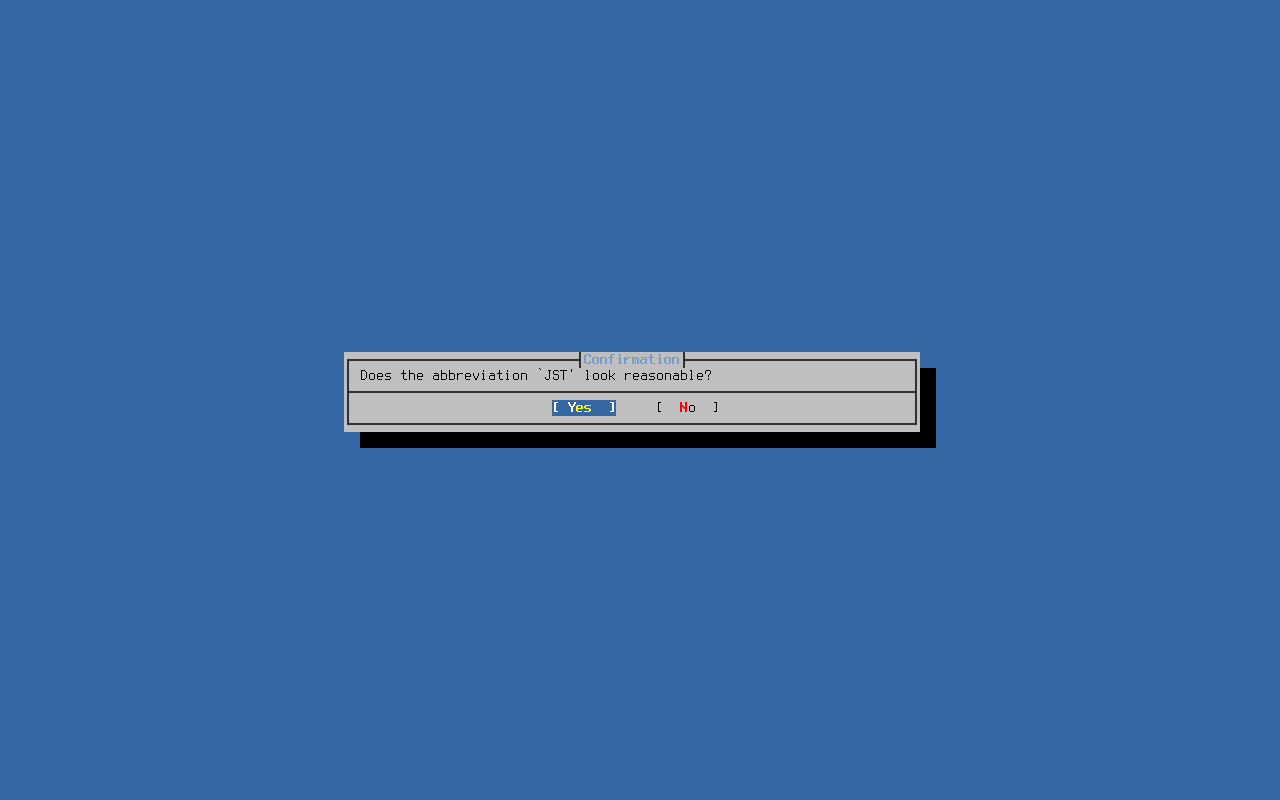
|
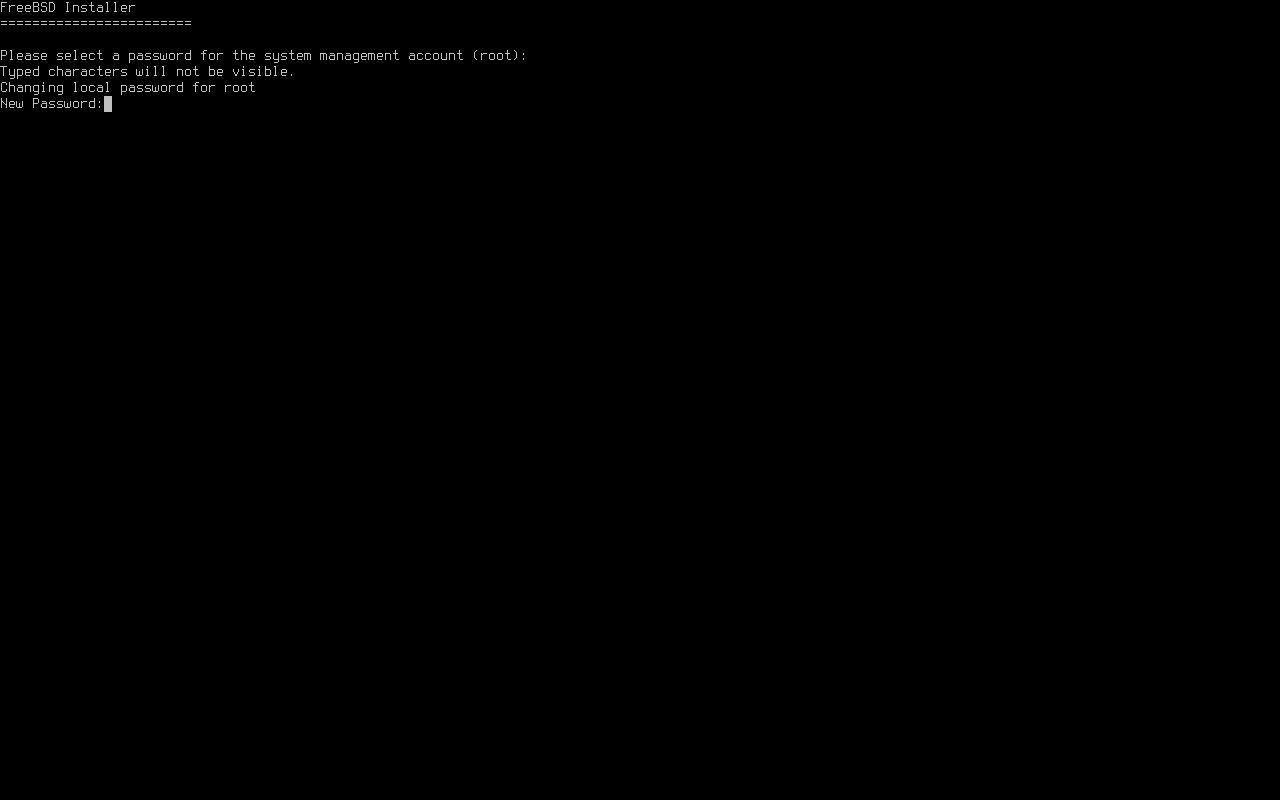
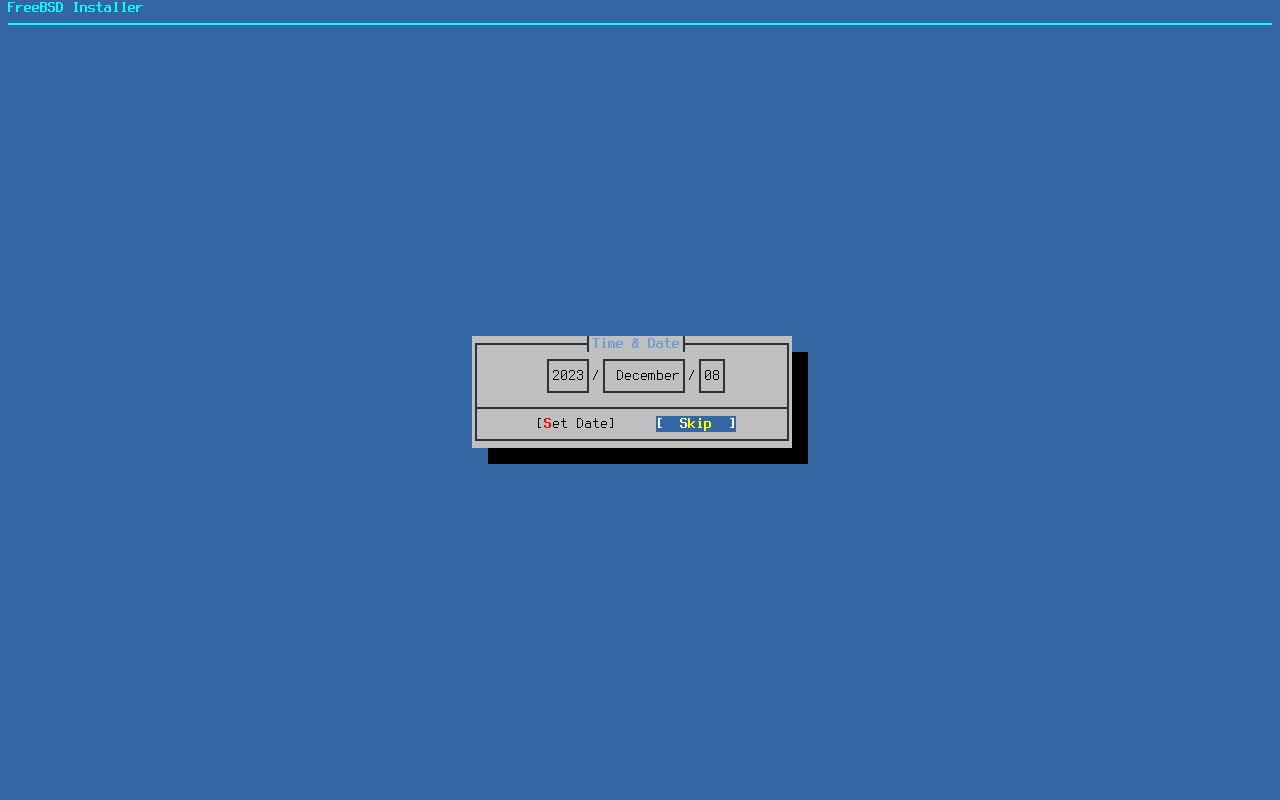
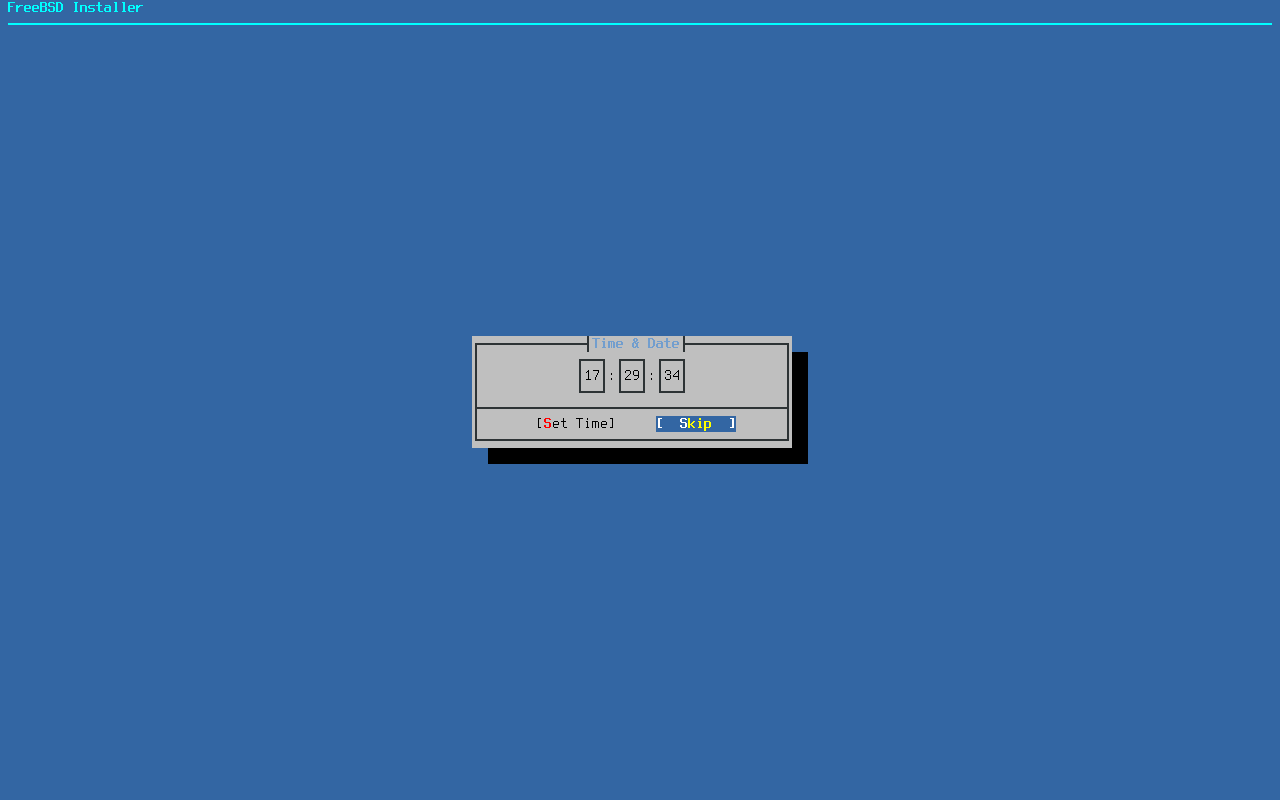
| [12] | After the installation process progresses, Set root password. Input any password you like. |
|
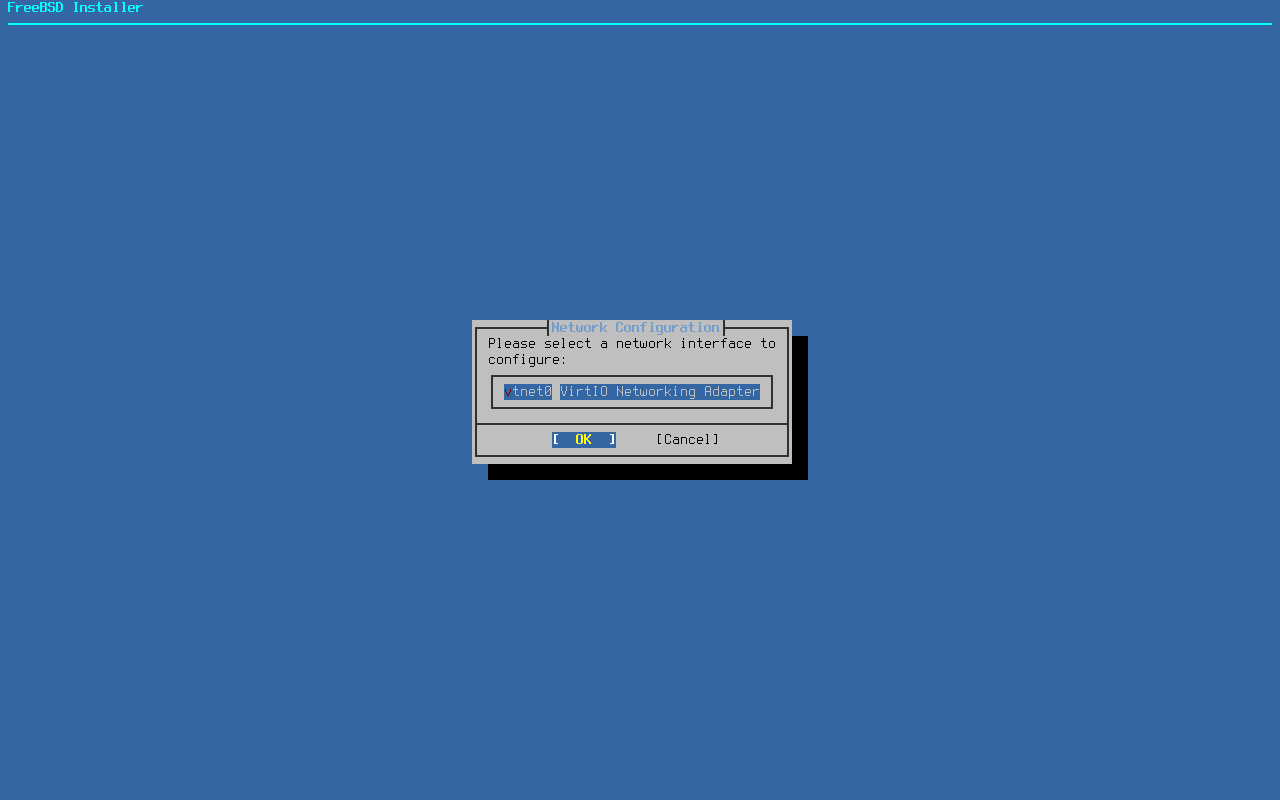
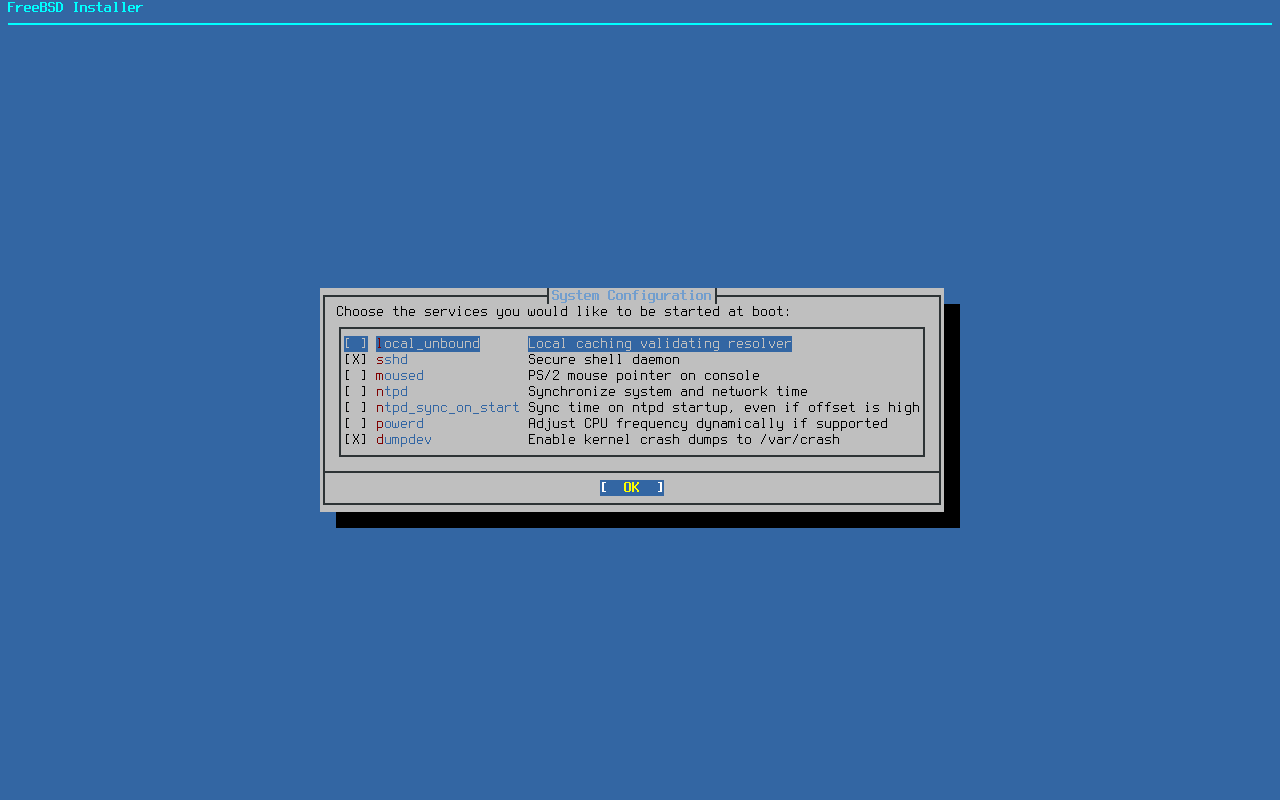
| [13] | Select the interface to configure the network. |
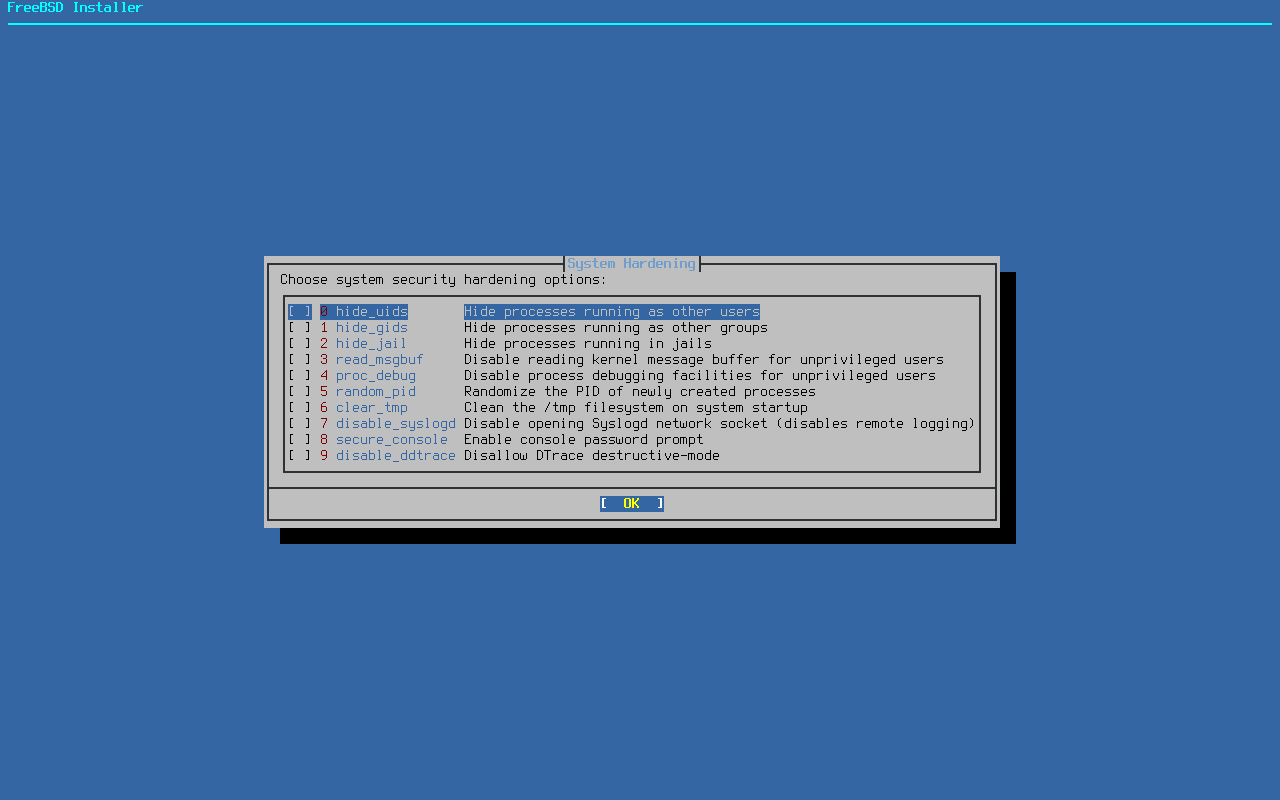
|
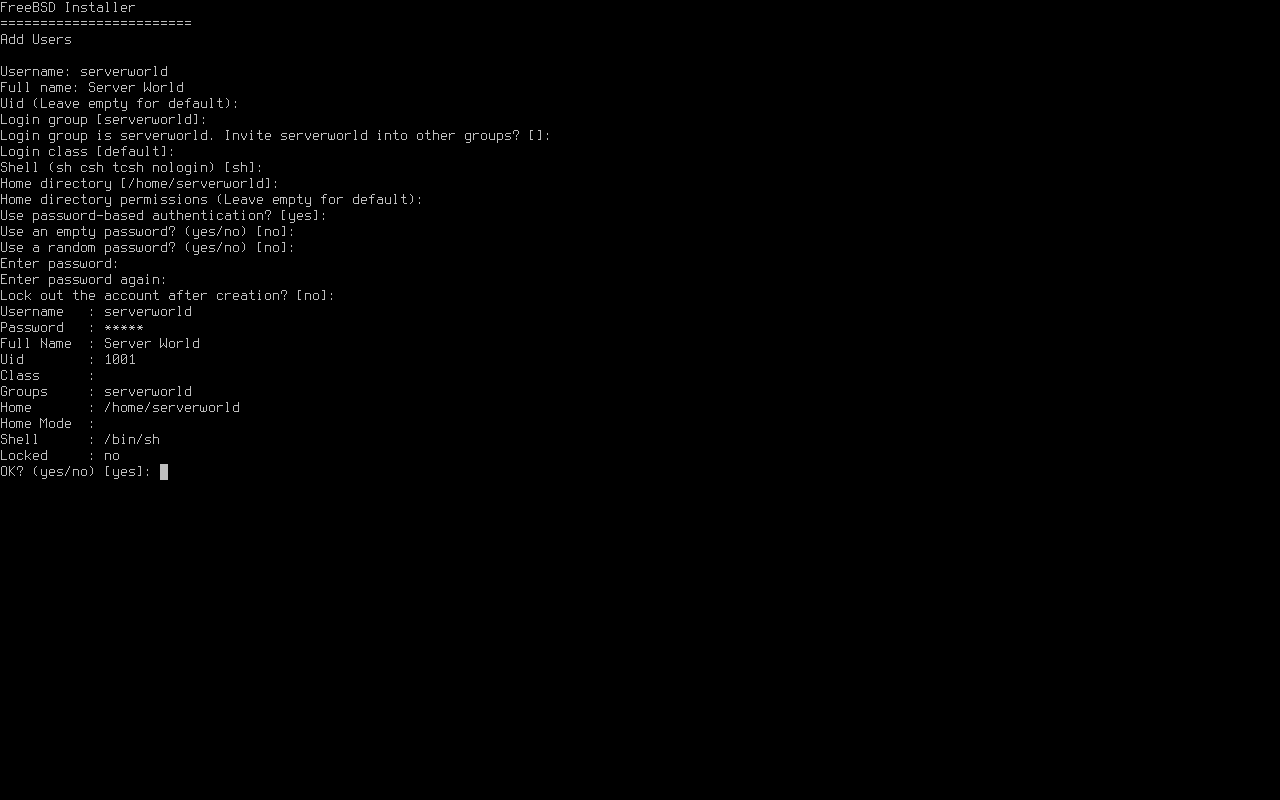
| [14] | Select whether to configure IPv4 network for the selected network interface. |

|
| [15] | When setting IPv4 to the selected network interface, select whether to use IP address assignment by [DHCP]. Select [Yes] if a DHCP server exists in your local network and also you like to use automatic IP address assignment. |

|
| [16] | Select whether to configure an IPv6 network for the selected network interface. |
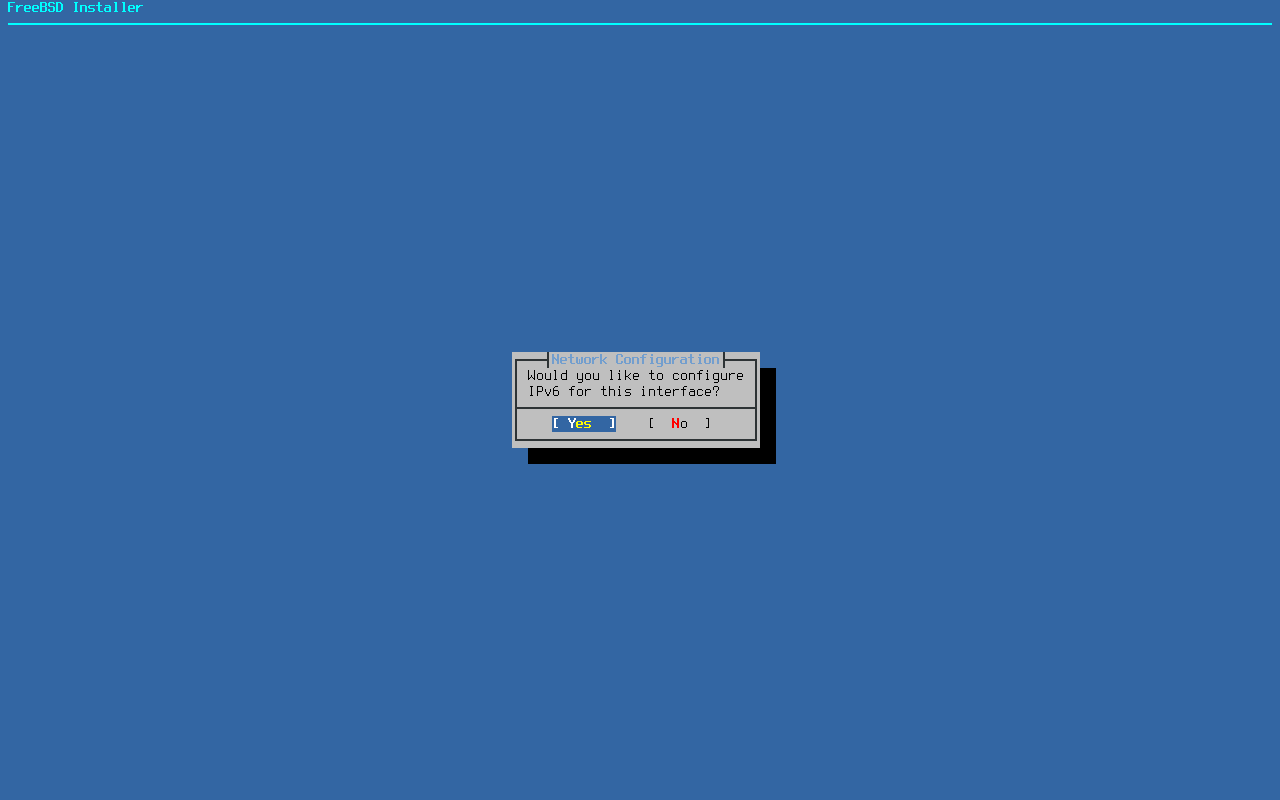
|
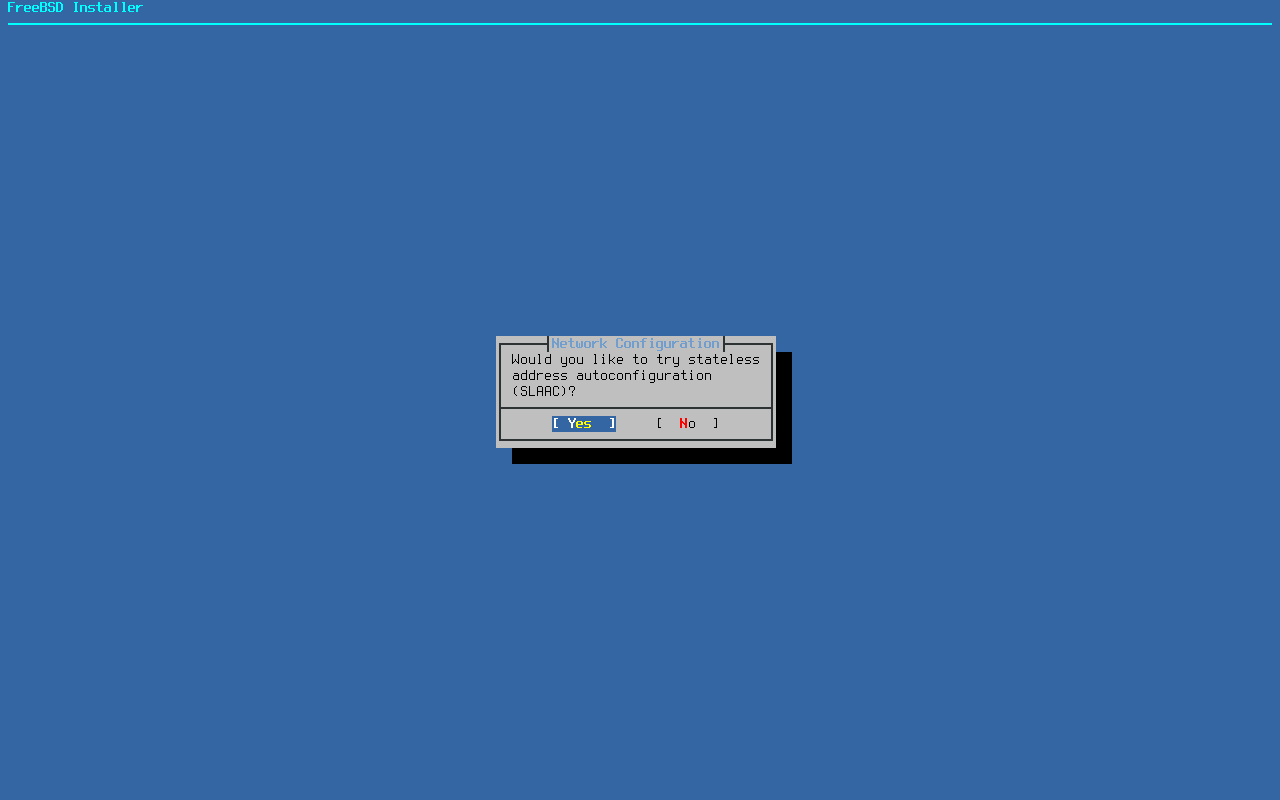
| [17] | When configuring IPv6 for the selected network interface, select whether to apply automatic IPv6 address configuration using SLAAC (Stateless Address Auto Configuration). |
|
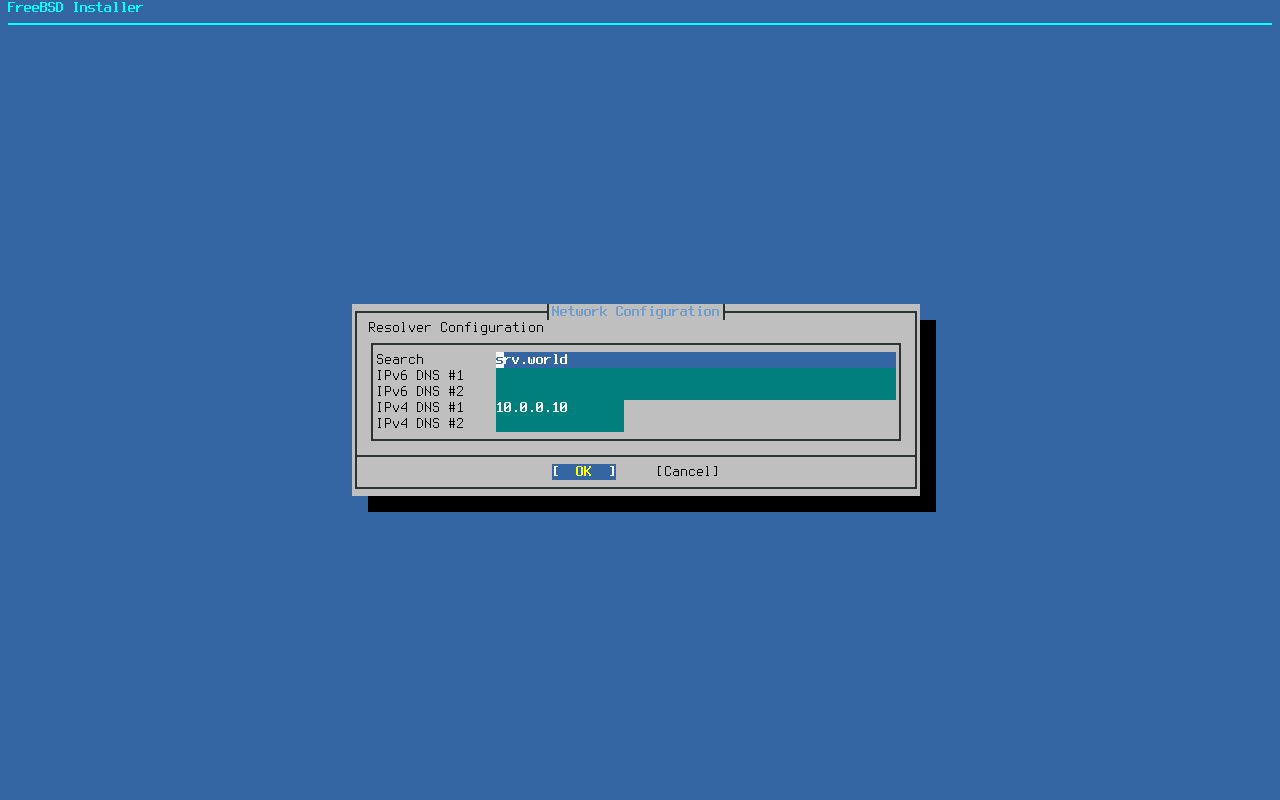
| [18] | This is the settings related to name resolution. The automatically searched results will be displayed. If you agree, press the [Enter] key, or edit the settings if you like to configure them manually. |
|
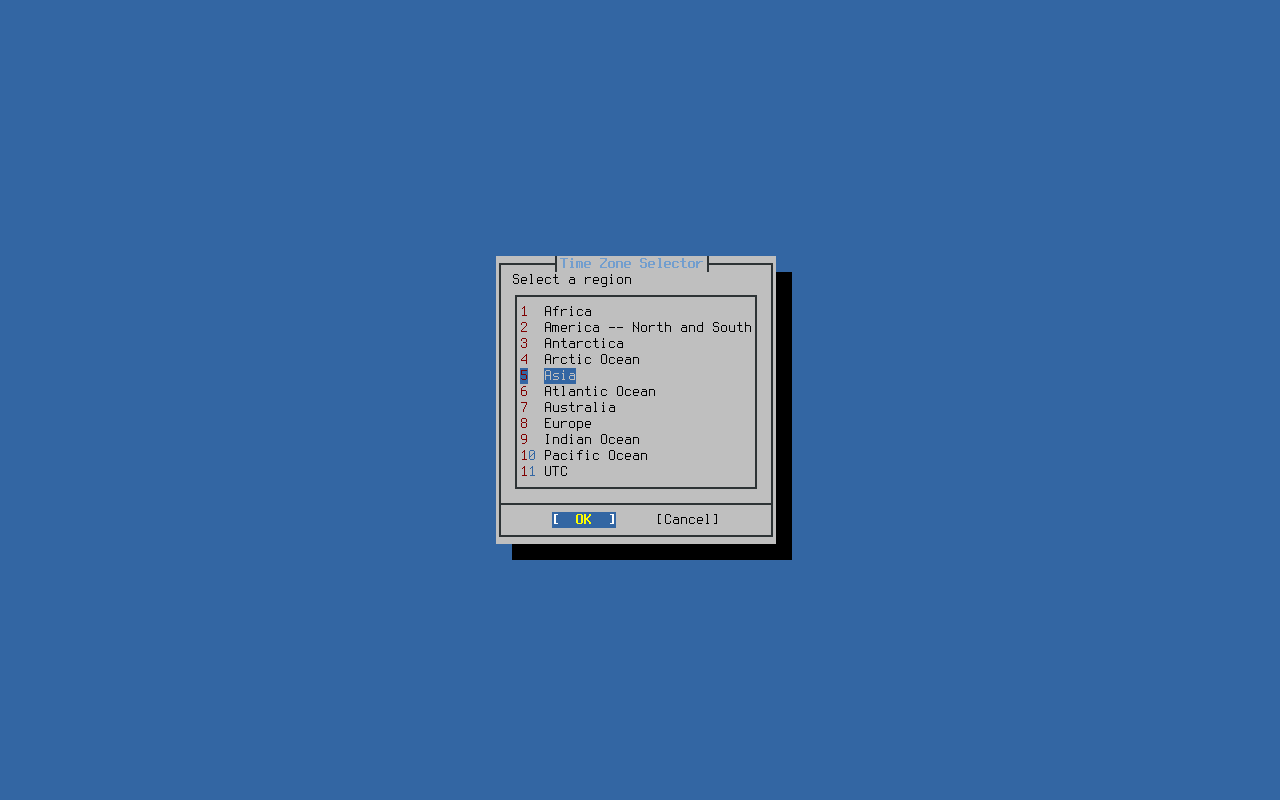
| [19] | This is the Time zone setting section. Select the time zone to which you belong. |
|
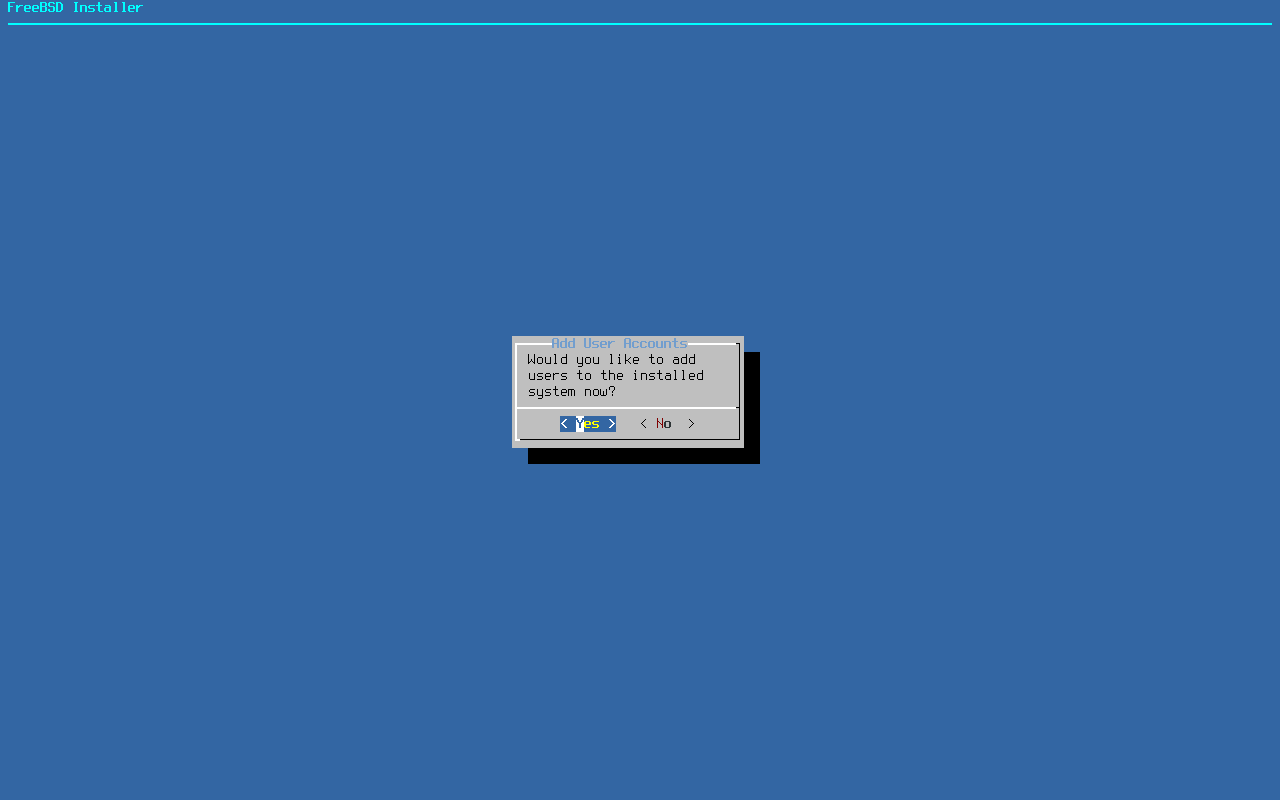
| [20] | Select whether to add user accounts. |
|
| [21] | Continuing with the time zone settings in [19] section. Select your country. |

|
| [22] | Continuing with the time zone settings. Check whether the display settings are correct. |
|
| [23] | This is the date setting. It will be set automatically depending on the selected time zone, but you can edit it if you like to set it manually. |
|
| [24] | This is the time setting. It will be set automatically depending on the selected time zone, but you can edit it if you like to set it manually. |
|
| [25] | Select services to enable automatic startup at system startup. It can be changed even after installation. In this example, proceed with the defaults as shown below. |
|
| [26] | Additional settings related to system security settings. It can be changed even after installation. In this example, proceed with the defaults as shown below. |
|
| [27] | If you selected to add user accounts in [20] section, input the settings such as the user name and password to be added. |
|
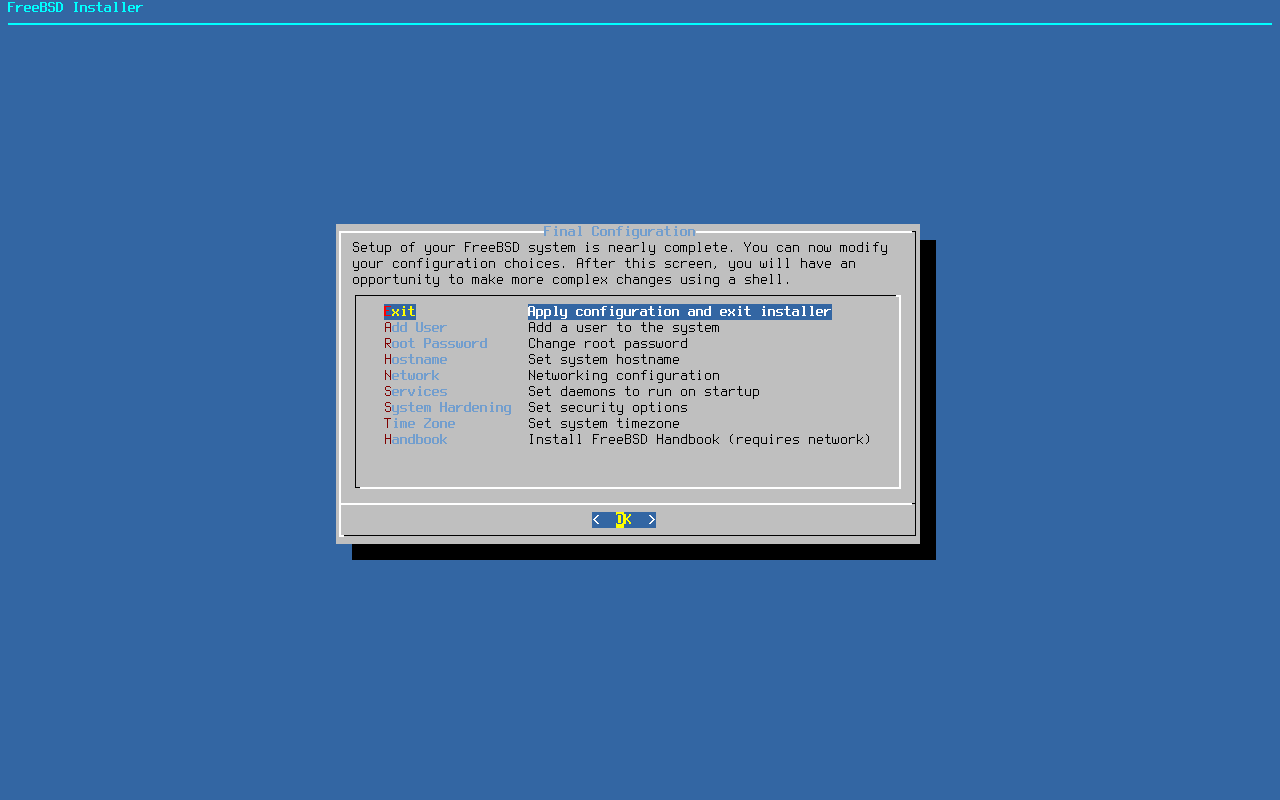
| [28] | This is the final configuration of the system. If you line to redo the previous settings, you can select them from the list and reconfigure them. If no problem, select [Apply configuration ***] and press the [Enter] key. |
|
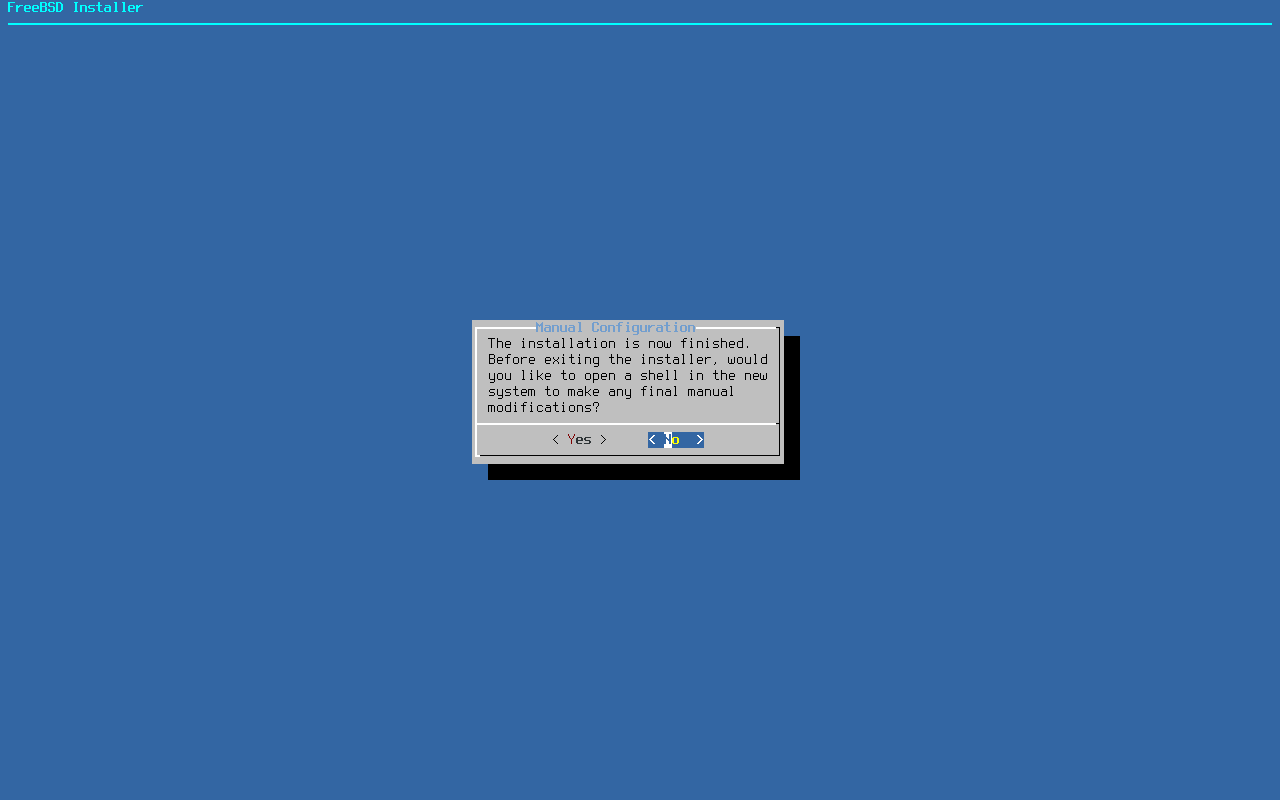
| [29] | Installation finished. Select [No] to restart computer immediately, or Select [Yes] to open a shell to perform additional manual configuration before restarting the computer. |
|
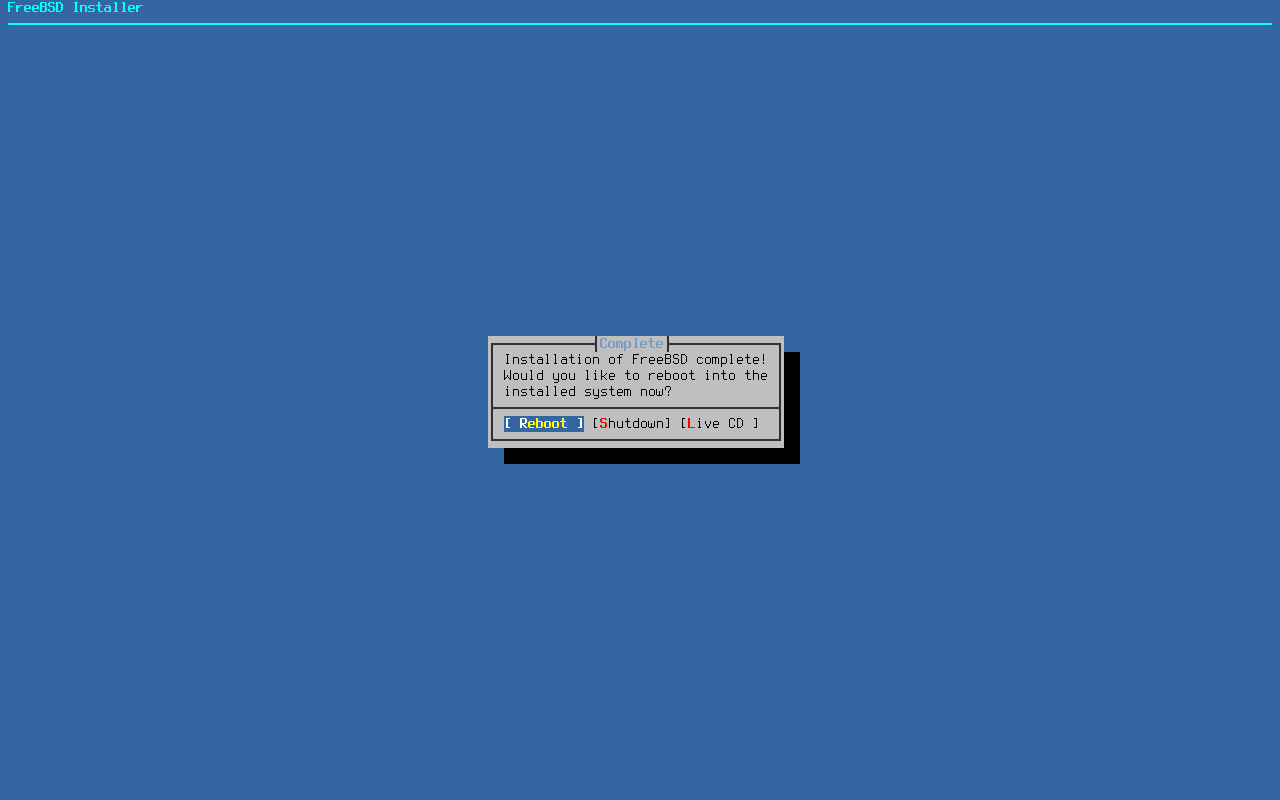
| [30] | You can choose whether to restart the system or shutdown and exit. |
|
| [31] | If you restart computer, a login prompt will appear. Check whether you can login using the root user account. If successfully logged in, your FreeBSD installation finished. |
|  ______               ____   _____ _____
  |  ____|             |  _ \ / ____|  __ \
  | |___ _ __ ___  ___ | |_) | (___ | |  | |
  |  ___| '__/ _ \/ _ \|  _ < \___ \| |  | |
  | |   | | |  __/  __/| |_) |____) | |__| |
  | |   | | |    |    ||     |      |      |
  |_|   |_|  \___|\___||____/|_____/|_____/      ```                        `
                                                s` `.....---.......--.```   -/
 +========== Welcome to FreeBSD ===========+    +o   .--`         /y:`      +.
 |                                         |     yo`:.            :o      `+-
 |  1. Boot Multi user [Enter]             |      y/               -/`   -o/
 |  2. Boot Single user                    |     .-                  ::/sy+:.
 |  3. Escape to loader prompt             |     /                     `--  /
 |  4. Reboot                              |    `:                          :`
 |  5. Cons: Dual (Video primary)          |    `:                          :`
 |                                         |     /                          /
 |  Options:                               |     .-                        -.
 |  6. Kernel: default/kernel (1 of 1)     |      --                      -.
 |  7. Boot Options                        |       `:`                  `:`
 |                                         |         .--             `--.
 |                                         |            .---.....----.
 +=========================================+
   Autoboot in 1 seconds. [Space] to pause


FreeBSD/amd64 (localhost) (ttyu0)

.....
.....

FreeBSD/amd64 (localhost) (ttyu0)

login: root
Password:
Last login: Fri Dec 15 09:58:04 on ttyu0
FreeBSD 14.0-RELEASE (GENERIC) #0 releng/14.0-n265380-f9716eee8ab4: Fri Nov 10 05:57:23 UTC 2023

Welcome to FreeBSD!

Release Notes, Errata: https://www.FreeBSD.org/releases/
Security Advisories:   https://www.FreeBSD.org/security/
FreeBSD Handbook:      https://www.FreeBSD.org/handbook/
FreeBSD FAQ:           https://www.FreeBSD.org/faq/
Questions List:        https://www.FreeBSD.org/lists/questions/
FreeBSD Forums:        https://forums.FreeBSD.org/

Documents installed with the system are in the /usr/local/share/doc/freebsd/
directory, or can be installed later with:  pkg install en-freebsd-doc
For other languages, replace "en" with a language code like de or fr.

Show the version of FreeBSD installed:  freebsd-version ; uname -a
Please include that output and any error messages when posting questions.
Introduction to manual pages:  man man
FreeBSD directory layout:      man hier

To change this login announcement, see motd(5).
root@localhost:~ #
|
Matched Content