Elastic Stack 7 : X-Pack.Security2019/06/18 |
|
Configure X-Pack.Security feature.
|
|
| [1] | Enable X-Pack.Security feature on all Elasticsearch Nodes. And also set password on an Elasticsearch Master Node. |
|
[root@dlp ~]# /usr/share/elasticsearch/bin/elasticsearch-setup-passwords interactive
Initiating the setup of passwords for reserved users elastic,apm_system,kibana,logstash_system,beats_system,remote_monitoring_user.
You will be prompted to enter passwords as the process progresses.
Please confirm that you would like to continue [y/N] y

Enter password for [elastic]:
Reenter password for [elastic]:
Enter password for [apm_system]:
Reenter password for [apm_system]:
Enter password for [kibana]:
Reenter password for [kibana]:
Enter password for [logstash_system]:
Reenter password for [logstash_system]:
Enter password for [beats_system]:
Reenter password for [beats_system]:
Enter password for [remote_monitoring_user]:
Reenter password for [remote_monitoring_user]:
Changed password for user [apm_system]
Changed password for user [kibana]
Changed password for user [logstash_system]
Changed password for user [beats_system]
Changed password for user [remote_monitoring_user]
Changed password for user [elastic]
|
| [2] | On an Elasticsearch Master Node in Cluster, Generate CA and Certificate. |
|
[root@dlp ~]# /usr/share/elasticsearch/bin/elasticsearch-certutil ca
This tool assists you in the generation of X.509 certificates and certificate
signing requests for use with SSL/TLS in the Elastic stack.

The 'ca' mode generates a new 'certificate authority'
This will create a new X.509 certificate and private key that can be used
to sign certificate when running in 'cert' mode.

Use the 'ca-dn' option if you wish to configure the 'distinguished name'
of the certificate authority

By default the 'ca' mode produces a single PKCS#12 output file which holds:
    * The CA certificate
    * The CA's private key

If you elect to generate PEM format certificates (the -pem option), then the output will
be a zip file containing individual files for the CA certificate and private key

# specify output file name (if kepp default, Enter with empty)
Please enter the desired output file [elastic-stack-ca.p12]:
# set password
Enter password for elastic-stack-ca.p12 :
# --ca [generated CA file] [root@dlp ~]# /usr/share/elasticsearch/bin/elasticsearch-certutil cert --ca elastic-stack-ca.p12
This tool assists you in the generation of X.509 certificates and certificate
signing requests for use with SSL/TLS in the Elastic stack.

The 'ca' mode generates a new 'certificate authority'
This will create a new X.509 certificate and private key that can be used
to sign certificate when running in 'cert' mode.

Use the 'ca-dn' option if you wish to configure the 'distinguished name'
of the certificate authority

By default the 'ca' mode produces a single PKCS#12 output file which holds:
    * The CA certificate
    * The CA's private key

If you elect to generate PEM format certificates (the -pem option), then the output will
be a zip file containing individual files for the CA certificate and private key

Please enter the desired output file [elastic-stack-ca.p12]:
Enter password for elastic-stack-ca.p12 :
tic-stack-ca.p12sr/share/elasticsearch/bin/elasticsearch-certutil cert --ca elas
This tool assists you in the generation of X.509 certificates and certificate
signing requests for use with SSL/TLS in the Elastic stack.

The 'cert' mode generates X.509 certificate and private keys.
    * By default, this generates a single certificate and key for use
       on a single instance.
    * The '-multiple' option will prompt you to enter details for multiple
       instances and will generate a certificate and key for each one
    * The '-in' option allows for the certificate generation to be automated by describing
       the details of each instance in a YAML file

    * An instance is any piece of the Elastic Stack that requires a SSL certificate.
      Depending on your configuration, Elasticsearch, Logstash, Kibana, and Beats
      may all require a certificate and private key.
    * The minimum required value for each instance is a name. This can simply be the
      hostname, which will be used as the Common Name of the certificate. A full
      distinguished name may also be used.
    * A filename value may be required for each instance. This is necessary when the
      name would result in an invalid file or directory name. The name provided here
      is used as the directory name (within the zip) and the prefix for the key and
      certificate files. The filename is required if you are prompted and the name
      is not displayed in the prompt.
    * IP addresses and DNS names are optional. Multiple values can be specified as a
      comma separated string. If no IP addresses or DNS names are provided, you may
      disable hostname verification in your SSL configuration.

    * All certificates generated by this tool will be signed by a certificate authority (CA).
    * The tool can automatically generate a new CA for you, or you can provide your own with the
         -ca or -ca-cert command line options.

By default the 'cert' mode produces a single PKCS#12 output file which holds:
    * The instance certificate
    * The private key for the instance certificate
    * The CA certificate

If you specify any of the following options:
    * -pem (PEM formatted output)
    * -keep-ca-key (retain generated CA key)
    * -multiple (generate multiple certificates)
    * -in (generate certificates from an input file)
then the output will be be a zip file containing individual certificate/key files

# input password of CA you generated
Enter password for CA (elastic-stack-ca.p12) :
# specify output file name (if kepp default, Enter with empty)
Please enter the desired output file [elastic-certificates.p12]:
# set password
Enter password for elastic-certificates.p12 :

Certificates written to /usr/share/elasticsearch/elastic-certificates.p12

This file should be properly secured as it contains the private key for
your instance.

This file is a self contained file and can be copied and used 'as is'
For each Elastic product that you wish to configure, you should copy
this '.p12' file to the relevant configuration directory
and then follow the SSL configuration instructions in the product guide.

For client applications, you may only need to copy the CA certificate and
configure the client to trust this certificate.
[root@dlp ~]# chgrp elasticsearch /usr/share/elasticsearch/elastic-certificates.p12 /usr/share/elasticsearch/elastic-stack-ca.p12 [root@dlp ~]# chmod 640 /usr/share/elasticsearch/elastic-certificates.p12 /usr/share/elasticsearch/elastic-stack-ca.p12 [root@dlp ~]# mv /usr/share/elasticsearch/elastic-* /etc/elasticsearch/ |
| [3] |
Copy CA and Certificate you generated above to all Elasticsearch Nodes in cluster.
(on this example, it's under [/etc/elasticsearch/]) |
| [4] | Configure X-Pack.Security for CA and Certificate on all Elasticsearch Nodes. |
|
# add CA password to keystore [root@dlp ~]# /usr/share/elasticsearch/bin/elasticsearch-keystore add xpack.security.transport.ssl.keystore.secure_password Enter value for xpack.security.transport.ssl.keystore.secure_password: # add Certificate password to keystore [root@dlp ~]# /usr/share/elasticsearch/bin/elasticsearch-keystore add xpack.security.transport.ssl.truststore.secure_password Enter value for xpack.security.transport.ssl.truststore.secure_password:
[root@dlp ~]#
vi /etc/elasticsearch/elasticsearch.yml
xpack.license.self_generated.type: trial
xpack.monitoring.collection.enabled: true # enable Security feature xpack.security.enabled: true
# add to the end xpack.security.transport.ssl.enabled: true xpack.security.transport.ssl.verification_mode: certificate xpack.security.transport.ssl.keystore.path: /etc/elasticsearch/elastic-certificates.p12 xpack.security.transport.ssl.truststore.path: /etc/elasticsearch/elastic-certificates.p12 systemctl restart elasticsearch |
| [5] | Set SSL Settings that is used on the connection between Elasticsearch Server and Clients. So it needs to get SSL certificates. The environment on this example, there are copied certificates under the [/etc/elasticsearch]. |
|
[root@dlp ~]# chgrp elasticsearch /etc/elasticsearch/*.pem [root@dlp ~]# chmod 640 /etc/elasticsearch/*.pem
[root@dlp ~]#
vi /etc/elasticsearch/elasticsearch.yml # add to the end xpack.security.http.ssl.enabled: true xpack.security.http.ssl.key: /etc/elasticsearch/privkey.pem xpack.security.http.ssl.certificate: /etc/elasticsearch/fullchain.pem
[root@dlp ~]#
systemctl restart elasticsearch
# verify https access : the password is just the one you set on section [1] [root@dlp ~]# curl https://dlp.srv.world:9200/_cat/indices?v -u elastic Enter host password for user 'elastic': health status index uuid pri rep docs.count docs.deleted store.size pri.store.size yellow open winlogbeat-7.1.1-2019.06.18-000001 9mTTgj-TQa2BqFP2e9CGvQ 1 1 1336 0 1.2mb 1.2mb green open .security-7 uNbYTp4VTwi1wtu-xC1x9g 1 0 6 0 19.8kb 19.8kb green open .kibana_1 hF7j0i5iRRSa9hAebihkfg 1 0 924 10 759.4kb 759.4kb green open .kibana_task_manager vxyGU_agTXyFTLac6lDMYg 1 0 2 0 12.8kb 12.8kb green open .monitoring-es-7-2019.06.18 M5L-X5qFQ5WbUfsBcHdkeA 1 0 1996 338 1.4mb 1.4mb yellow open metricbeat-7.1.1-2019.06.18-000001 cXFRA4p3SaO_Jaahxxx-hw 1 1 7652 0 2.4mb 2.4mb green open .monitoring-kibana-7-2019.06.18 nDKEG9fVQWKY9k4iU-nvoQ 1 0 66 0 53kb 53kb yellow open sshd_fail-2019.06 Mu9wxqZPTkK2X9biuvGP1g 1 1 40 0 90.2kb 90.2kb yellow open packetbeat-7.1.1-2019.06.18-000001 1uSGzcBjQXO4VlTOKqtNSA 1 1 17787 0 6.7mb 6.7mb |
| [6] | If Kibana or Logstash is running, Configure them for Security plugin, too. |
|
[root@dlp ~]#
vi /etc/kibana/kibana.yml # line 28: uncomment and change to https URL elasticsearch.hosts: " https://dlp.srv.world:9200 "
# line 46: uncomment and change to the username and password you set on section [1] elasticsearch.username: " kibana "elasticsearch.password: " password "
[root@dlp ~]#
systemctl restart kibana
[root@dlp ~]#
vi /etc/logstash/logstash.yml # add to the end # for username and password, they are the one you set on section [1] xpack.monitoring.enabled: true xpack.monitoring.elasticsearch.url: "https://dlp.srv.world:9200/" xpack.monitoring.elasticsearch.username: "logstash_system" xpack.monitoring.elasticsearch.password: "password" xpack.management.enabled: true xpack.management.elasticsearch.url: "https://dlp.srv.world:9200/" xpack.management.elasticsearch.username: "logstash_system" xpack.management.elasticsearch.password: "password" systemctl restart logstash
|
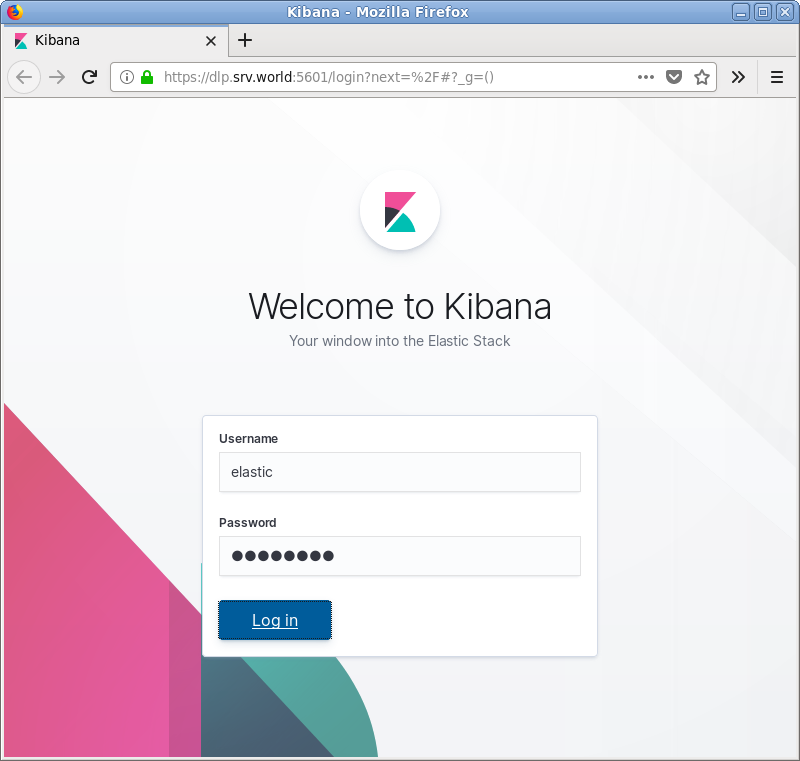
| [7] | Access to Kibana Dashboard, then username and password is required like follows. You can authenticate with them you set on section [1]. |
|
|
Matched Content