VNCサーバーの導入2008/08/26 |
| [1] | VNCサーバーを導入してクライアントのWindowsマシンからグラフィカルにリモート接続します。 |
|
[root@ns root]# apt-get -y install vnc-server [root@ns root]# vi /etc/sysconfig/vncservers # 以下のように 'ディスプレイ番号:ユーザー' として設定 VNCSERVERS=" 1:vine "# 画面解像度は好みに応じて指定。 VNCSERVERARGS[1]="-geometry 1024x768 -nolisten tcp -nohttpd "[root@ns root]# su - vine [vine@ns vine]$ vncpasswd # VNC用パスワード設定 Password: # 入力 Verify: [vine@ns vine]$ vncserver New 'ns.srv.world:1 (vine)' desktop is ns.srv.world:1 Starting applications specified in /home/vine/.vnc/xstartup Log file is /home/vine/.vnc/ns.srv.world:1.log [vine@ns vine]$ vi .vnc/xstartup # twm &# 最終行:コメント化 LANG=ja_JP.UTF8 # 以下2行追記:日本語化 exec startkde & # KDE起動 [vine@ns vine]$ ps -ef | grep vnc vine 3947 1 0 21:02 pts/1 00:00:01 Xvnc :1 -desktop ns.srv.world:1 (vine) -httpd /usr/share/vnc/classes -auth /home/vine/.Xauthority -geometry 1024x768 -depth 16 -rfbwait 30000 -rfbauth /home/vine/.vnc/passwd -rfbport 5901 -pn vine 4493 4386 0 21:24 pts/1 00:00:00 grep vnc [vine@ns vine]$ kill 3947 # VNCのプロセス一旦削除 [vine@ns vine]$ vncserver # 再度VNCプロセス立ち上げ New 'ns.srv.world:1 (vine)' desktop is ns.srv.world:1 Starting applications specified in /home/vine/.vnc/xstartup Log file is /home/vine/.vnc/ns.srv.world:1.log |
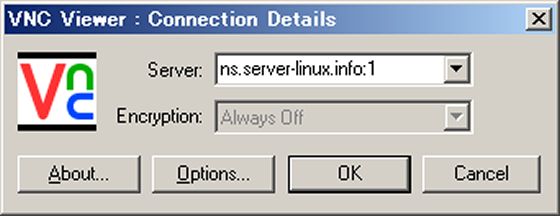
| [2] | サーバー側の次は、Windows用のVNCクライアントを入れます。 下記サイトより、名前等をテキトーに入力してダウンロードします。 www.realvnc.com/products/free/4.1/download.html ダウンロードしたらインストールして、「Run VNC Viewer」をクリックして起動します。 以下の画面になります。「Server」の欄に「サーバーのホスト名:[1]で指定したディスプレイ番号」と指定しOKをクリックします。 |
|
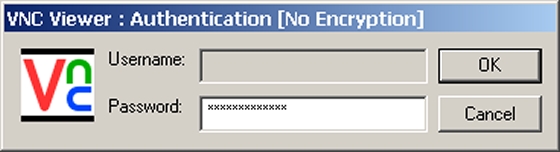
| [3] | 以下の画面になるので[1]で設定したパスワードを入力します。 |
|
| [4] | 以下のように接続できました。 |

|
関連コンテンツ